Project HF Vertical! (part 2)
 In a previous post, I outlined the parts and the basic planning for installation of my new HF vertical antenna, the Hustler 6BTV. Now that my installation is completed I thought I would go over a bit of what I have learned and just how it performs.
First of all, I must say that this antenna works fantastic. After the initial installation I noticed that my receive performance was noticeably better on most of the bands. By noticeably better, I am talking 1 to 1 1/2 S-units better over my G5RV dipole! I was hoping that this antenna would perform well and was very happy to see that it does work very well. I have already made several DX contacts as well as state-side contacts on it and get great reports back.
I took my time with the installation of this antenna as I did the entire installation by myself. With such a busy work schedule and everything else going on in my life at the moment, I wanted to take my time to make sure that it was done right. Lucky for me we also had some great weather (only in the mid to upper 70’s) the past few days here in Indiana. This made it much more comfortable for me to be outside without baking in the hot summer sun.
The installation was divided up into a few phases. In the first phases I readied the location for the mount. I made a decision about where I would like to mount this antenna and then used a hole post digger to dig a 2 foot hole. I then purchased a 2″ diameter steel pipe and set that pipe in concrete. After a few days I began the 2nd phase and installed the DX Engineering radial plate and installed the radials. First I trenched a short path through my lawn and buried the coax cable about 3-4 inches deep. Using landscape fabric staples, I laid out the ground wires shortly after the lawn was mowed. I stretched out the ground wires and held them in with the staples. Then I took a break for a while before finishing with the final phase. In the final phase I mounted the vertical feed line choke, and assembled the antenna. I installed all the traps and then the 12m and 17m add on kits that I bought from DX Engineering. Then I tuned the antenna per the instructions.
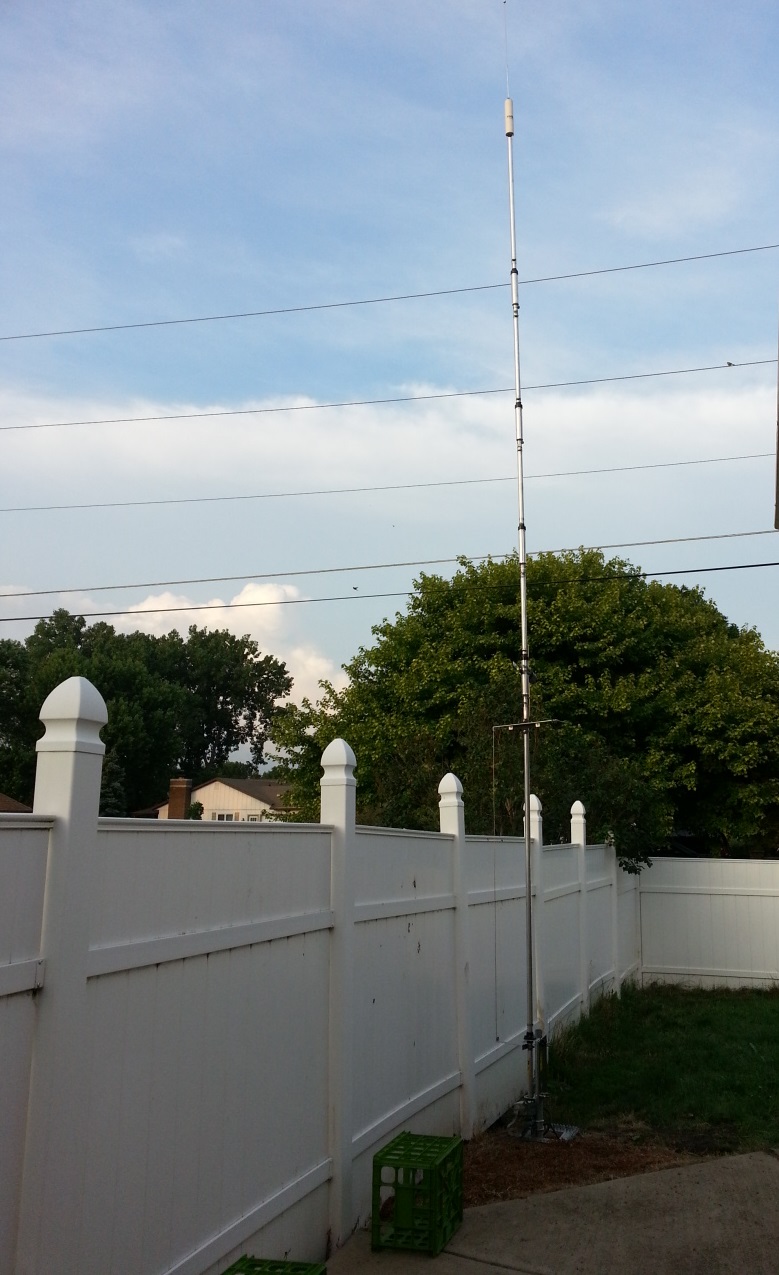
I really like the mounting location as this serves 2 purposes. Tilting this antenna down it will lower right behind the fence, protecting it against high winds. It also is very stealthy as when it is folded down behind the fence, nobody can see it from outside the back yard.
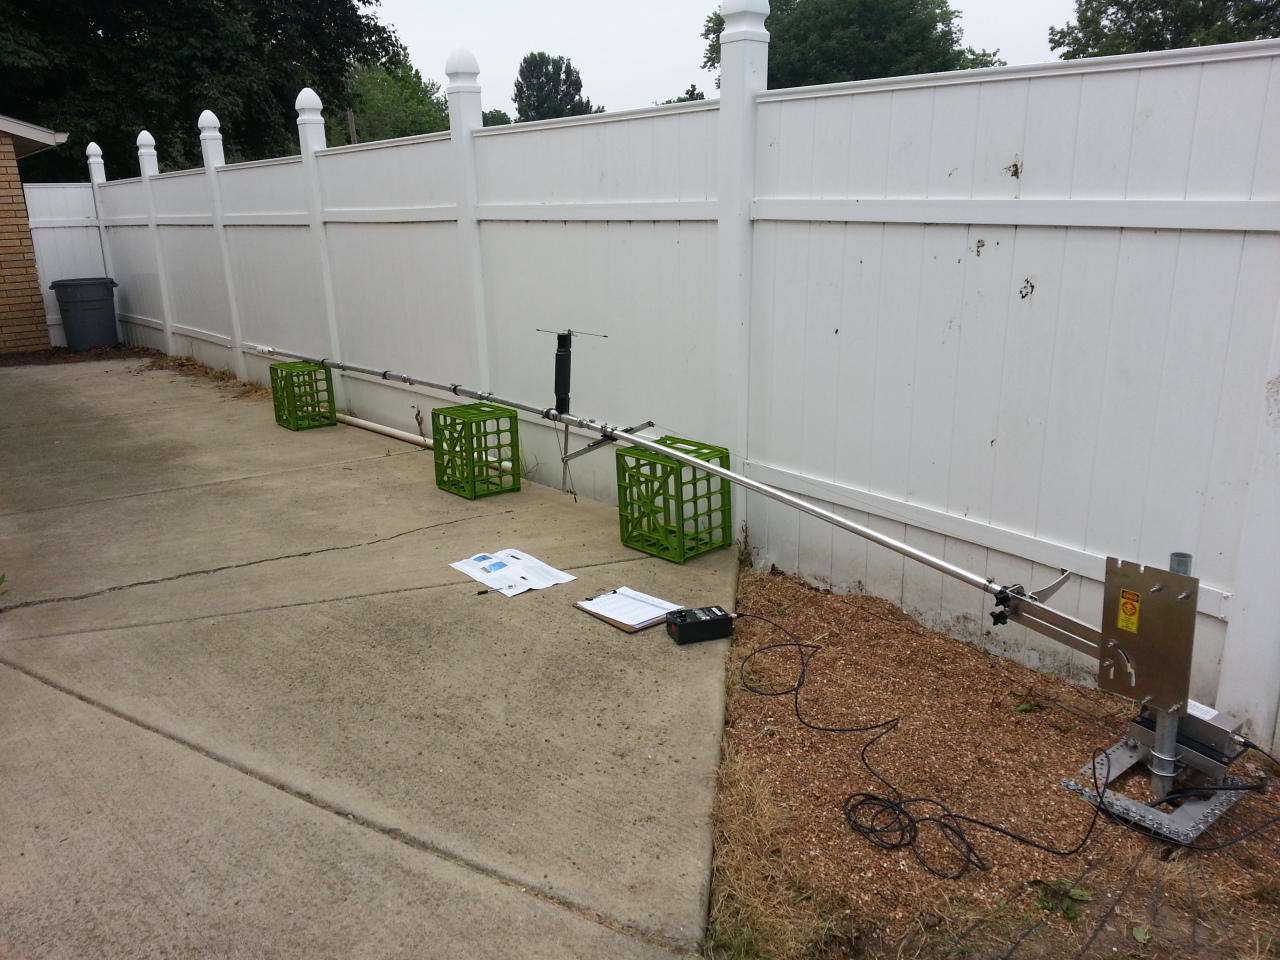
I bought some cheap milk crates from the hardware store to use as supports for when the antenna is tilted. These work well since they are cheap, weather proof, and just the right size.
Here are a few things that I learned from my experience putting up this antenna…
On Radials:
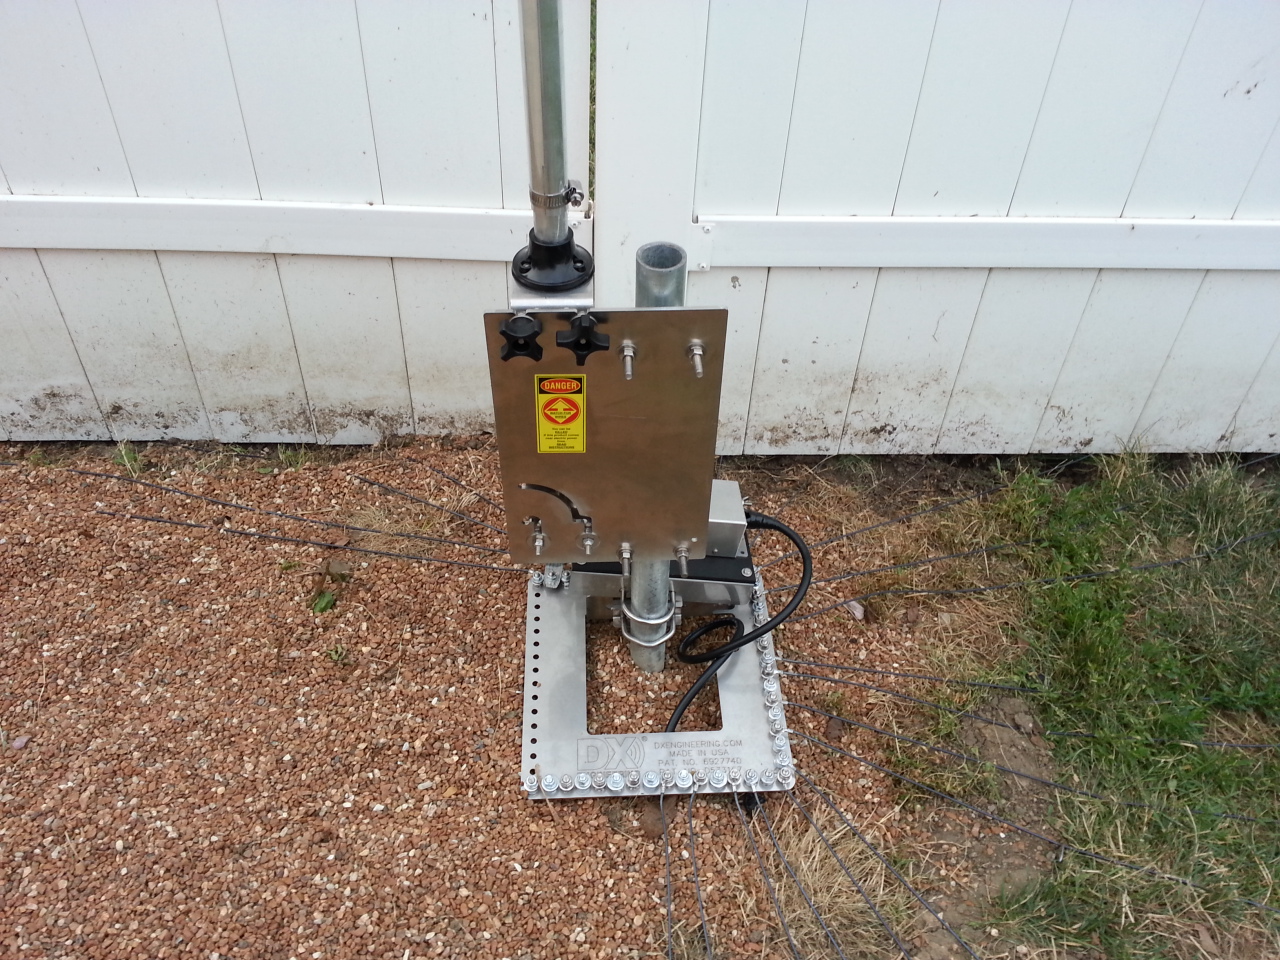
1. You must use ground radials for the Hustler 6BTV. You will not get good performance without a radial installation.
2. The more radials the better. Although I had a tough time finding room, I still was able to put down 26 radials. I could not put them in a complete 360 degree arc, but put them in as many angels that I could. (There is a concrete patio to the left of this photo only 1 foot away).
3. Cutting radials to specific wavelengths is not necessary since they will change electrically when put on the ground. Just make as many as you can that are 40ft long or so. Use shorter lengths if you must, but put them down. I have a mixture of 24 foot and 40 foot radials.
On installation:
1. Use a tilt mount. This will make it easy (and safer) to raise and lower the antenna for maintenance. I was very nervous about the power lines behind my house, but with the tilt mount properly installed I did not have to worry about the antenna falling into the lines.
2. Mount the base of the Hustler 6BTV to the tilt mount first. Then tilt the base. Then install the parts of the antenna. I used a 4 foot ladder to lean the sections on. This way I could move the ladder to where I was working. This meant less bending over and no sore back.
3. Use a ScotchBrite pad or steel wool to clean the parts of the tubes before insertion. This will ensure proper electrical contact between the sections.
4. I used Penetrox-A electrical joint compound to ensure a good connection between parts. This stuff is incredibly messy. It is like a conductive paste that is very sticky. I am not sure if this stuff works well or not. It was recommended, so I decided it couldn’t hurt using it. I suspect as long as you have good metal to metal contact you would be fine without using the messy Penetrox.
On DX Engineering parts and accessories:

1. I was very happy purchasing this antenna and all the parts from DX Engineering. Some say that they are expensive, but I found the best price for my Hustler 6BTV was DXE. R&L had it for a little bit less, but did not sell all the other accessories I needed/wanted for my installation.
2. The staff at DX Engineering were great. I did have some questions about some of the parts that I was purchasing and they were very courteous and helpful on the phone.
3. As for the 12m kit addition DX Engineering part number DXE-AOK-12M there is a plastic bracket that comes with this kit that mounts the top part of the kit under the 10m trap. In the instructions it will tell you to use a carriage bolt, washer, lock washer, then nut. You will find that the carriage bolt is to short for all the washers and then the nut. The reason is the square base of the carriage bolt that will not be flush, thereby giving you sufficient length of the bolt threads. This is an easy problem to solve. Just insert the carriage bolt without any of the washers, tighten the nut down until the square base of the carriage bolt embeds itself within the plastic bracket. Once the head of the carriage bolt is flush, remove the nut and remove the bolt and install with the proper washers.
4. The DX Engineering “New Assemby and High Performance Instructions” are excellent. I would strongly advise using these instructions for any Hustler 4/5/6BTV type installation. They are simply awesome. If you follow these instructions properly the 6BTV will perform great!
5. All of the parts I purchased from DX Engineering were of very high quality. All stainless steel, heavy duty bolts, and good connectors.
I have spent some time tuning the antenna. I found this process to be somewhat tedious, but generally I have not had much difficulty getting the antenna tuned.
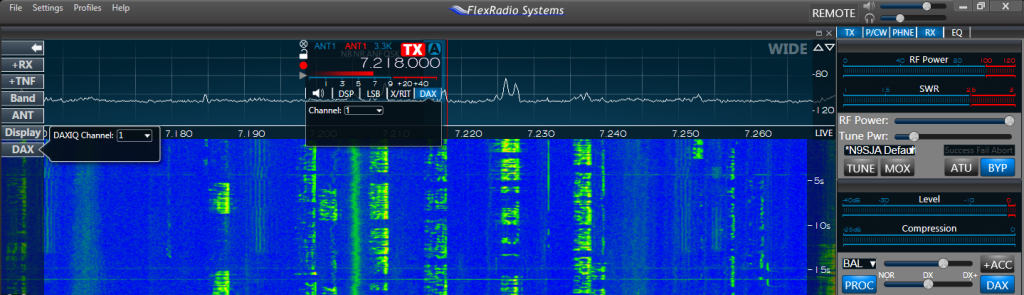
Here are some SWR plots that I made using my Wavenode WN2, so that I could document and graph SWR on each band:
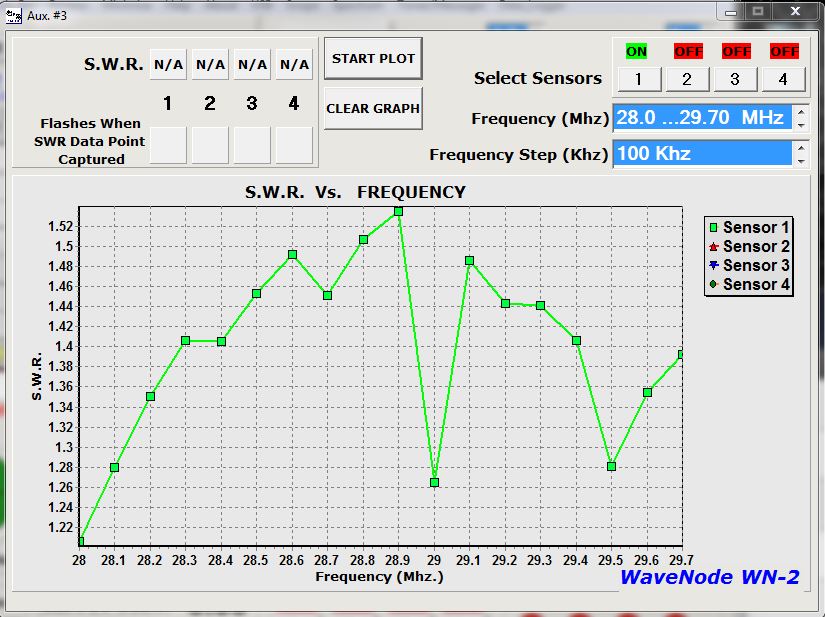
10m SWR plot using 20 watts RF power.
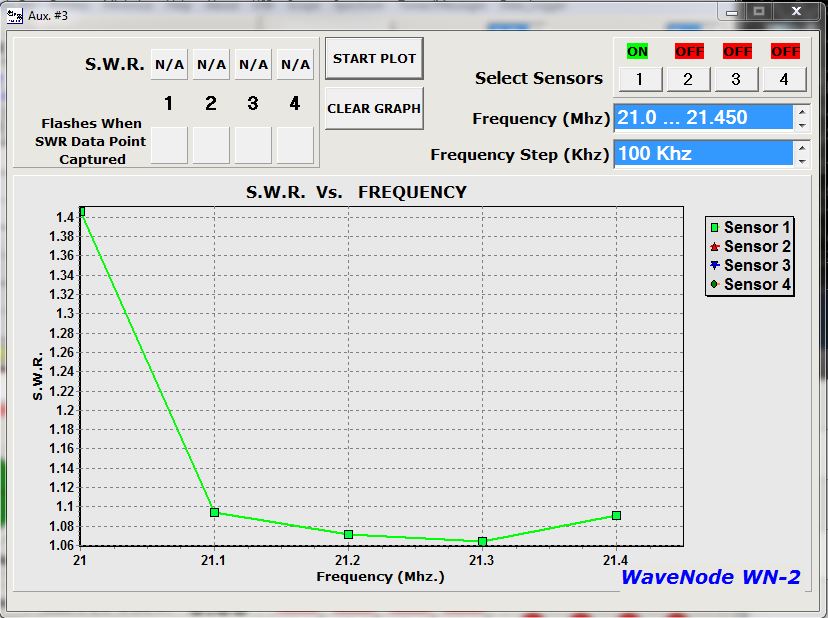
15m SWR plot using 20 watts RF power.
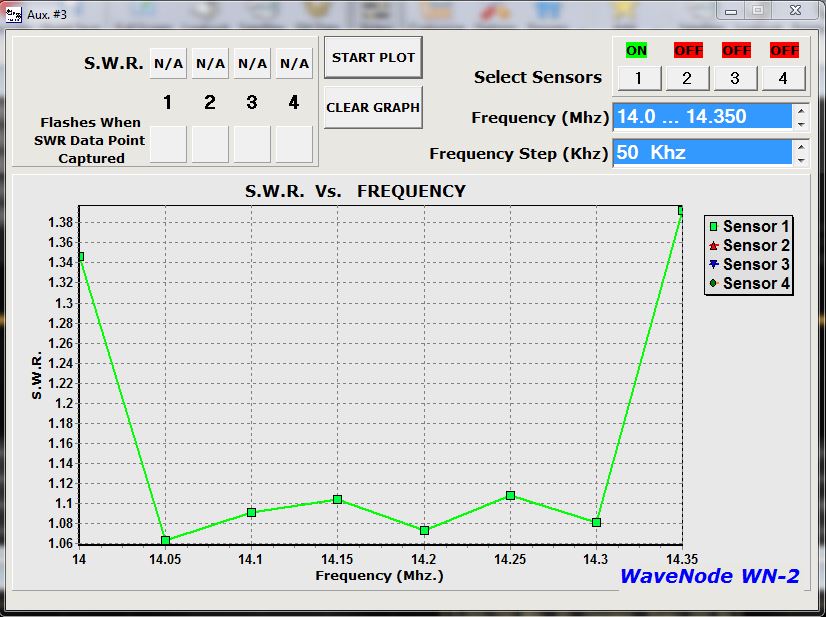
20m SWR plot using 20 watts RF power.

40m SWR plot using 20 watts RF power.
As you can see I do need to adjust tuning a bit more on 40m, but for the most part it is OK. As of now 12m is good, but 17m and 80m needs some adjustment. I really need to shorten the whip at the top for operation at 3.900 MHz. Since the portion of 80m is only about 100 kHz, I decided to set the center frequency to be 3.900 MHz so that I could operate 3.850 – 3.950. Currently it works well at 3.780 so I need to shorten the whip a little bit more to raise the frequency where the antenna will be resonant.
After the first time I tuned this antenna I was amazed to make DX contact on 15m to Ecuador. I made a contact with HC2AO on 15m and spoke to him for a few minutes asking him about my signal quality. He told me that my signal was great and the vertical was working well! I was so happy to make this contact because I was really hoping that this antenna would shine on 20 – 10m. A bit later I was able to make a contact with LY80L in Lithuania on 20m using just 100 watts!
So far I am very happy with this antenna. It really works well, and although it was time consuming to do it correctly, I had fun installing this antenna and all the accessories.
Do you have a Hustler 4/5/6BTV or other vertical antenna? Let me know what you think and tell me about your antenna in the comments.
73! de Nick N9SJA

Hi,
I have a 6BTV Antenna and am extremely happy with the results I have received stations from around the world and have no problems. I did have some noise problems when I first put it up but discovered that my measurements were off and after fixing that it is working fine. I am going to install some radials here soon and see what difference they make. Thanks for the site