Installation and Initial Configuration of the NWDR ThumbDV
Introduction:
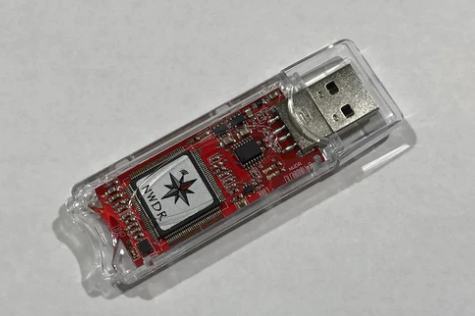
The Northwest Digital ThumbDV is a USB adapter for your PC that allows you to use your PC audio for connection to D-Star, YSF, and DMR radio networks. The ThumbDV contains an AMBE3000 hardware chipset for connecting legally to these networks in conjunction with the BLUEDV software by PA7LIM. The ThumbDV is a fantastic device for listening and accessing these digital radio networks.
Setup can be a bit tricky, so this is why I made this setup guide. I hope it helps you.
**PLEASE NOTE** Any modification, installation or configuration is done at your own risk. I do not have time for technical support so please do not try to contact me for support. I am not responsible for any issues that may arise from your setup of this device. Please take care.
I. Modification of the ThumbDV to fit in USB ports on PC (optional):
*Important Note: The NWDR ThumbDV may need to be slightly modified physically. Upon first receiving my unit I noticed that the plastic case stuck out a bit too far over the USB connector. This made it difficult for the USB connector on the ThumbDV to fully insert into a USB port on a standard Dell PC. You may or may not need to do this. If you insert the ThumbDV and don’t hear the familiar sound on your PC that a USB device was inserted, then the case is probably preventing the USB connector from properly contacting the pins on the connector in your PC and you will need to modify the plastic case.
To modify your ThumbDV casing you can cut the plastic off by scoring it with a razor blade several times then breaking the scored line with a pair of pliers. The transparent plastic case is held together with little plastic clips. Be sure to take caution when taking the case apart. You do this at your own risk of breaking the case, so take your time and be careful!
- Remove the plastic case by inserting a thin spudger or thin bit of metal to pry the translucent case apart.
- Remove the red NWDR circuit board carefully and set it aside.
- Take the bottom of the plastic case first and then score a line with a razor blade to remove the extra bit of plastic where the USB connector sits in the case:

- Once you score the plastic several times, gently use pliers to break off the plastic along the score line.
- Do this also for the top of the plastic case.
- Once you are done then carefully put the red circuit board back in the bottom first then snap the top cover back on.
II. First time hardware installation:
This guide makes the following assumptions:
- That you are using a modern Windows 10 PC.
- That you have administrative rights over the operating system to install software/hardware properly.
**DO NOT CONNECT YOUR ThumbDV into your PC until you go to step 3 of this section!**
- First you will need to open Device Manager. To do this go to the search bar at the bottom left of the screen and type “device manager” then click on the device manager option in the menu to bring it up:

- Next you will be shown the device manager. Expand the section marked “Ports (COM & LPT):

Under ports you will notice on my example that I have “Communications Port (COM1)” and “Intel Active Management Technology – SOL (COM3)” already listed. My ports may be different than yours. Just make sure that you see which ones are listed for the next step.
3. Next plug in your ThumbDV into your Windows computer USB port and watch the device manager screen under “Ports (Com & LPT):
4. Next we will need to set the port speed properly in Windows for the NWDR ThumbDV. You can do that by going to the COM port that is used by your ThumbDV then by RIGHT CLICKING ONCE a menu will pop up. Choose “Properties” by LEFT CLICKING once on that pop up menu:
You should see the following menu. You will want to click on the port settings tab at the top:

5. Under “Port Settings” you will see at the top a field named “Bits per second” with a drop down box where you can select the different speed options. By default, the integer 9600 will be listed in this field. You will want to change this to be 460800:

Just change the “Bits per second:” to be 460800
Everything else is correct so do not change the Data Bits, Parity, Stop bits, or Flow control lines.
When you have set the bits per second to 460800 correctly click on “OK” at the bottom right of the window to close the properties window.
You now have your PC and your ThumbDV properly configured to communicate to the software (coming up next in this guide!)
III. BlueDV software installation and configuration:
BlueDV is software written by David Grootendorst PA7LIM to utilize the AMBE3000 vocoder chip in the NWDR ThumbDV and enable the user to access digital voice networks such as D-Star, DMR, and Yeasu System Fusion C4FM (YSF).
You can obtain the software for Windows 10 at the following location: https://software.pa7lim.nl/BlueDV/BETA/Windows/
I do not recommend that you get this software from any other source on the internet. Always download the software from pa7lim.com directly.
1. Download the file “BlueDV-9610.zip” This is the most current version of the software as of the date of this document.
2. After downloading unzip the compressed zip file to your desktop.
3. Double click the install file named “BlueDV-9610” and follow the onscreen instructions.
4. After Blue DV is installed you will see the icon for BlueDV:
5. Double click the BlueDV program icon to launch BlueDV.
6. Next we will need to configure the software with your specific information (Callsign, DMR ID, BM password, etc.). It is at this point that you will want to make sure that you have the following information available and or setup with the service you wish to use:
D-STAR: If you are planning on using D-Star and you have not done so yet, you will need to register your callsign with the D-Star network. You can do that by going to the following website: https://regist.dstargateway.org/Dstar.do
More information about the D-Star registration process can be found here: https://regist.dstargateway.org/instructions/
DMR: For DMR connections you will need your DMR ID number and possibly more information for the DMR system that you are connecting to.
In the USA Brandmeister is one of the most popular DMR networks. You can find information about registration of Brandmeister here: https://brandmeister.network/?page=login&returnurl=%2F%3Fpage%3Dselfcare
You will need your Self Care account in the Brandmeister portal to create a “Hot Spot password” for security reasons. Your DMR ID number and Brandmeister hot spot password will be required to connect BlueDV to the Brandmeister DMR network.
YSF: Yeasu System Fusion (C4FM) does not require any registration to use their network. You will just use your callsign. However it is urged that you put your grid square locator information in the locator field. If you need help to determine your maidenhead grid square location information you can find it here: https://levinecentral.com/ham/grid_square.php
7. Next we will take your specific information to configure BlueDV:

Click on “Menu”, then on “Setup”
8. Next I have a 20 step process that I have simplified (yeah I know…20 steps simplified yeah right!) that will enable you to enter your information then quickly get on D-Star, DMR, and YSF (with the assumption that you have already registered and have the proper information to fill in here. These settings can be of course customized to connect to different DMR networks, DStar Reflectors, or YSF networks, but these basic options will get you started.
On the image below I have numbered the fields 1 though 20. Here is what information you will need for each field:
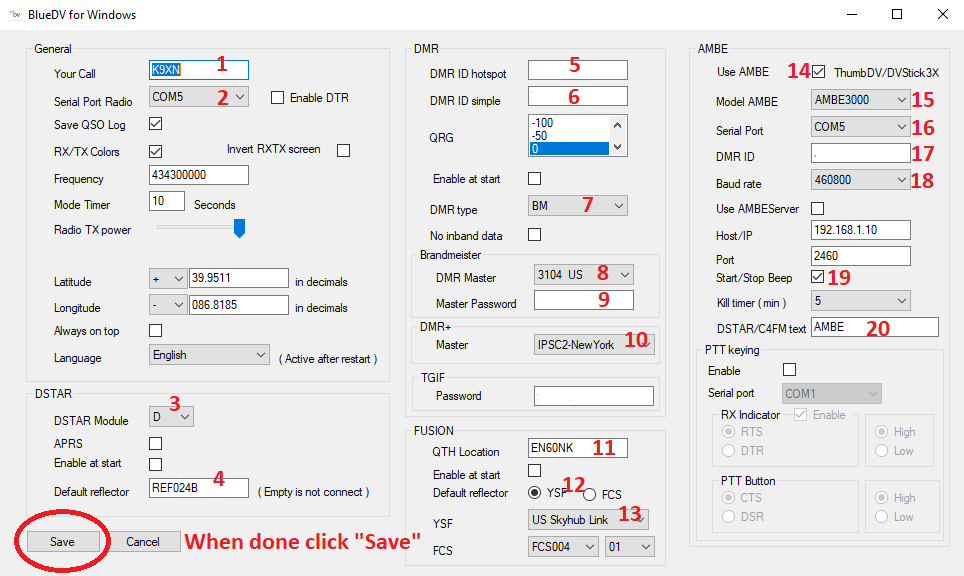
1. Enter your callsign here
2. Enter the COM port number that we setup back in section II of this document. If you do not know your COM port for your ThumbDV go back to section 2 and go over that again.
3. IF USING D-Star leave this as a letter “D” if you are not planning on connecting with D-Star it is also fine to leave with a letter “D” here.
4. IF USING D-Star enter the name of the reflector that you initially want to connect to. I would recommend something like REF030C here, or the designator possibly for your statewide D-Star reflector. You will be able to connect to other reflectors, this is just the initial connection when you start up D-Star with BlueDV.
5. IF USING DMR: Enter your DMR ID here.
6. IF USING DMR: Enter your DMR ID again here.
7. IF USING DMR: Choose your DMR network here. BM is for the Brandmeister network, so I have BM set here. If you are in the US Brandmeister is one of the most popular DMR networks.
8. IF USING DMR: Choose your DMR master connection here. Choose 3102 US for Brandmeister or 3104 US for Brandmeister.
9. IF USING DMR: Enter in your password that you created in Brandmeister self care:
10. IF USING DMR: choose the DMR+ master server for DMR+ networks….I just chose one near(ish) to me. In this case IPSC2-NewYork. Use the drop down menu to choose one closer to you if you wish.
11. IF USING YSF: Enter your maidenhead grid square location here.
https://levinecentral.com/ham/grid_square.php
12. Click YSF button here
13. IF USING YSF: Selection your connection here. I just chose “US Skyhub Link” since that is a popular talkgroup for YSF. Choose what you wish here.
14. CHECK THIS BOX that says “Use AMBE – ThumbDV/DVStick3x”
15. Under model name choose AMBE3000
16. Set the serial port again here to the correct com port for your ThumbDV (from section II of this document).
17. IF USING DMR: Enter in your DMR ID here
18. Baud Rate: Select 460800 from this drop down menu.
19. Start/Stop beep: this sounds a tone when you transmit or are receiving a transmission. Some people might find these sounds annoying or distracting you can turn them on or off here. (optional)
20. IF USING DSTAR OR YSF: DSTAR/C4FM text: This is additional text that can be shown when you transmit. You can put your Name here or your City and State. There is a limitation of 20 characters for this field.
Be sure that you click SAVE when you are done entering this information.
IV. BlueDV Basic use:
Once you have everything setup in section III then your set to go onto the last bit of setup and using BlueDV.
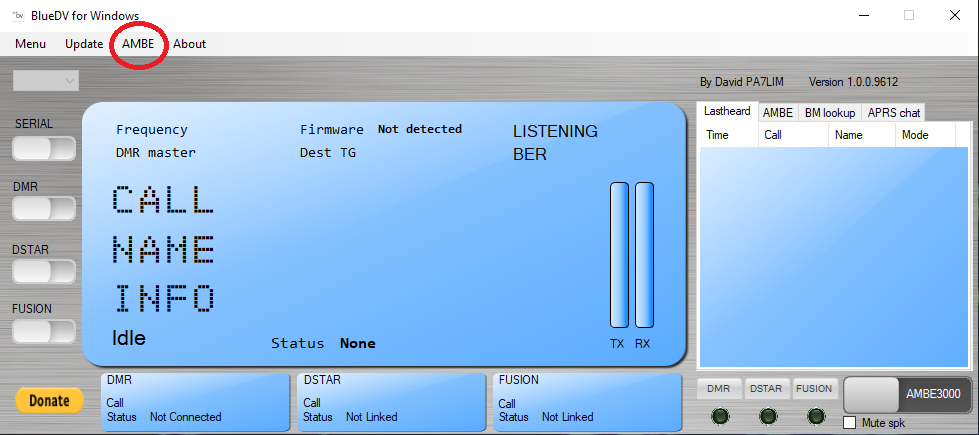
1. In the main window, go to the top and click on the AMBE menu:
This is where you will select your sound card microphone and speakers.
Once set it will remember the options.
2. In the main window, go to the top and click on the Update menu.
Update the following:
a.) If using D-Star: Update D-Star Hosts
b.) Update Call database
c.) If using DMR: Update DMR Masters
d.) If using YSF: Update Fusion Masters
3. Now that you have your soundcard (microphone and speakers) selected in the AMBE menu and the Updates all done you are ready to turn on and use your NWDR ThumbDV:
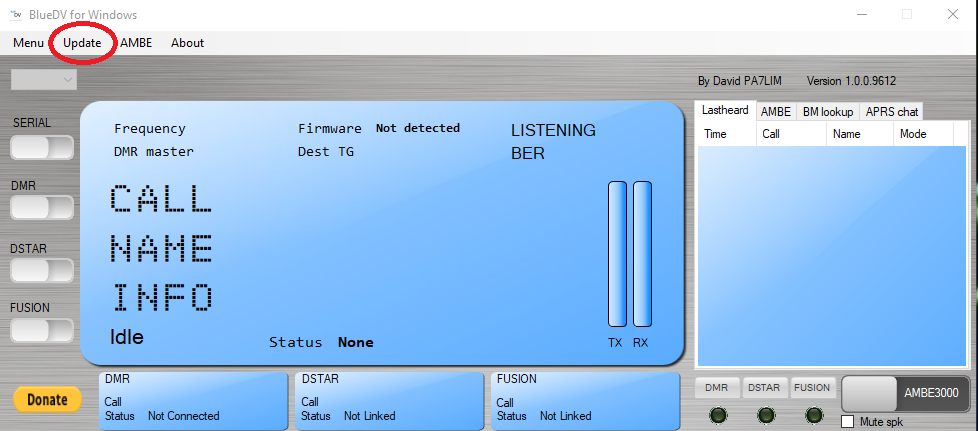
Note at the top that says “Firmware Not Detected” This for now is ok. You will need to enable the serial switch on the left side of the window to connect and see the AMBE3000 ThumbDV:

Turn on the SERIAL switch and if you have your COM settings set correctly it should say “Firmware AMBE3000R”. This means that BlueDV sees your NWDR ThumbDV and all is good so far. If it still says “Firmware Not Detected” or nothing is listed here, check to make sure that your ThumbDV is connected properly to the USB port and that your settings are correct back in section II of this document.
You will use the slide switches on the left side of the window to enable or disable the system that you wish to connect to. You can turn all these on at the same time, however you can only listen and or transmit with one system at a time (i.e. DMR, D-Star, Fusion [YSF]).

BlueDV UI layout and brief introduction into what the buttons do:
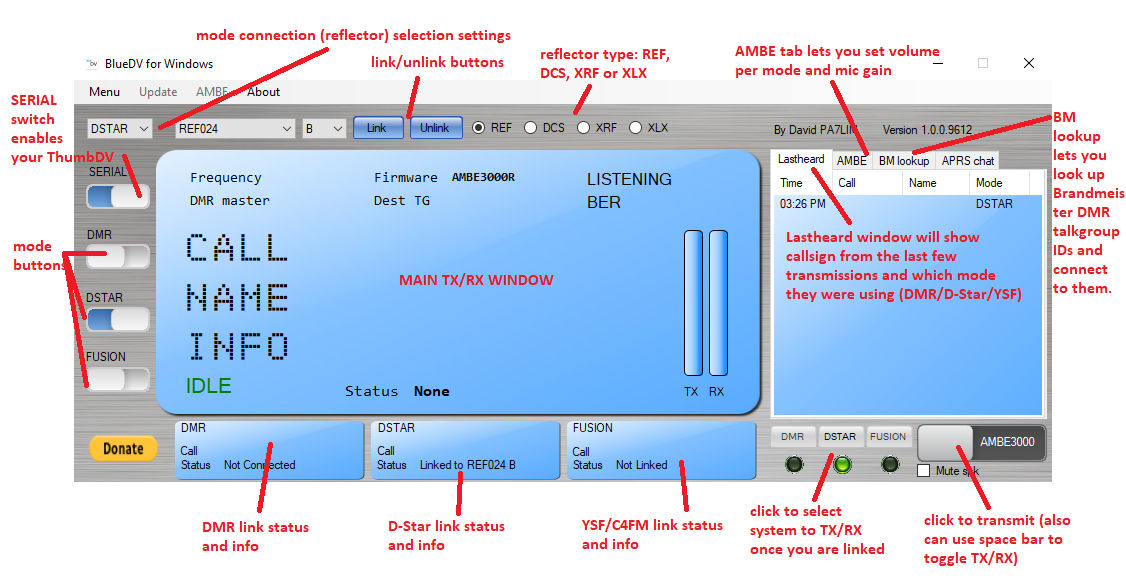
From here there is a TON of information out there about using BlueDV and connecting to various reflectors, talk groups, networks, and links.
Please reference these links for more information:
BlueDV user’s manual: http://radioham.mydns.jp/bluedv/BlueDVWindows.pdf
BlueDV software downloads (for multiple platforms): https://software.pa7lim.nl/
BlueDV software for Windows PCs: https://software.pa7lim.nl/BlueDV/BETA/Windows/
BlueDV archive of older versions of BlueDV for Windows: https://software.pa7lim.nl/BlueDV/BETA/Windows/archive/
Youtube: Tech Minds – “How to setup BlueDV with a ThumbDV or DV Mega AMBE3000 Dongle”
https://software.pa7lim.nl/BlueDV/BETA/Windows/archive/
YouTube Search “BlueDV”: https://www.youtube.com/results?search_query=BlueDV
Here is a PDF (printable copy) of this post:
Monitoring the HF Hurricane Net
 Well it is hurricane season again now with peak activity to be in September. Although I do not live near the coast, I have friends and family that do and like to keep tabs on any hurricanes that are near.
There are a lot of resources especially on the internet to track the progress of hurricanes and get news. But the HF Hurricane net is a special radio net that also will be able to communicate directly via HF radio to those in the affected areas.
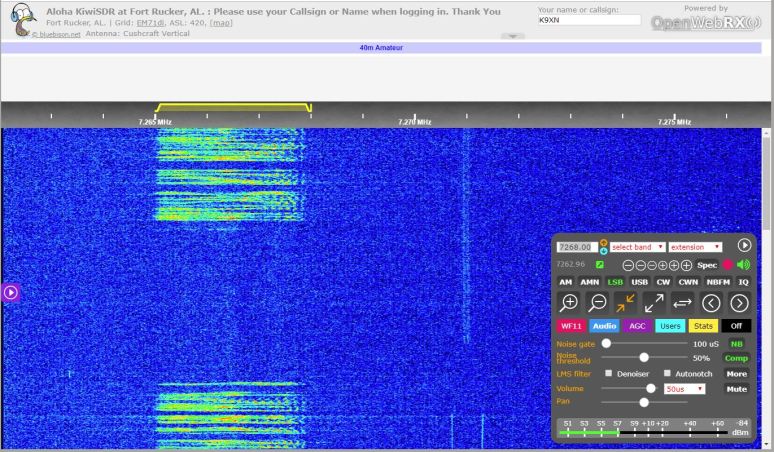
I like to use a online SDR radio to monitor the hurricane while at work as I can have it on in the background while I am doing other things and keep up on any information.
For information and net frequencies please check out The Hurricane Watch Net at https://www.hwn.org/
You can tune in with any HF capable receiver provided it has SSB capability or use an online SDR such as sdr.hu at https://sdr.hu/
At the time of this blog post I am monitoring Hurricane Dorian which is just off the NE edge of Puerto Rico and then is supposed to strengthen and eventually hit the east coast of the US. The HF Hurricane net will be very active over the next few days so tune in and give it a listen!

73! (and be careful if you live in hurricane affected areas this year!)
de Nick K9XN
The Real Satellite Radio
Way to go guys! Nice contact. Satellites are a lot of fun to operate! – 73! de Nick K9XN

W9YB | Purdue University Amateur Radio Club
W9YB has completed another awesome project in the shack. As of tonight (11/29/2018) we now have a fully functional all-mode satellite station. Complete with all the trimmings:
- TS-790A Tri-band All-mode VHF+ Rig
- Yaesu G-5500A AZ-EL Rotator System
- 2m & 70cm Dual-Polarization Beams
- FoxDelta ST-2 Digital Rotator Controller
The officers were up late tonight getting everything pieced together. It’s by no means in its final configuration but it’s a working setup. Several contacts were made on AO-92 as it passed overhead. A video of club president Patrick, W3AXL, making the first official contact is below!
We’re looking forward to making many more satellite contacts in the coming months, and hopefully even a random ISS contact or two (if they decide to operate above us that is!)
73s
New callsign! K9XN
 Well…After 25 years of holding the original callsign of N9SJA I decided to try for an Extra 1×2 call. I wasn’t sure if I would get it since there are so many people now days competing for such a small pool of callsigns. But to my amazement I was awarded the callsign K9XN on Saturday, November 24 2018.
So I have bought a new domain named ‘K9XN.org’ that I will be redirecting traffic to for the time being and eventually changing over my other services to show the new callsign.
I am a little bit torn about doing this since I have QSL cards, web blog, social media accounts, etc with N9SJA all on them. Now I have to change that all over. It also seems weird that I am using the callsign…it doesn’t really feel like it is “mine” so to speak yet. I really like the shorter call and everything but it’s definitely going to take some time to get used to.
Thanks for your friendship and support to everyone out there!
73! de Nick K9XN
Prepping and Portable Ops – My Favorite YouTube Channels.
![]() Over the years, I have watched many YouTube videos on Ham Radio and hobby electronics. With so much content out there I thought that I would list some of my favorite YouTube channels that show portable radio operations and give them a bit of a review. This list is based on my opinion and there are a lot of other fine YouTubers out there I am sure, so if you have a favorite that I do not have listed, please don’t take offense. I may just have not gotten around to watching their videos yet. With that said….let the show begin!
Over the years, I have watched many YouTube videos on Ham Radio and hobby electronics. With so much content out there I thought that I would list some of my favorite YouTube channels that show portable radio operations and give them a bit of a review. This list is based on my opinion and there are a lot of other fine YouTubers out there I am sure, so if you have a favorite that I do not have listed, please don’t take offense. I may just have not gotten around to watching their videos yet. With that said….let the show begin!
![]()
![]()
![]()
![]() 4/5 Stars: Radio Prepper
4/5 Stars: Radio Prepper
The Radio Prepper Channel is run by Gil Gruson – F4WBY of Lille France. Gil shows portable operations from a disaster preparation point of view. His content is not quite as polished with music and fancy graphics as other YouTubers, but the information provided is great.
You will find a great deal of CW operation from Gil and he usually always shows the text of the decoded CW for those people not familiar with morse code. Gil also shows various QRP outings with minimal setups such as the Webber MTR style rigs and even the QRP Pixie kits, showing us that worldwide communications can even fit in the pockets of your jacket.
Reviews and builds of different QRP radio kits, antenna building, and even VHF SSB operation round out the content of the channel nicely. In particular I like his QRP radio kit builds, as I find these videos the most interesting. Portable ops are typically to local parks, but on occasion you will see him venturing to other counties on holiday.
Mostly the videos are in English, but there are times that he will make the occasional video in French for his amateur radio countrymen. Gil is an fervent anti-contester and at times will complain about contesting on the bands. I personally think that he should embrace contesting. I think that he would make some more contacts during contests as they can bring out more DX than usual.
Overall I really love what Gil has done and his channel is always interesting and enjoyable to watch. I highly recommend anyone into QRP portable ops, kit building, and antenna building to subscribe to his channel. You will enjoy it.
![]()
![]()
![]() 3/5 Stars: Anything With Wheels
3/5 Stars: Anything With Wheels
Anything With Wheels is the YouTube channel of Tom Newcomb – N9YO. Short outings to parks operating QRP CW or voice as well as overnight camp-outs in the state of Missouri with radio highlight his channel. No highly polished production here, but the videos are well done and the quality is good.
The channel name is kind of misleading as this was probably a channel with other content when first conceived, slowly converting over more to portable Amateur Radio operating videos. For a little while there were some strange video rants where he was burning NFL jerseys, and expelling his disdain for the NFL after the Colin Kaepernick national anthem deal. Personally I agree with Tom as the NFL was on the wrong side of Patriotism, but I just don’t think making a rant video about it when most of his subscribers were wanting radio videos was progressing the cause. I in particular shy away from political rantings and demagoguery as there is enough of that on the news and look to YouTube and Amateur Radio as an escape from that kind of content.
Tom usually shows the text of his CW QSOs onscreen so that viewers that do not know morse code can follow along which is great. He also shows a “LETS GO!” graphic that is quite enthusiastic when he finally gets that QRP contact that I really enjoy. Most of his videos are operating and setup with only the occasional review of gear, with also some setups of antennas.
![]()
![]()
![]() 3/5 Stars: SurvivalTech Nord – OH8STN
3/5 Stars: SurvivalTech Nord – OH8STN
SurvivalTech Nord’s YouTube channel is more about using radio in extreme survival conditions. I would classify this also as a “prepper” type of channel. Julian – OH8STN is a radio amateur and survival enthusiast from Finland. There are many views of setups of power (solar and battery packs), QRP operation, and camping out in extremely cold conditions. Julian’s videos include some reviews of equipment and also quite a bit about operating digital modes.
His videos are semi produced with graphics and transitions and the video quality is always HD (if not 4K).
For a while he was really stuck on different power setups and batteries. Putting together battery packs and such, which I found to be a bit boring since there were already so many videos about that sort of thing. The power consumption reviews for different radios have a wealth of great info, but the videos can be boring…
The portable operations that he does with the small tent in the middle of a snow-covered field where he is operating completely off the grid are most interesting. This would be the more extreme portable operations than the causal ham would be into, but it is very interesting to see Julian’s approach to survival communications.
Simple reception of ISS SSTV Images
 Want to try something cool with stuff that you most likely already have? Downloading images from the ISS space station is so much fun and really easy to do with a handheld receiver and a smartphone!
The international space station is manned by Astronauts and Cosmonauts that are licensed Amateur Radio Operators. On-board the ISS is a small VHF/UHF amateur radio station used to talk to children during school events and other Amateur Radio Operators.
Every so often the crew of the ISS will transmit images from a computer that they have connected to the VHF/UHF transceiver using a mode called Slow Scan Television or SSTV. SSTV is a long popular mode used by ham radio operators on HF frequencies to send still images. However this mode is also used on VHF/UHF frequencies as well and is easy to decode using a smartphone with a free app.
What you need:
- A handheld receiver that can tune into the 144 MHz -2 meter Amateur Radio band. A 2m HT works great!
- An android smartphone or tablet.
- The “Heavens Above” satellite tracking app (or similar app to track the ISS and or other satellites. You can open the following link on your Android device to download the app: https://play.google.com/store/apps/details?id=com.heavens_above.viewer
- “Robot36” or similar SSTV decoding app. You can open the following link on your Android device to download the app: https://play.google.com/store/apps/details?id=xdsopl.robot36
*This can also be done with an Apple iPhone or iPad as well with apps available from the Apple App Store, so look for equivalent apps if you have an Apple device.
Finding out when the ISS is transmitting imagery:
You can find out what the current status is of the Amateur Radio Station on the ISS by visiting this site: http://www.ariss.org/current-status-of-iss-stations.html
They also announce activities about ARISS (Amateur Radio on the International Space Station) on the ISS fan site: https://www.issfanclub.com/
The AMSAT website is also very informative and will post news on ISS radio transmissions: https://www.amsat.org/amateur-radio-on-the-iss/
Tracking the ISS in orbit:
Once you find out when they are transmitting images, you will need to know when and where the ISS will be over your geographic area to receive the images. You can track the ISS online using a PC by visiting NASA’s “Spot The Station” website: https://spotthestation.nasa.gov/home.cfm
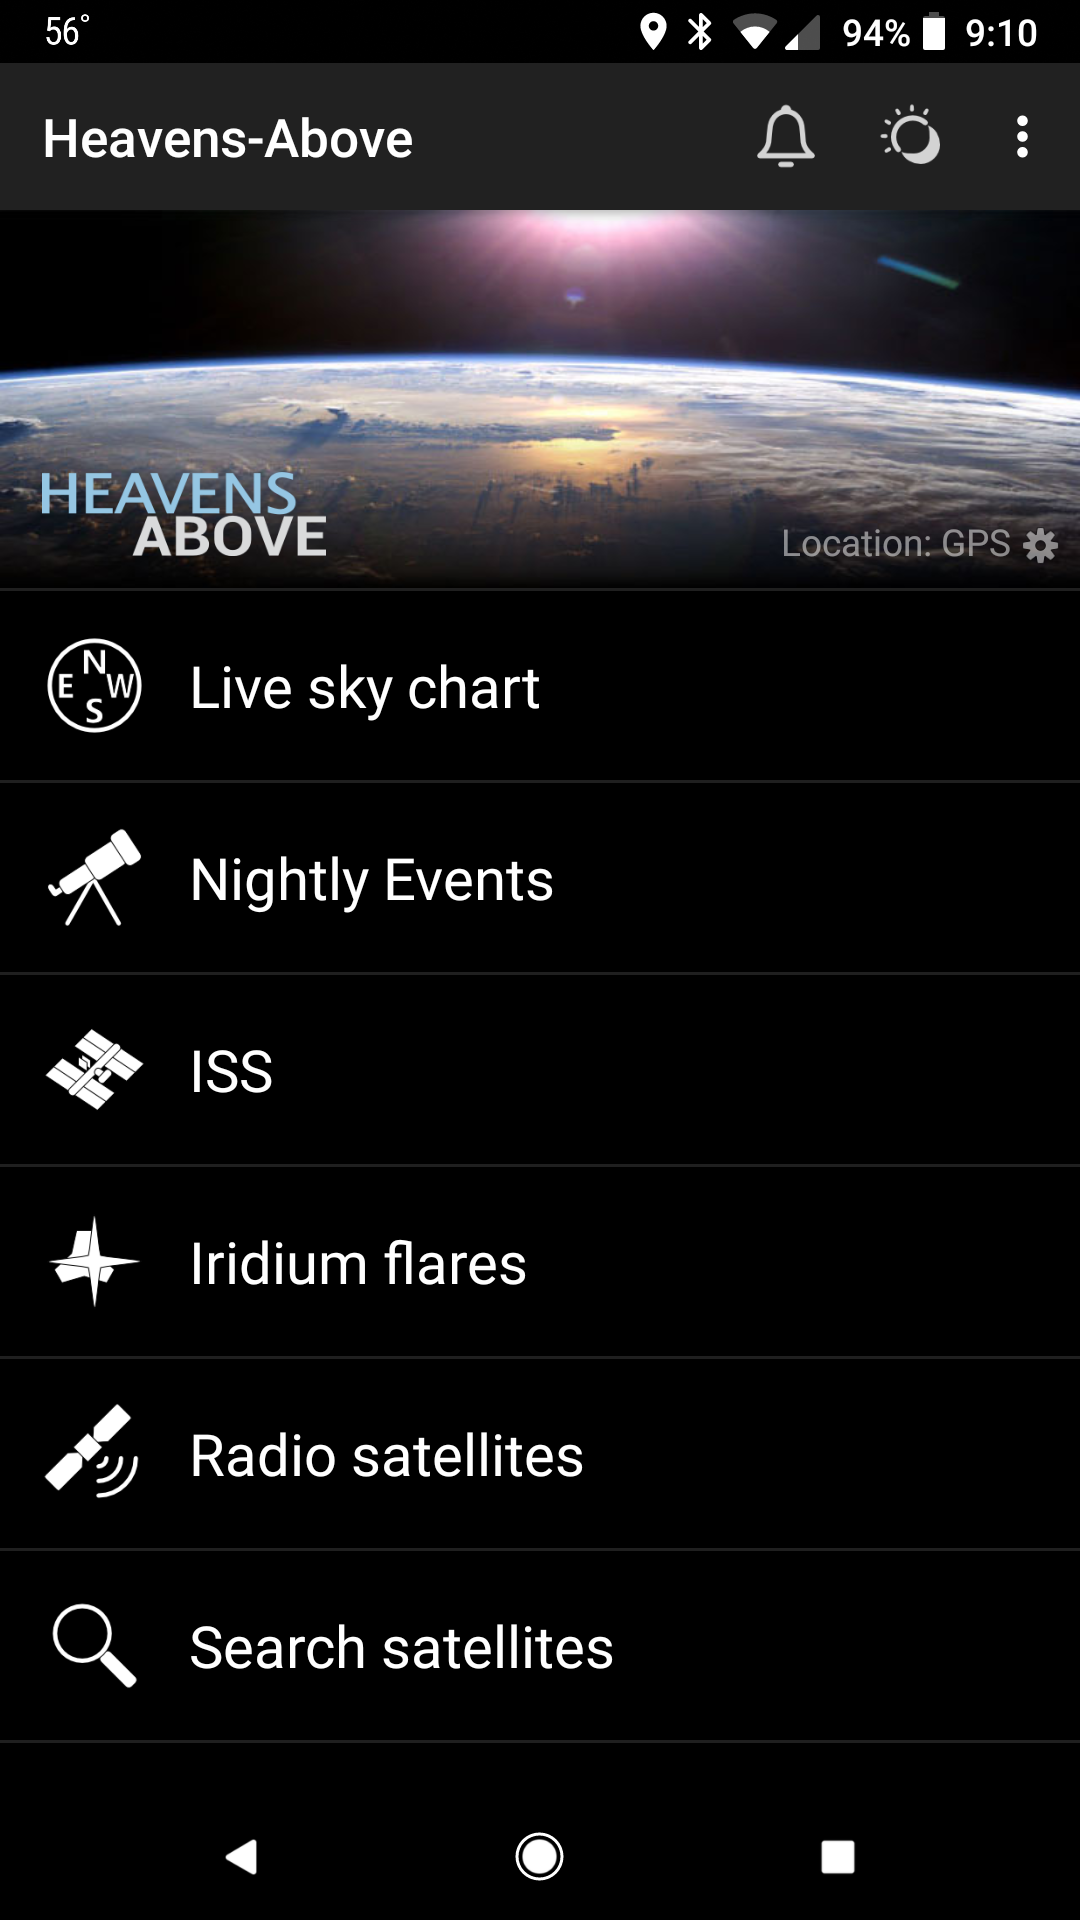
But it is far better to have a real-time tracking app installed on your Android device like Heavens Above:
 One of the best things about the Heavens Above app is that every time you start the app the “Keplerian” elements are automatically updated. Keplerian elements are the numbers that define a satellite’s orbit. So these “Keplerian” elements are also known as Orbital Elements.
Obviously to update the elements the app will need access to the internet. Either via cellular connection or Wi-Fi.
Once Heavens Above is started you will see several choices. “ISS” is listed as the 3rd option down.
Click it to open a menu that will show the dates and times for various passes of the ISS.
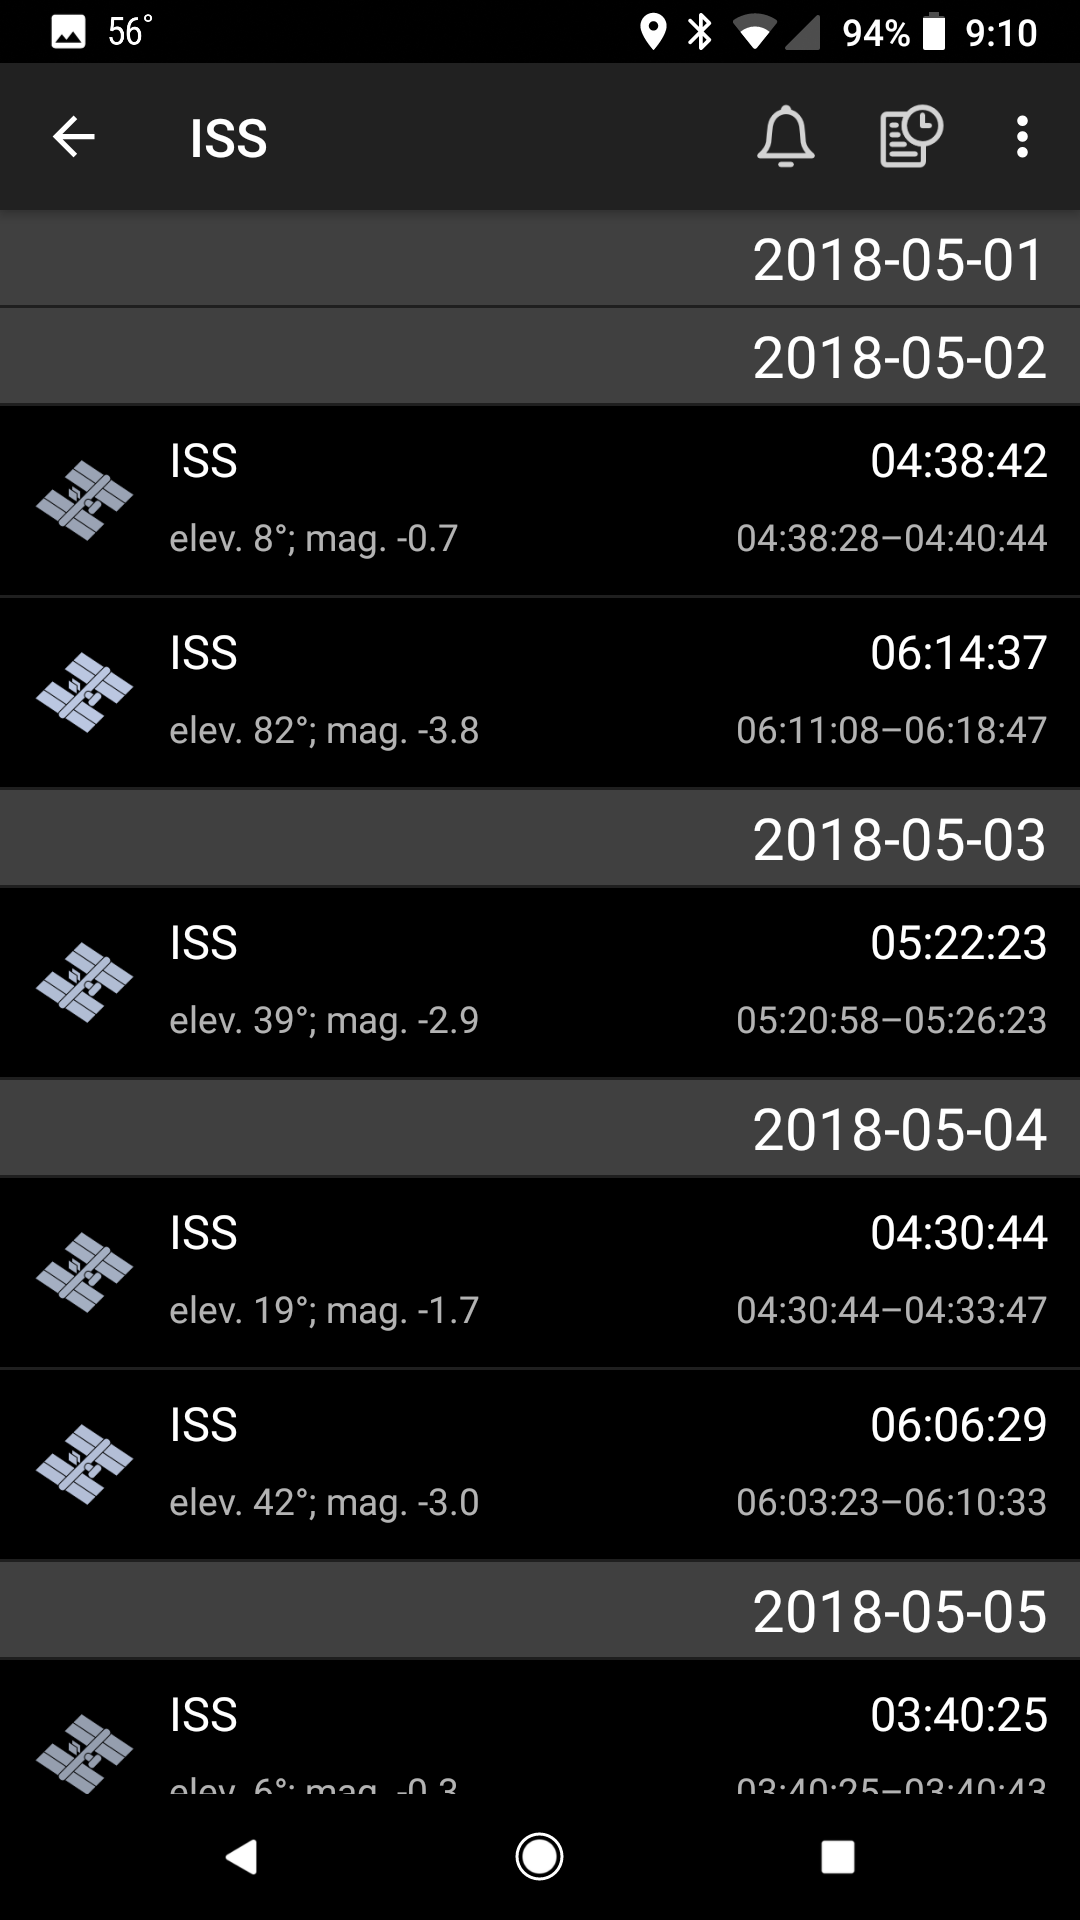
Since the app is made by a European developer please note that the dates are in YEAR-MONTH-DAY format. The times are in your local time zone based on the time set of your device.
Click on one of the passes at a reasonable time in the future that you are available to be present for the pass.
There are many “glancing” passes where as the ISS will not be directly overhead, but will be on the edge of your horizon. It is possible to decode the images from such a pass, but the pass will not last as long and their also could be large buildings in your way that will degrade the signal.
An overhead pass would look like this:
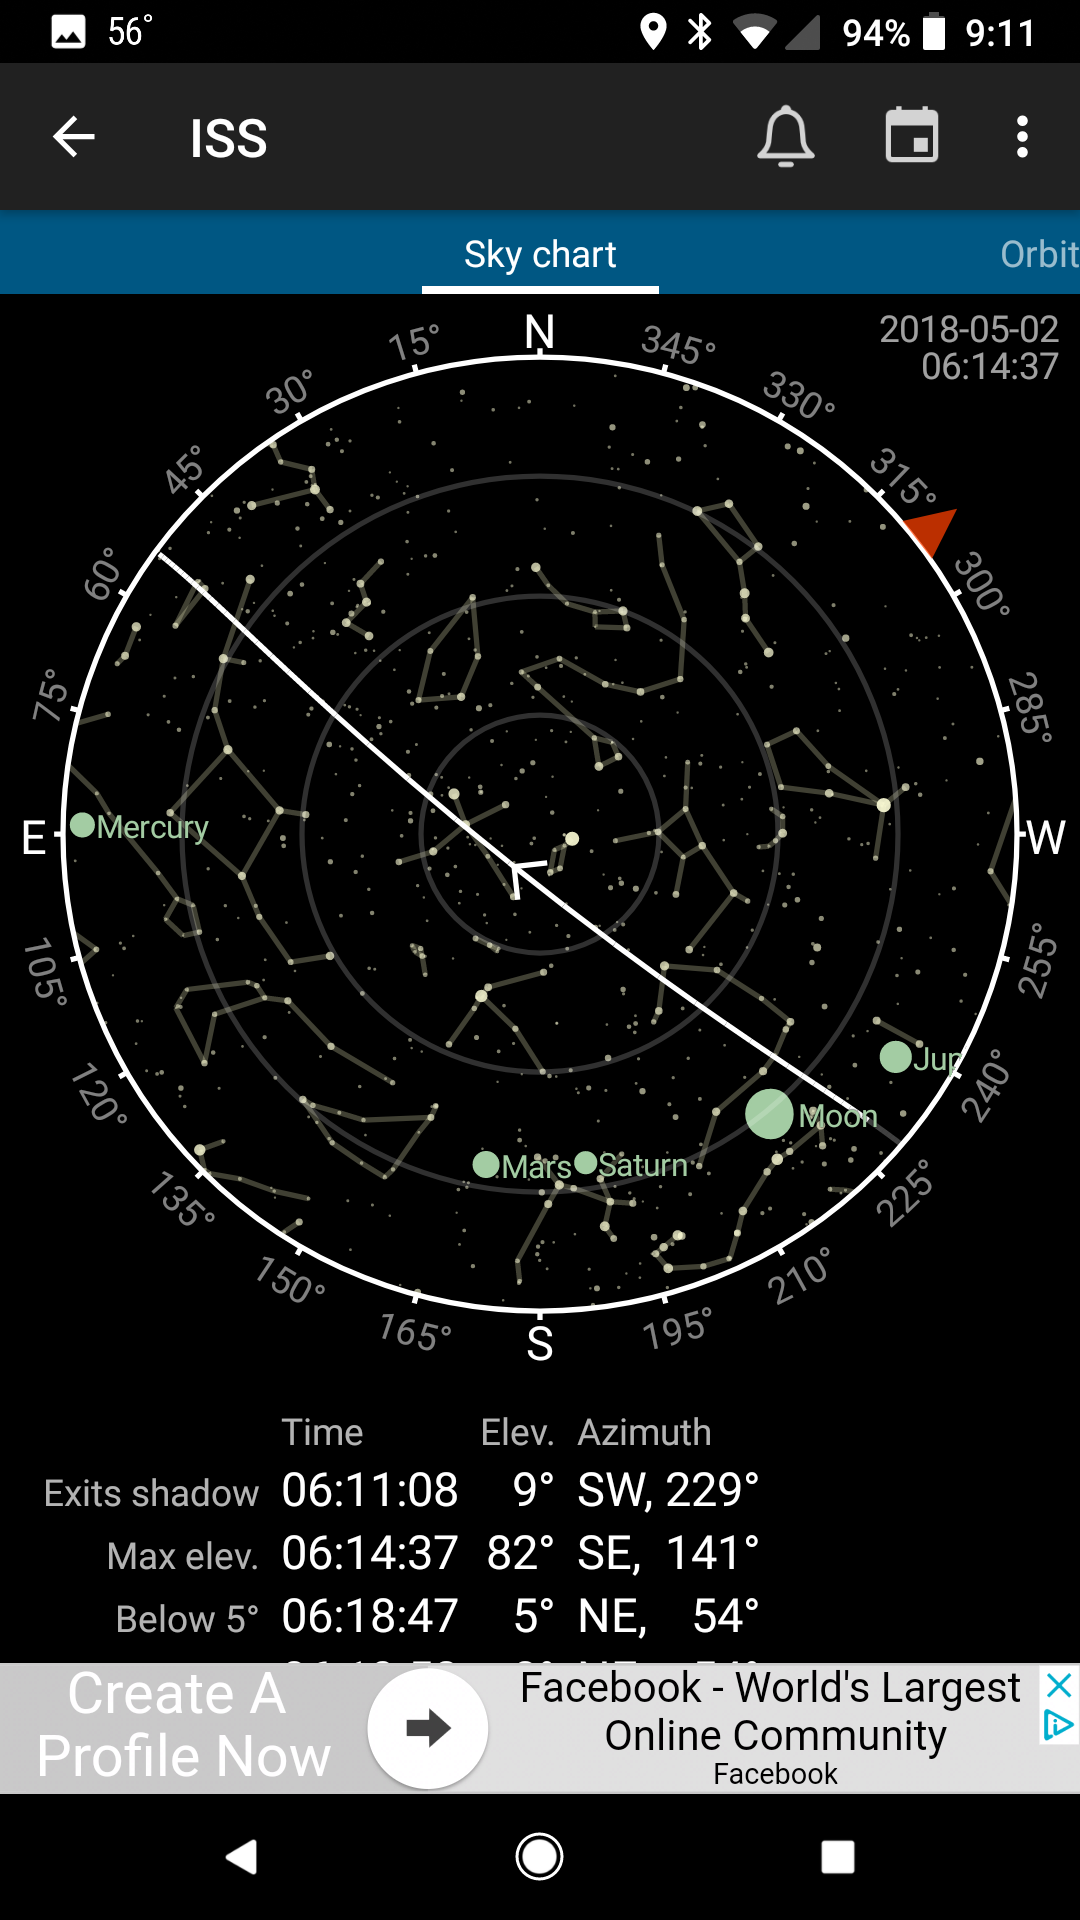
This image is an example of a more or less direct overhead pass and will give me the best opportunity to receive the images of the ISS. As you can see the ISS will start to appear at about 230 degrees (Southwest) and then fly overhead with a bearing of about 56 degrees (Northwest).
The information at the bottom of this screen will show you exactly when you will start to be in range of the ISS for the reception of the signal:
Exit Shadow: This shows you the AOS (acquisition of signal) time. The time that the ISS starts to be within your range.
Max Elevation: This shows you the time where the ISS will be at it’s highest elevation point in its orbit.
Below 5 degrees: This shows you the time where the ISS will be starting to be out of range from you (flying away over the horizon).
Sets: This shows you the time at which the ISS will leaving your area and will be out of range. Also known as LOS (loss of signal) time.
The ISS travels at 17,150 miles-per-hour or about 4.76 miles per second, so it is really traveling fast! It has to in order to stay in a stable orbit and not come down into our atmosphere. This means that generally on an optimum overhead pass you have approximately 15-18 minutes where the ISS will be in range to receive its signals.
The ISS orbits the earth approximately every 92 minutes, so you will have another opportunity in 92 minutes to receive the signal again, but with a less optimized path overhead, meaning that you will have less time that the ISS is within signal range.
Setting your handheld receiver up to receive the ISS signals:
The transmission of the SSTV images is done using FM (Frequency modulation), so you can receive the images using a standard FM Handie Talkie (HT) or scanning receiver.
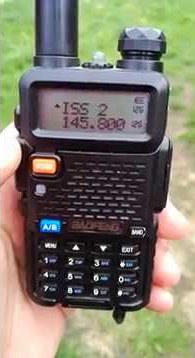
Program the frequency of 145.800 MHz into your receiver, and then adjust your squelch setting to wide open (you want to hear static). You can adjust the volume a bit so that it is not super loud.
Using your smartphone and HT to receive the SSTV Images:
In general is is a good idea to choose a location to receive the images that has a clear path to the horizon. Large buildings or other structures will block the signal from reaching your radio receiver properly. I like to go to an open field or top of a parking garage, but a residential neighborhood would be OK as long as there is no large buildings or houses blocking your path directly to the satellite for the pass.
On your smartphone, open the Robot36 app, and place the smartphone within close proximity of your HT speaker. As soon as the satellite comes within range you will start to hear some high pitched tones. Adjust the volume and closeness of the smartphone or tablet to get the best image.
You may also have to move the handheld radio around a bit in your hand orienting the long sides of your antenna toward the position of the satellite in the sky. Try moving the radio about to get clear tones with minimal static keeping the smartphone close to the speaker of the radio.
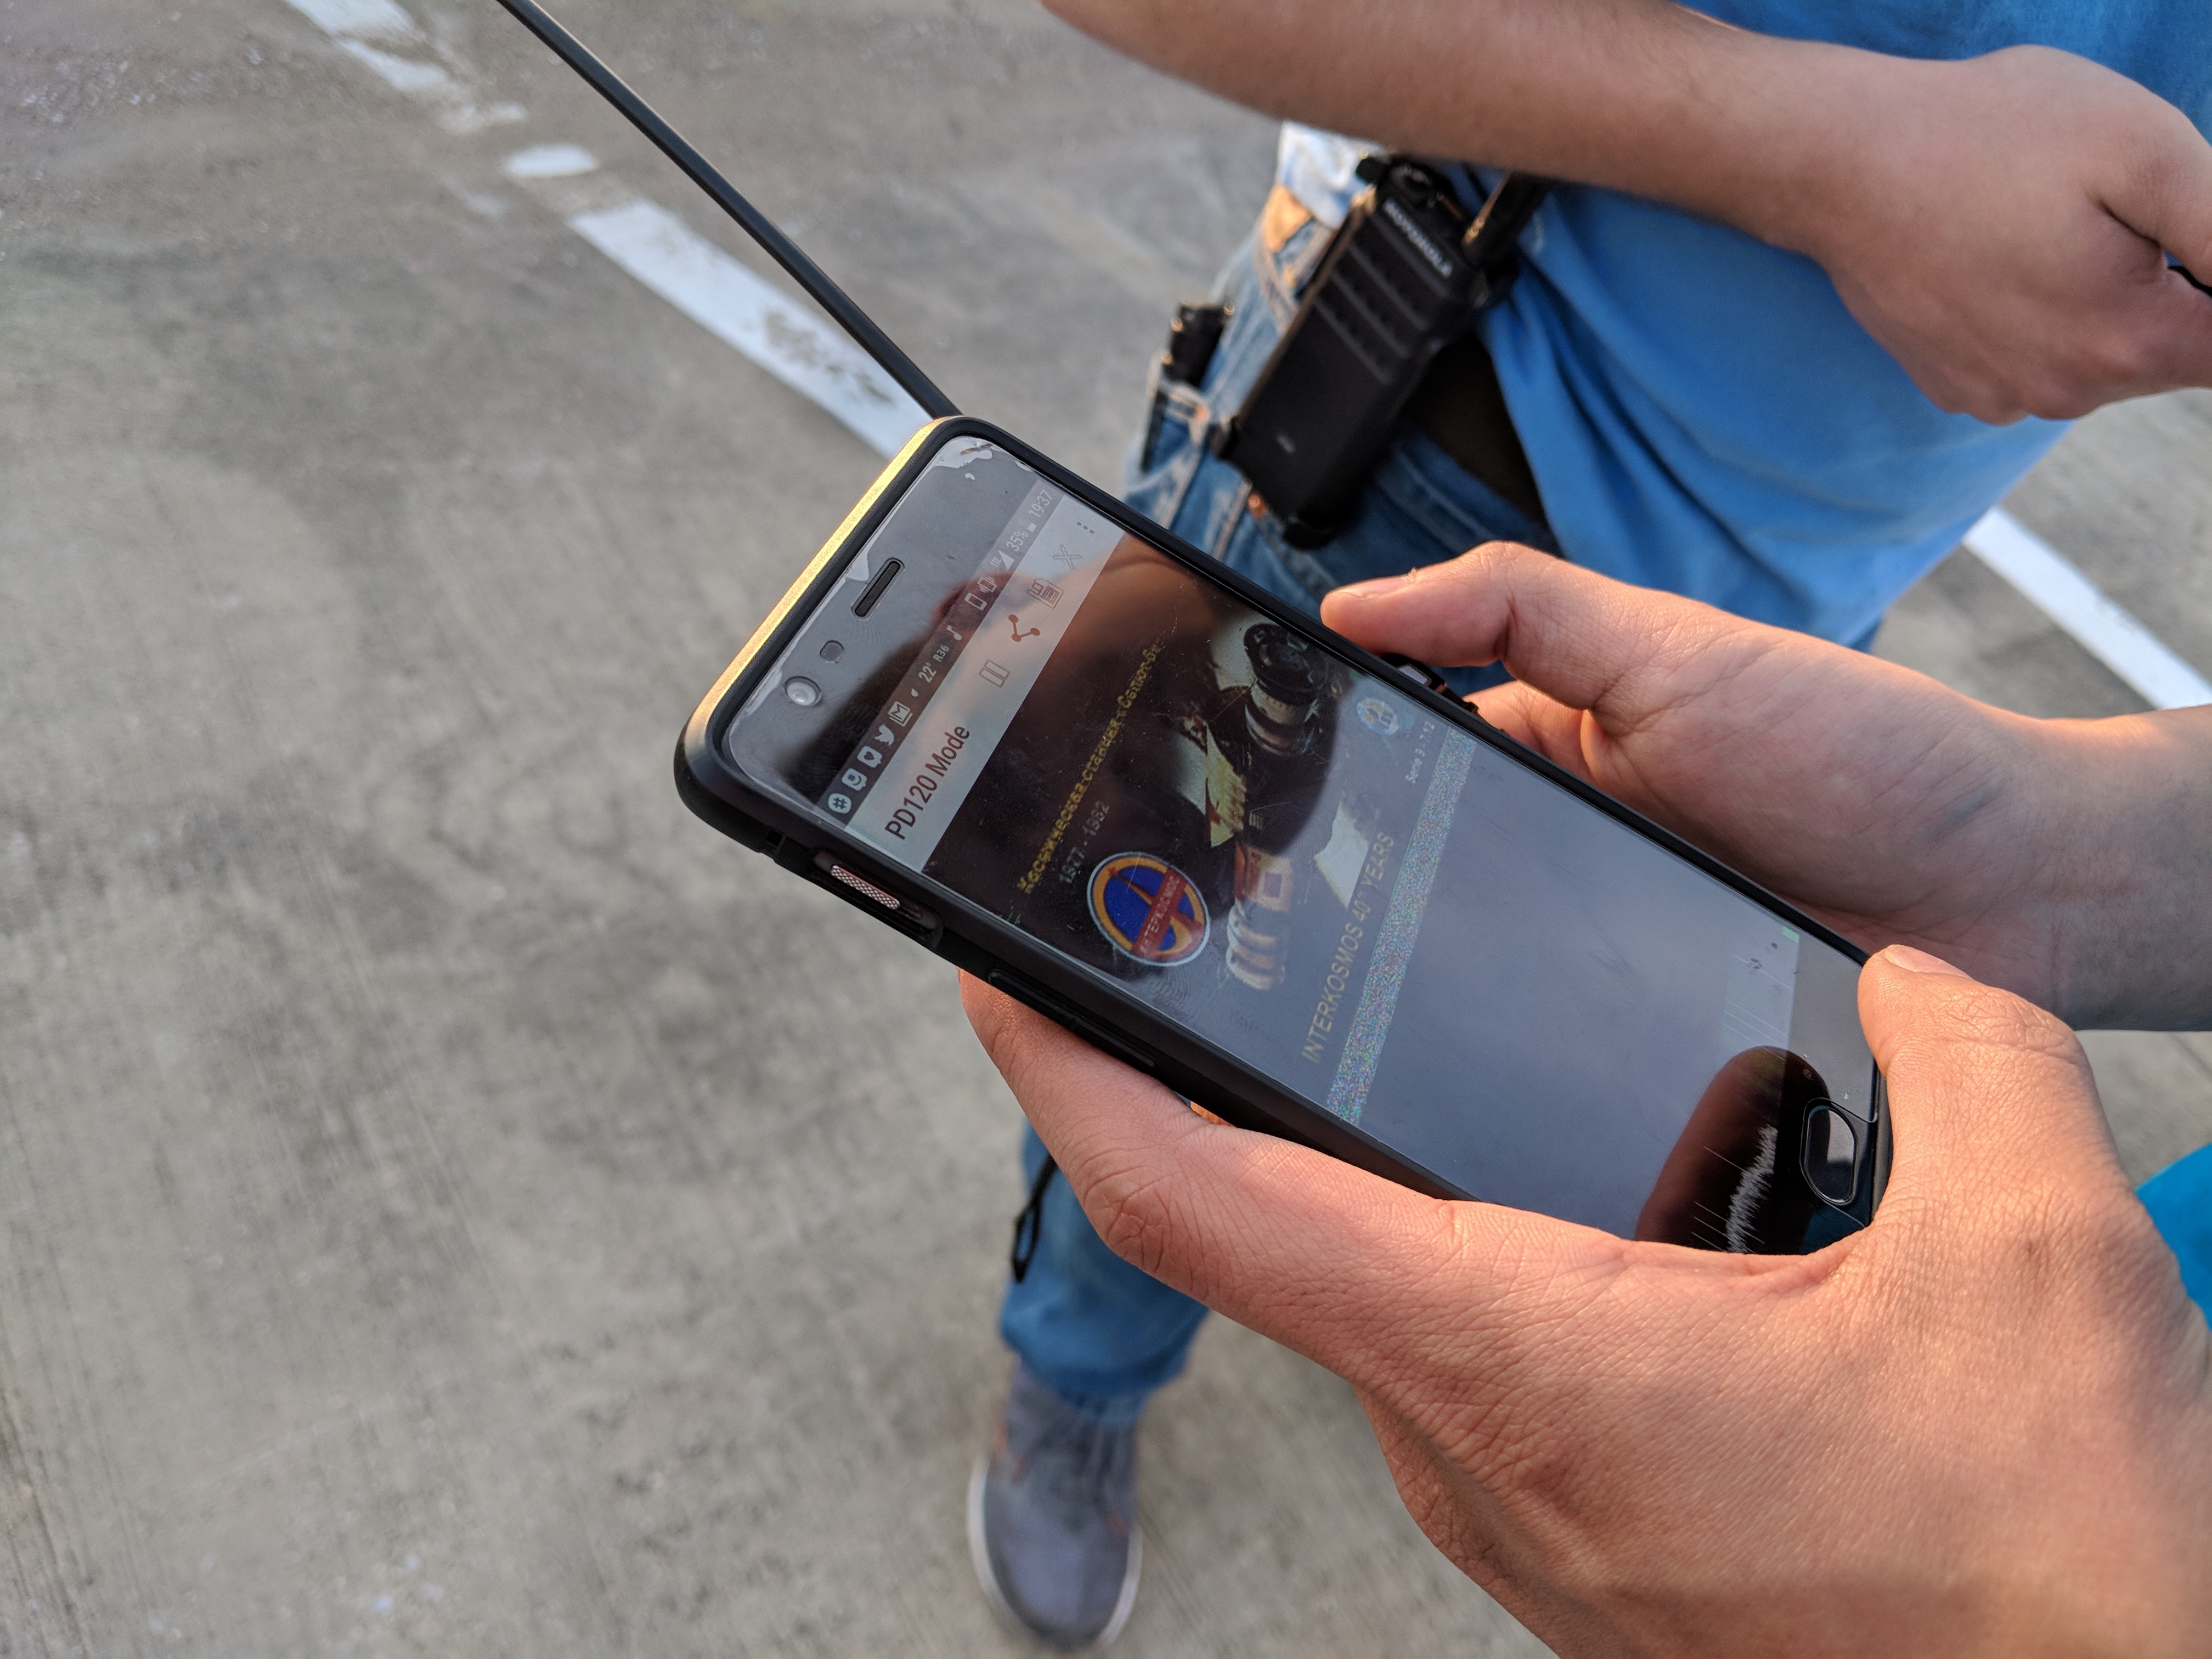
In the photo you will see that the radio is under the smartphone and the antenna instead of being straight vertical is orientated with its long side toward the ISS in the sky.
I needed to move the radio around a bit as the ISS passed overhead keeping the smartphone’s microphone within close enough proximity to pickup the audio from the radio.
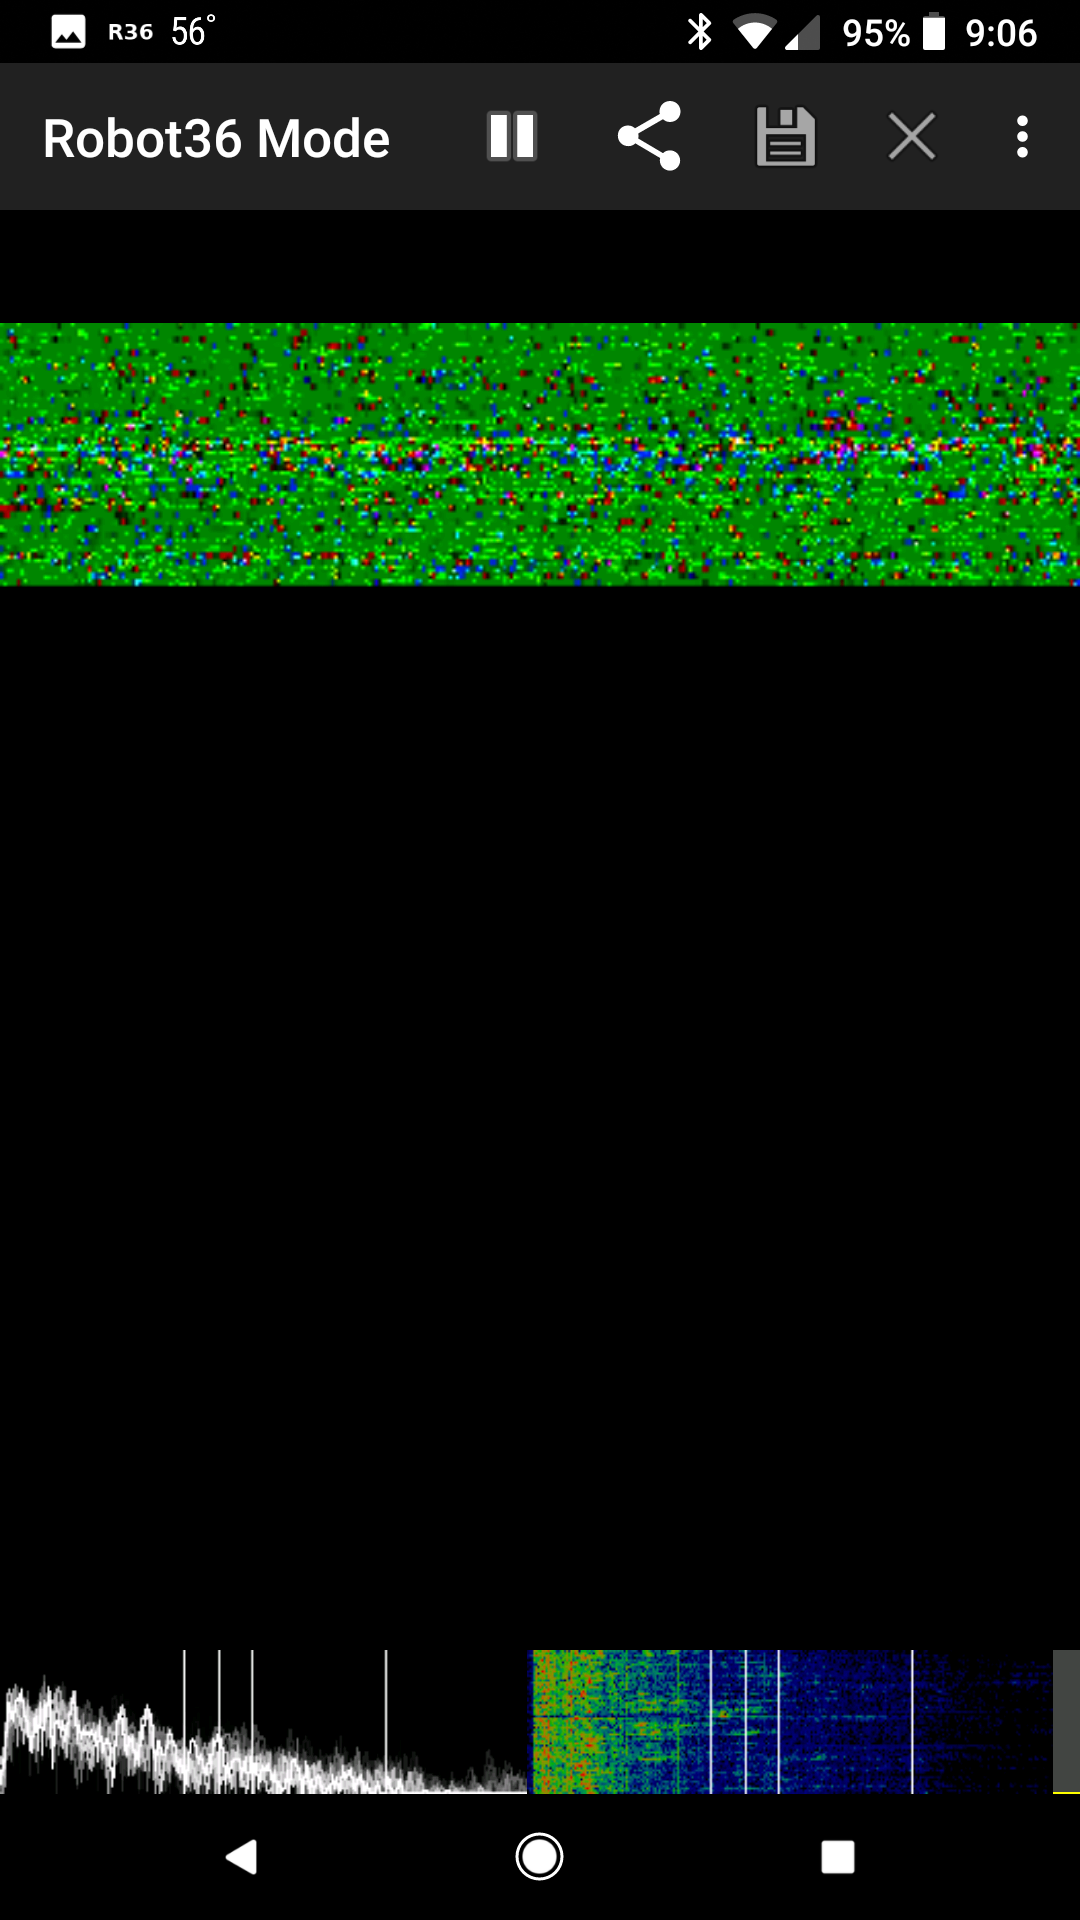
You should start to receive an image in the Robot36 screen. If you have clear loud tones and are not receiving an image, be sure to set the receive mode to AUTO MODE receive from the menu (the 3 dots in the upper right bit of the display).
You should start to receive the image line by line.

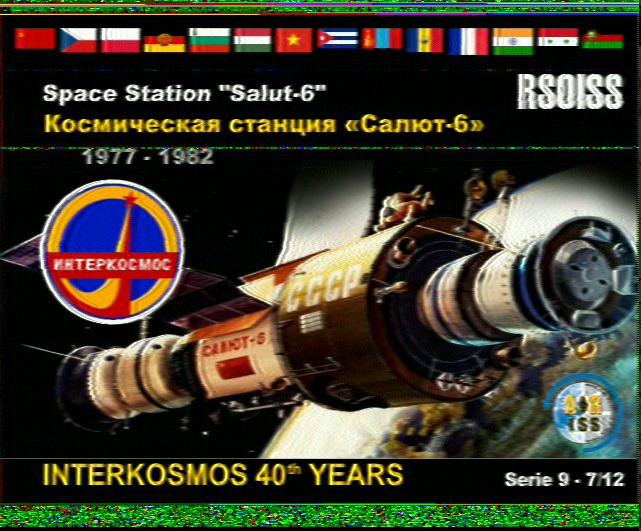
This image is one that I received on April 13, 2018 from a ISS pass and shows a retrospective of Salyut 6 Cosmonauts . Salyut 6 was a Russian space station that was in orbit from 1977 to 1982.
Here is another great image received that is part of the Salyut 6 retrospective:
To save the images you can click on the little disk icon on the Robot36 app. The ‘X’ icon will clear the display so be careful that you don’t inadvertently hit that button.
Conclusion:
Receiving these images has been a lot of fun, but does require a bit of practice to get the best and cleanest images. The green lines are a result of noise or weak signal beacuse of the orientation of the radio’s antenna, but the above images are pretty darn good.
The ISS crew does transmit these SSTV images fairly regularly to promote the space station and respective space agencies. So next time they are transmitting get outside and receive these images directly yourself! This would be an excellent family activity as kids would love to know that they are receiving signals directly to their phone from the International Space Station!
Other setups using directional antennas, SDR receivers and laptop computers can yield better results, but require more setup time before AOS (acquisition of signal) and can be cumbersome compared to an HT and a smartphone.
I hope you enjoyed this blog post. Satellites operations have been a new interest for me over the past year, and I have had a blast talking on a few amateur radio satellites and receiving images from the ISS and weather satellites. If you are interested in Amateur Radio satellites AMSAT is a great resource: https://www.amsat.org/
73! de Nick N9SJA
The EFW “Skookum Choocher” 40-6m Portable Antenna w/ 9:1 Un-un
Over the past few months I have taken a fancy to QRP portable operation. It has been a big thrill for me to go to a local park or forest and throw up and antenna to see what stations I can work with 5 watts.
I decided to invest in a small portable HF radio, the Elecraft KX-3. I chose the KX3 mainly because of its ultra small size and awesome receiver performance. But having a good QRP radio is only part of the equation. Having a good antenna is also just as important as the radio as you need to get those 5 watts to work for you.
I checked out several designs online. From the humble dipole to portable vertical style antennas. Although I don’t plan on just using one particular antenna, I wanted something that I could deploy quickly and as easily as possible. After searching about, I found plans for a End-Fed random wire antenna that was fed by a 9:1 un-un that would work mult-band 40-6m. Seeing from the plans that this antenna looked easy enough to build I started construction on my own antenna. *Note – this antenna will require a tuner for multi-band use!
I had just a few requirements really…I wanted to build this antenna with things that I found lying about so that I spent really nothing to build it. However it really wouldn’t cost much in parts anyway to build. I found an excellent PDF article from EARC Amateur Radio Club. Here is a link to this PDF file: http://www.earchi.org/92011endfedfiles/Endfed6_40.pdf
Here is a parts list that I used to build my 9:1 un-un box:
- The box. Plastic would probably be better for water resistance, but a metal box will be fine if you keep it dry.
- A powdered iron toroid core T-130-2 (I used a slightly larger toroid because that is what I had lying about).
- 3 20″ pieces of 22-18 AWG wire (solid conductor works best -red, green and black colors). However I used different wire that was white, red and black because that was what I had laying around.
- 2 binding posts (this can be also bolts with wing-nuts and lock washers to fasten to the un-un box). I had binding posts so I used them (and they work nice to quickly remove wires!)
- A Chassis mount SO-239 connector.
- Various nuts, bolts and fasteners (depending on your construction).
- A soldering iron, solder, and a bit of RA flux
- A hot-glue gun (used to secure the toroid in the box)
- Basic hand tools (screwdrivers and pliers)
- 30′ of 18 AWG stranded wire
- 1 qty large diameter ring wire terminal lug (this is used to put a ring on the end of the wire antenna so that you can hang it or raise and lower the wire antenna.
After looking through my junk box (it would seem that every ham radio operator has a box of junk lying about) I found an old TV signal amplifier box. The box is an all aluminum box, so I thought this would be good to ground connections and keep everything contained. I gutted all the electronics (it was a good thing anyway since this device had a live chassis to mains voltage! – If you have one of these laying about don’t use them. They are not safe). I drilled some holes in the metal box to accommodate a SO-239 and the binding posts that I could connect my antenna and counterpoise to.
 The gutted Wineguard TV antenna amplifier box I used as the chassis.
(Note the SO-239 connector – I drilled out the hole and used rivets to attach SO-239 to chassis)
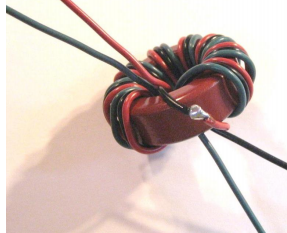
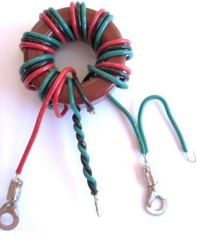
Next I needed to wind the toroid. This was actually pretty easy and I learned a few things to help make it an easier process. I found that if I used zip ties that I could hold the wire in place easier. This may not be the best solution for you, but for me it did help. Every time that you put a wire through the center of the toroid core means that the wire has been wrapped once. So that is an easy way for you to keep track of how many turns you are making. Since this is a 9:1 un-un, you will make 9 turns around the core. (Easy right?) You start by taking all 3 wires (red, green, and black) and wrapping them 9 times around the core.
 The 3 wires wrapped 9 times around the toroid core. Try to keep the coils around the torid core evenly spaced. Make sure wires do not overlap.
Once that is done you will connect the left hand black wire and the right hand red wire. You will need to trim the wire a bit since they still may be long:
 The wound toroid with the red and black wires
For the last bit with the winding of the toroid you will need to connect the other end of the red wire with one end of the green wire:
 The black and the green wire. Leave them long as you will need to connect these. Also you can add ring terminal lugs if you wish to the red and green wires to more easily connect them to the biding posts, or bolts with wingnuts that you will use for the counterpoise and wire antenna.
The twisted green and black wire will be soldered to the SO-239 connector’s center conductor. The end of the green wire with no connector will be soldered to the shield of the SO-239 connector and the green wire with the ring terminal will be attached to the binding post or bolt that you use to connect the counterpoise wire to. The red wire with the ring lug is used to connect to your antenna binding post or bolt.
Here is a picture of the assembled antenna showing the connections in an enclosure:
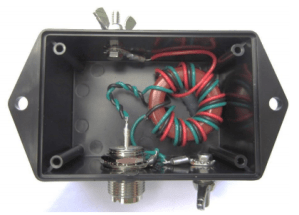
That photo really shows the connections to very well. You can see that the bolt with the wingnut that is on the top is connected to the red wire. This is the antenna connection and where you will connect your 30 feet of wire that you will use as the antenna.
The bottom bolt with wingnut is the counterpoise connection. You can add 15-20 feet of wire to get your SWR just right, however you may not need a counterpoise most of the time for this type of antenna design as it will use the shield of your coax cable as the counterpoise.
The SO-239 coax connector is used to connect your radio to the antenna. If you use this type of antenna a minimum of 20 ft of coax is recommended as the shield is used as a counterpoise. If you want to use a shorter piece of coax to connect to your radio, then attach a 20 ft piece of wire to the counterpoise connection and lay it on the ground.
Here are pictures of my particular build:
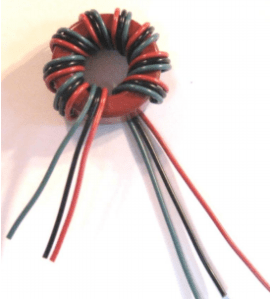
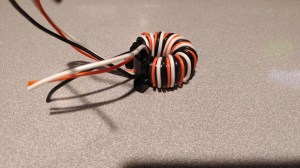 This is my toroid that I wound. Note the white, black and red wire (I had this wire lying around so I used it).
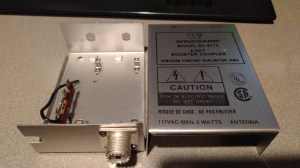
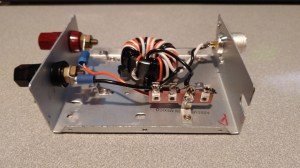 My box with the binding posts, 9:1 toroid transformer and SO-239. (Note the terminal strip a the bottom right. This was already in the box so I decided to use it as a convenient place to make my connections!)
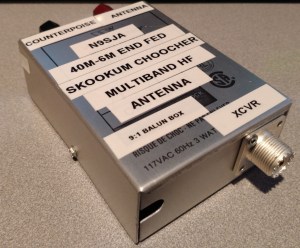
The end product with the case on and my custom labels!
After the build I decided to take it out and give it a try. I connected my 30 foot piece of wire to the antenna binding post and then sent the other end skyward into a tree getting it up around 25 feet or so (I could have probably got it higher, but this was good enough for testing). I connected my 20 ft of coax to my Elecraft KX-3 and then powered it on.
Using the built-in tuner on the KX3 I was able to tune up on the 40m band with a 1.2:1 SWR on 7.185 MHz.
I tried the antenna on several other bands, taking note on how difficult it was to tune using the KX3’s ATU. I also tried it on 80m and was able to tune it with a decent SWR (2.2:1) Although this antenna just wont work well on 75/80m (it is to short and the wire is not high enough).
Just in the front yard, I decided to setup my QRP portable station:
I used my KX3 transciever, the PX3 panadapter and a 6AH Bioenno branded LiFePO4 battery to power it all. I made several US contacts using 5-10 watts and the end fed antenna that day, including a QRP contact to Ireland on 20m! I found performance on 20 and 40m to be superb with only 30 feet of wire. Conditions were good as it was spring time 2017 and the bands were in good shape. I am always blown away by the fact that you can use 5 or 10 watts and talk so very far away. QRP has been a lot of fun and I cannot wait until the winter is over so I can get back outside. (At the time of writing this article it is January 2018 and is -15 degrees here at my QTH in NW Indiana).
My verdict is that this antenna is a quick, cheap, and easy to build and deploy antenna that should be considered for QRP portable ops. I still tend to use dipoles as they work very well, but there are times when you may not be able to have 3 supports for the center and two ends of a dipole antenna. This antenna solves a lot of problems for portable ops such as the support of the antenna, quick deployment and stealthy deployment if you don’t want to attract a lot of attention.
If your into portable ops I urge you to give this a try. Although you can buy antennas like these for $40 – $100 I urge you to build it yourself. The satisfaction from building something, putting it on the air and making contacts with it is a joy to behold!
73! de Nick N9SJA
A tale of two Drakes.
Recently I found myself with some extra money that of course for an Amateur Radio op, just seems to light a fire right in your pocket when there is some sort of hamsexy radio gear around. The conflagration of my wallet started when my very good friend Jeff N9IZ and myself took a trip over to another collector’s home Ward K8FD. Ward is into collecting military radios and wanted to clear out bits of his other collection to facilitate his collection of military gear (when we visited we saw 6 R390’s there). Ward had a complete C-line set that he was wanting to part with, and with my trusty wallet on fire I was soon carrying the C line out to the car.

My haul:
1. Drake T-4XC Transmitter – Excellent cosmetic shape. Works perfectly.
2. Drake R-4C Receiver – Very Good cosmetic shape. 1.5 kHz/500 Hz/250 Hz filters installed. Various Sherwood Engineering modifications installed.
3. Drake MS-4 external speaker – Very Good cosmetic shape. Speaker sounds great.
4. Drake AC-4 power supply – Power supply is original, and it also works just fine.
5. Drake C-4 station monitor/control – Excellent cosmetic shape. Works fine.
6. Drake RCS-4 remote coax switch – NEW OLD STOCK IN BOX. Never removed from box, purchased 1977.
When I got my haul back home I did bring up the AC4 power supply, the R-4C and the C4 up on a variac. I first connected the AC 4 to the variac and also connected my Fluke ammeter so that I could monitor the current. After about 24 hrs, the power supply and the other gear were all brought up to modern line voltage on the variac (120 VAC). Since there were no sharp increases in current, and nothing went “bang!” and let the magic smoke out, I figured I was good to go to bring them on the air.
I didn’t have a microphone for this gear yet, but my friend Jeff N9IZ was kind enough to let me borrow a Sure 444 microphone so that I could get them on the air.
After getting the myriad of interconnecting cables plugged in and working I was ready for my first QSO using this old gear.
My first contact with the Drakes was with W5FMX Scott – in Texas on 7/4/2017. I had an excellent signal report and Scott told me that my audio was fantastic. After hearing the encouragement I went on to make about 25 more QSOs (many with the 13 Colonies special event stations) of which I made about 5 DX contacts on 20m.
I love collecting radios. I decided perhaps the Drake line of gear was for me. It is a bit cheaper to collect than the Collins stuff and is fairly available at hamfests and online at places like QRZ Swapmeet and QTH Swapmeet.
Tuning up old tube radios is a lot of fun. These older radios require a bit more interaction than newer radios. But that is some of the fun. I’m always tweaking that preselector on the R-4C along with the tuning dial to get stations tuned in just right.
Recently I just purchased a used ElectroVoice 664 microphone to use with the Drake station. This microphone was first designed in 1955, and was sold until the early 1960’s. A thing of beauty, the chrome microphone sitting on it’s grey base brings a smile to my face every time I lay eyes on it.

The EV664 is a unidirectional cardioid dynamic microphone. They were sold for use as a general purpose/communication/PA microphone. Big and beefy there is no plastic on this microphone (well, except for the small switch). It weighs in at a hefty 1 lb, 12 oz (without the base). The 419 desk stand is also a heavy chunk of metal weighing over 2 lbs. This isn’t the type of microphone that you are going to just knock over. If you were to say drop this on your foot, your toes would most likely be broken.
I did order some cable for this guy so that I can get it cabled up. I think I am going to have to wire up also a foot switch for this since there is no PTT (push-to-talk) button and I really don’t want to mod the base with a switch.
I am having a bast operating with this gear, and when I get some more of the station setup, I will write another post. In the mean time, 73! and gud DX.
Nick N9SJA
Messy Ham Shack (Chronicles of the Ham Radio Horder!)
 Does your shack look like this? I know most of the time mine does. For the past year I have been contemplating just how to get a handle on the massive mess that is my shack.
It didn’t always used to be this way. When I first bought my home, I saw the potential of a finished basement area that would be the ideal man-cave. I had visions of all my favorite toys/hobbies neatly co-existing in one harmonious space. In my mind I saw neatly built shelves displaying my massive ham radio collection with plenty of room for a dart board, a pool table and all my favorite bobbles on display while Kate Upton brought me a cold beer in a bikini. So how did all this just go so terribly wrong?
Now my beloved man cave is a crazy mish-mash of wires, half completed projects, and parts all over the place. I have noticed that I have small baggies with various parts still in new in unopened packages because I thought I would use it for a project, or something later.
Now, as a Ham I love a good hamfest (who doesn’t?) and find myself going to half a dozen of the flea market fests every year. I seem to go berserk at these shows every time. From buying some bits and parts to someone else’s junk that in my mind is the perfect project. After the trip I seem to go down to the shack and deposit the bag of goodies that I just bought with every good intention on the desk, just to be forgotten in the rest of the clutter.
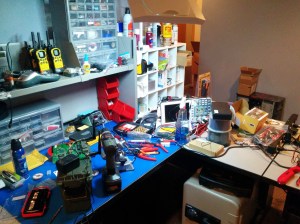
The Author’s messy workbench.

The Author’s clean workbench (a rarity!)
The worst bit for me is the workbench. It seems to collect my mess like a huge magnet. I have purchased the little organizer cabinets and the shelves to properly put things away, but they seldom if ever make it back to their little homes. Every now and then I can convence myself that if I clean up first, then I can work on whatever project I want to. This seems to help keep things tidy for a little while at least.
For me the mess just feels so overwhelming at times. Like I don’t even know where to start with it. I say things to myself like “If I just had some cabinets, or more shelves, I could keep things tidy.”
But the truth is that I buy and bring to my house too much stuff. If I didn’t have 1/2 of the stuff I have now it would be easier to manage and keep things clean. Us hams seem to have the dream of 90 MINT Collins radios <or substitute your favorite collectible boat anchor here> all on display for others to gawk at. But the reality for most of us is quite different. Boxes of parts for those favorite boat anchors to get them working stacked on the floor and wires all over the place.
My non-radio appreciating friends call my shack the “Cold War Nuclear Bunker” for it’s resemblance to such a place. (First off it is underground in my basement, I have a lot of cold war era radio equipment, and lots of old radio books from the 1950’s and 60’s). What I want is something…well….more….refined.
So, I have put a bit of a plan together. My plan is to first move everything from my “bunker” place it in boxes and store it neatly in my utility room. Once everything is moved out, I plan on cleaning the floors and painting the walls (perhaps the shack could use a new fung-shui by a lovely color of paint!) Then installation of some shelves and cabinets. Once it is clean to then move back in just the things that I need. For the remainder, that is stuff for my entry into the flea market of the next local hamfest and or put it on QRZ.
(we’ll see what actually happens here – I am terrible at sticking with plans to clean up my shack).
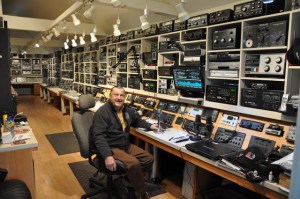
George Ulm W9EVT’s awesome and tidy shack! (why can’t my shack look like this???)
Perhaps it would be inspirational to look at some clean and organized shacks. I know there must be some neat and tidy shacks out there (although I would venture to say those shacks would be in the minority for us hams).
I have seen some guys with custom consoles with their gear installed that looked totally awesome. Some shacks with all rack mount equipment and even built-in shelving systems with automatic doors!
More shelving and cupboards would be nice. Modern desks seldom come with drawers anymore for whatever the reason, so where do you put things that would be nice to just shove in a cabinet and shut the door on?
Recently I have purchased several of the plastic see-through bins from my favorite local retailer. I thought these might be good to put various bits and pieces in, but I could still see what was in them, so when I wanted something I can just look at them and see what was inside. I think this might be a good way to store and organize everything.
My biggest problem really seems to be that when I go down to organize and clean everything, if I cannot get it done the way that I want to, perfectly, then I become disillusioned by the whole process. This is a bit of perfectionism creeping in which is not a good thing. People that are perfectionists are known for not getting anything finished beacuse they mainly find out that the world is not perfect and nothing they can do is going to make it so (hey at least I realize my main fault).
Anyway…that’s about enough for this blog post. I plan on my spring cleaning to start soon and over the course of the next few weekends get things cleaned up a bit at a time.
Now…if I can just stay off the darn radio enough when I’m down there to clean…ta ta for now.
73! de Nick N9SJA
POWER TO THE PowerSDR
Nice information from Jeff N9IZ about some ongoing development for PowerSDR.
After Flex Radio’s newest Signature series software defined radios hit the market there’s been a steady decline in value and interest in their original Flex series radios (Flex-5000, 3000, 1500). The only one still marketed is the Flex-1500, and only time will tell how much longer it will last. Flex now refers to these radios as their “legacy” series of radios and unfortunately has ceased developing software for them as well. To the best of my knowledge the Flex-1000 was their first radio and is considered first generation SDR technology as it required a soundcard interface with the computer.
In spite of the excellent performance of the newest generation of SDRs on the market there still remains a dedicated core group of Flexers using their “legacy” radios. Recently I’ve found a bit of good news for those who haven’t yet jumped ship to the current offerings available from Apache Labs…
View original post 560 more words
HF Band Conditions
