Installation and Initial Configuration of the NWDR ThumbDV
Introduction:
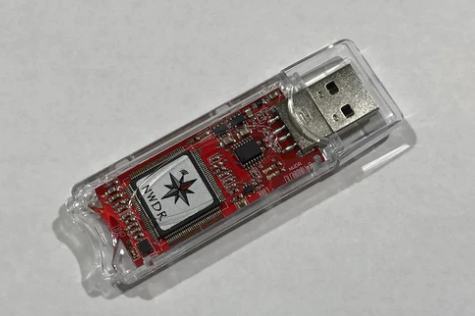
The Northwest Digital ThumbDV is a USB adapter for your PC that allows you to use your PC audio for connection to D-Star, YSF, and DMR radio networks. The ThumbDV contains an AMBE3000 hardware chipset for connecting legally to these networks in conjunction with the BLUEDV software by PA7LIM. The ThumbDV is a fantastic device for listening and accessing these digital radio networks.
Setup can be a bit tricky, so this is why I made this setup guide. I hope it helps you.
**PLEASE NOTE** Any modification, installation or configuration is done at your own risk. I do not have time for technical support so please do not try to contact me for support. I am not responsible for any issues that may arise from your setup of this device. Please take care.
I. Modification of the ThumbDV to fit in USB ports on PC (optional):
*Important Note: The NWDR ThumbDV may need to be slightly modified physically. Upon first receiving my unit I noticed that the plastic case stuck out a bit too far over the USB connector. This made it difficult for the USB connector on the ThumbDV to fully insert into a USB port on a standard Dell PC. You may or may not need to do this. If you insert the ThumbDV and don’t hear the familiar sound on your PC that a USB device was inserted, then the case is probably preventing the USB connector from properly contacting the pins on the connector in your PC and you will need to modify the plastic case.
To modify your ThumbDV casing you can cut the plastic off by scoring it with a razor blade several times then breaking the scored line with a pair of pliers. The transparent plastic case is held together with little plastic clips. Be sure to take caution when taking the case apart. You do this at your own risk of breaking the case, so take your time and be careful!
- Remove the plastic case by inserting a thin spudger or thin bit of metal to pry the translucent case apart.
- Remove the red NWDR circuit board carefully and set it aside.
- Take the bottom of the plastic case first and then score a line with a razor blade to remove the extra bit of plastic where the USB connector sits in the case:

- Once you score the plastic several times, gently use pliers to break off the plastic along the score line.
- Do this also for the top of the plastic case.
- Once you are done then carefully put the red circuit board back in the bottom first then snap the top cover back on.
II. First time hardware installation:
This guide makes the following assumptions:
- That you are using a modern Windows 10 PC.
- That you have administrative rights over the operating system to install software/hardware properly.
**DO NOT CONNECT YOUR ThumbDV into your PC until you go to step 3 of this section!**
- First you will need to open Device Manager. To do this go to the search bar at the bottom left of the screen and type “device manager” then click on the device manager option in the menu to bring it up:

- Next you will be shown the device manager. Expand the section marked “Ports (COM & LPT):

Under ports you will notice on my example that I have “Communications Port (COM1)” and “Intel Active Management Technology – SOL (COM3)” already listed. My ports may be different than yours. Just make sure that you see which ones are listed for the next step.
3. Next plug in your ThumbDV into your Windows computer USB port and watch the device manager screen under “Ports (Com & LPT):
4. Next we will need to set the port speed properly in Windows for the NWDR ThumbDV. You can do that by going to the COM port that is used by your ThumbDV then by RIGHT CLICKING ONCE a menu will pop up. Choose “Properties” by LEFT CLICKING once on that pop up menu:
You should see the following menu. You will want to click on the port settings tab at the top:

5. Under “Port Settings” you will see at the top a field named “Bits per second” with a drop down box where you can select the different speed options. By default, the integer 9600 will be listed in this field. You will want to change this to be 460800:

Just change the “Bits per second:” to be 460800
Everything else is correct so do not change the Data Bits, Parity, Stop bits, or Flow control lines.
When you have set the bits per second to 460800 correctly click on “OK” at the bottom right of the window to close the properties window.
You now have your PC and your ThumbDV properly configured to communicate to the software (coming up next in this guide!)
III. BlueDV software installation and configuration:
BlueDV is software written by David Grootendorst PA7LIM to utilize the AMBE3000 vocoder chip in the NWDR ThumbDV and enable the user to access digital voice networks such as D-Star, DMR, and Yeasu System Fusion C4FM (YSF).
You can obtain the software for Windows 10 at the following location: https://software.pa7lim.nl/BlueDV/BETA/Windows/
I do not recommend that you get this software from any other source on the internet. Always download the software from pa7lim.com directly.
1. Download the file “BlueDV-9610.zip” This is the most current version of the software as of the date of this document.
2. After downloading unzip the compressed zip file to your desktop.
3. Double click the install file named “BlueDV-9610” and follow the onscreen instructions.
4. After Blue DV is installed you will see the icon for BlueDV:
5. Double click the BlueDV program icon to launch BlueDV.
6. Next we will need to configure the software with your specific information (Callsign, DMR ID, BM password, etc.). It is at this point that you will want to make sure that you have the following information available and or setup with the service you wish to use:
D-STAR: If you are planning on using D-Star and you have not done so yet, you will need to register your callsign with the D-Star network. You can do that by going to the following website: https://regist.dstargateway.org/Dstar.do
More information about the D-Star registration process can be found here: https://regist.dstargateway.org/instructions/
DMR: For DMR connections you will need your DMR ID number and possibly more information for the DMR system that you are connecting to.
In the USA Brandmeister is one of the most popular DMR networks. You can find information about registration of Brandmeister here: https://brandmeister.network/?page=login&returnurl=%2F%3Fpage%3Dselfcare
You will need your Self Care account in the Brandmeister portal to create a “Hot Spot password” for security reasons. Your DMR ID number and Brandmeister hot spot password will be required to connect BlueDV to the Brandmeister DMR network.
YSF: Yeasu System Fusion (C4FM) does not require any registration to use their network. You will just use your callsign. However it is urged that you put your grid square locator information in the locator field. If you need help to determine your maidenhead grid square location information you can find it here: https://levinecentral.com/ham/grid_square.php
7. Next we will take your specific information to configure BlueDV:

Click on “Menu”, then on “Setup”
8. Next I have a 20 step process that I have simplified (yeah I know…20 steps simplified yeah right!) that will enable you to enter your information then quickly get on D-Star, DMR, and YSF (with the assumption that you have already registered and have the proper information to fill in here. These settings can be of course customized to connect to different DMR networks, DStar Reflectors, or YSF networks, but these basic options will get you started.
On the image below I have numbered the fields 1 though 20. Here is what information you will need for each field:
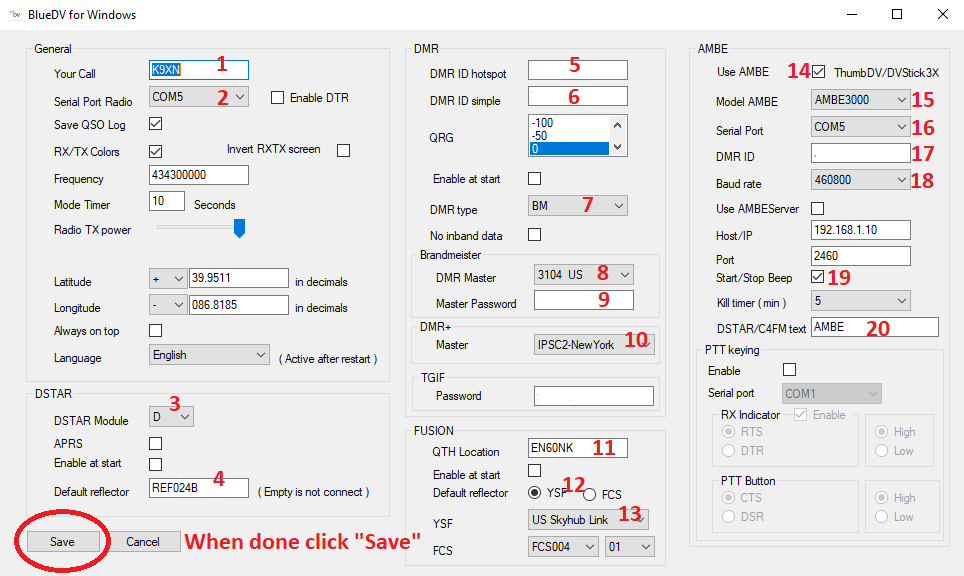
1. Enter your callsign here
2. Enter the COM port number that we setup back in section II of this document. If you do not know your COM port for your ThumbDV go back to section 2 and go over that again.
3. IF USING D-Star leave this as a letter “D” if you are not planning on connecting with D-Star it is also fine to leave with a letter “D” here.
4. IF USING D-Star enter the name of the reflector that you initially want to connect to. I would recommend something like REF030C here, or the designator possibly for your statewide D-Star reflector. You will be able to connect to other reflectors, this is just the initial connection when you start up D-Star with BlueDV.
5. IF USING DMR: Enter your DMR ID here.
6. IF USING DMR: Enter your DMR ID again here.
7. IF USING DMR: Choose your DMR network here. BM is for the Brandmeister network, so I have BM set here. If you are in the US Brandmeister is one of the most popular DMR networks.
8. IF USING DMR: Choose your DMR master connection here. Choose 3102 US for Brandmeister or 3104 US for Brandmeister.
9. IF USING DMR: Enter in your password that you created in Brandmeister self care:
10. IF USING DMR: choose the DMR+ master server for DMR+ networks….I just chose one near(ish) to me. In this case IPSC2-NewYork. Use the drop down menu to choose one closer to you if you wish.
11. IF USING YSF: Enter your maidenhead grid square location here.
https://levinecentral.com/ham/grid_square.php
12. Click YSF button here
13. IF USING YSF: Selection your connection here. I just chose “US Skyhub Link” since that is a popular talkgroup for YSF. Choose what you wish here.
14. CHECK THIS BOX that says “Use AMBE – ThumbDV/DVStick3x”
15. Under model name choose AMBE3000
16. Set the serial port again here to the correct com port for your ThumbDV (from section II of this document).
17. IF USING DMR: Enter in your DMR ID here
18. Baud Rate: Select 460800 from this drop down menu.
19. Start/Stop beep: this sounds a tone when you transmit or are receiving a transmission. Some people might find these sounds annoying or distracting you can turn them on or off here. (optional)
20. IF USING DSTAR OR YSF: DSTAR/C4FM text: This is additional text that can be shown when you transmit. You can put your Name here or your City and State. There is a limitation of 20 characters for this field.
Be sure that you click SAVE when you are done entering this information.
IV. BlueDV Basic use:
Once you have everything setup in section III then your set to go onto the last bit of setup and using BlueDV.
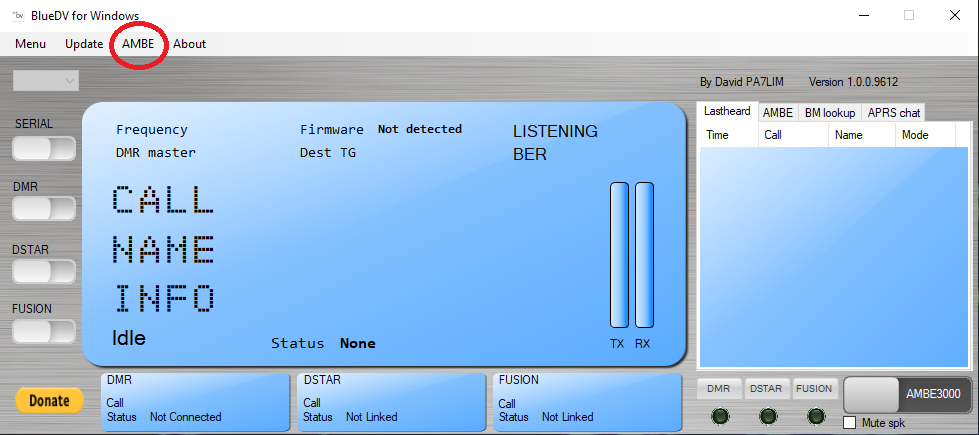
1. In the main window, go to the top and click on the AMBE menu:
This is where you will select your sound card microphone and speakers.
Once set it will remember the options.
2. In the main window, go to the top and click on the Update menu.
Update the following:
a.) If using D-Star: Update D-Star Hosts
b.) Update Call database
c.) If using DMR: Update DMR Masters
d.) If using YSF: Update Fusion Masters
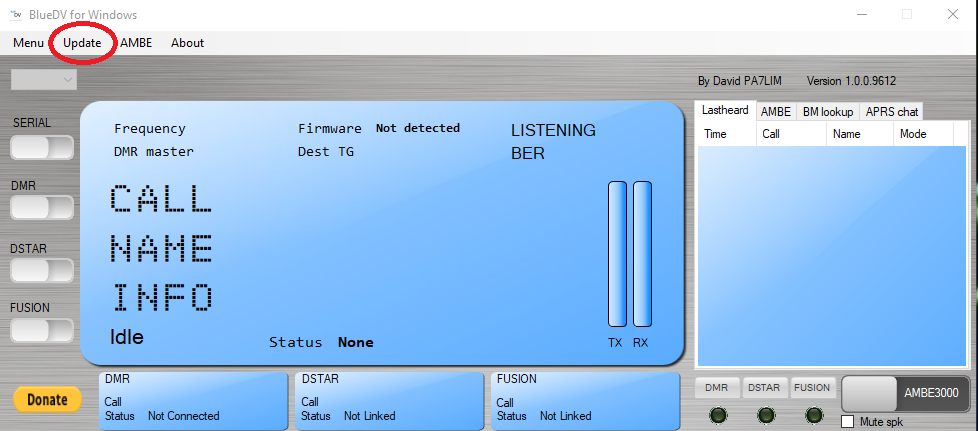
3. Now that you have your soundcard (microphone and speakers) selected in the AMBE menu and the Updates all done you are ready to turn on and use your NWDR ThumbDV:
Note at the top that says “Firmware Not Detected” This for now is ok. You will need to enable the serial switch on the left side of the window to connect and see the AMBE3000 ThumbDV:

Turn on the SERIAL switch and if you have your COM settings set correctly it should say “Firmware AMBE3000R”. This means that BlueDV sees your NWDR ThumbDV and all is good so far. If it still says “Firmware Not Detected” or nothing is listed here, check to make sure that your ThumbDV is connected properly to the USB port and that your settings are correct back in section II of this document.
You will use the slide switches on the left side of the window to enable or disable the system that you wish to connect to. You can turn all these on at the same time, however you can only listen and or transmit with one system at a time (i.e. DMR, D-Star, Fusion [YSF]).

BlueDV UI layout and brief introduction into what the buttons do:
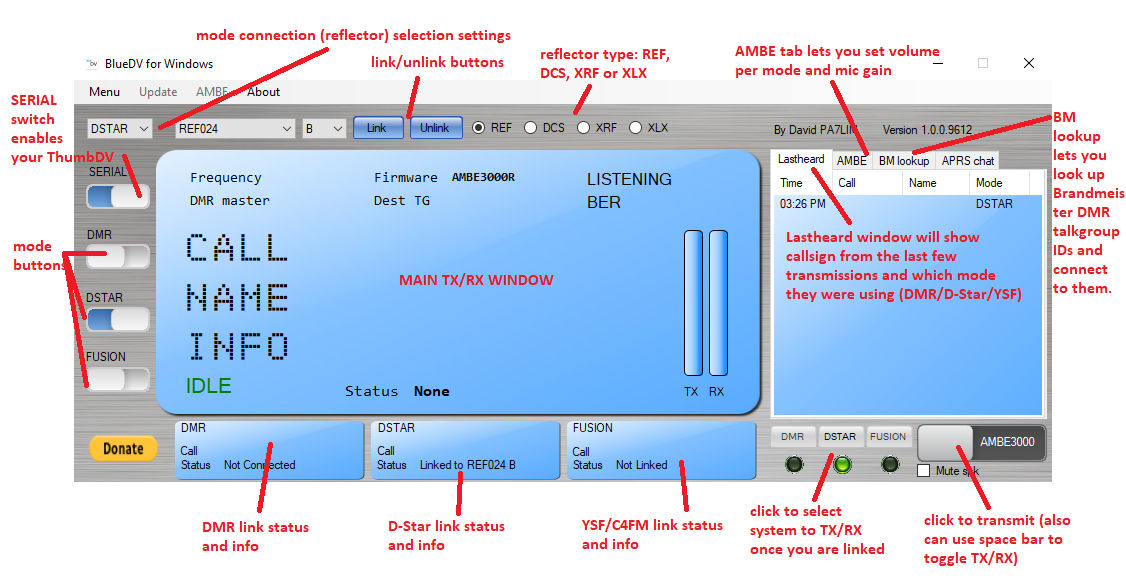
From here there is a TON of information out there about using BlueDV and connecting to various reflectors, talk groups, networks, and links.
Please reference these links for more information:
BlueDV user’s manual: http://radioham.mydns.jp/bluedv/BlueDVWindows.pdf
BlueDV software downloads (for multiple platforms): https://software.pa7lim.nl/
BlueDV software for Windows PCs: https://software.pa7lim.nl/BlueDV/BETA/Windows/
BlueDV archive of older versions of BlueDV for Windows: https://software.pa7lim.nl/BlueDV/BETA/Windows/archive/
Youtube: Tech Minds – “How to setup BlueDV with a ThumbDV or DV Mega AMBE3000 Dongle”
https://software.pa7lim.nl/BlueDV/BETA/Windows/archive/
YouTube Search “BlueDV”: https://www.youtube.com/results?search_query=BlueDV
Here is a PDF (printable copy) of this post:
