
The Ten-Tec 507 Patriot – 40m/20m QRP Open Source Transciever
 This past May during a trip to the Mecca of Amateur Radio in Dayton Ohio, I ordered a Ten-Tec 507 Patriot QRP rig at the 2015 Dayton Hamvention. I have been having a blast playing about with this small yet robust little rig!
I have always heard about the joys of QRP operation and I do love to operate portable. It’s always a lot of fun to take a small bit of HF kit, a dipole that I can throw up into a tree or something, and a battery to power everything.
I have decided to make a quick post to share my operations with the Ten-Tec 507.
Open Source meets Amateur Radio:
This particular rig is one of two now “open source” transceivers made by Ten-Tec. The first reiteration was the Ten-Tec 506 Rebel, a small 40m/20m CW transceiver. The Patriot continues from the heritage of the Rebel but this time gives you SSB phone as well as CW capabilities.
The thing about the Rebel and Patriot that makes them “open source” is really the fact that they both use a ChipKit 32 Uno microprocessor for DDS (direct digital synthesis) and is the overall “brains” of this radio. The ChipKit 32 Uno is a Ardunio compatible micro controller. The microprocessor code is easily changed to add/change features and capabilities. With all that being said, there is still much that you cannot change about the Rebel or Patriot. They are both locked into the bands that they have been designed to work on. This is because of the filters and other parts of the radio that are specifically designed to operate in those frequency areas. The Rebel is also always going to be a CW only rig because of a lack of other circuitry that would enable phone modes, however there are ways around that doing digital voice modes for example with a connected PC.
The main source for alternate forms of firmware worked on by the community is the Patriot Yahoo! group at https://groups.yahoo.com/neo/groups/TenTec507Patriot/info. This is a closed community group and you must register to join. I generally do not care for Yahoo groups, however the people on this group seem cooperative and always ready to help. A few months after I joined I decided to start my own group on Reddit. This way nobody had to register or sign in to gain access to the information and files created. My Reddit site is more of a brain dump style site so that anyone with information can post there. My Reddit site for the Patriot is at http://www.reddit.com/r/TenTecPatriots/.
A plain wrapper with lots of potential!
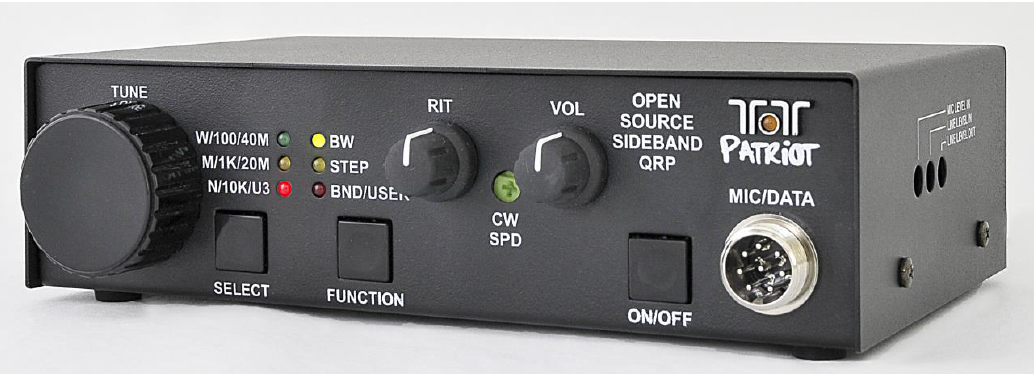
When you first purchase your Ten-Tec Patriot it is a seemingly basic radio with few options, but the potential for it to be much more is brewing from beneath it’s black aluminium chassis. The stock version has no display, which is a bit of a pain in the rear since the only way to know what frequency you are on is to press and hold the SELECT button to “announce” the frequency in CW using a tone over a connected headset or speaker. Additionally the TT logo has a LED that also flashes the CW announcement. SSB phone operation is automatic when the microphone is connected and is automatically set to LSB for 40m and USB for 20m. If you connect a key to the rear jack then CW can be uses on those bands as well. There are 3 select-able tuning steps for the patriot 100 kHz, 1 kHz and 10 kHz (for fast tuning) by default with the factory firmware. Additionally there are 3 bandwidth filters: W (wide ~2.5 kHz), M (medium ~1.5 kHz), N (narrow ~800 Hz) and a RIT control. There is code to support an optional 20×4 LCD display with the factory code.
Patriot Alliance Modification (PAM) ver 1.2:
The latest code to be floating about the Internet for the Patriot is the Patriot Alliance Modification ver 1.2 written by PA3ANG and modified by various other hams, or PAM 1.2 for short. PAM 1.2 introduces a great deal of features that were not available with the Ten-Tec stock firmware. The code is based on the original Ten-Tec factory code but also ads the following features:
IAMBIC (type A or B) keyer with keyer speed on front panel ‘CW SPD’ (A7).
Detection of Straight Keyer (middle ring 3.5mm stereo plug to ground).
Automatic mode change to CW (Key) or SSB (Ptt).
CW offset (parameter) during CW reception.
Frequency announce in CW when > .5 seconds SELECT.
Tune Carrier when > .5 FUNCTION.
CAT based on K3 protocol (tested with HRD).
Added support for OLED 128 x 32 pixel displays.
Furthermore they introduced a number of improvements:
DDS offset compensation (parameter).
Faster display routines (no updates when no changes).
Improved display layout and added S-meter and CW speed.
Easy selection of starting band and default frequencies.
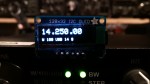
After I loaded this code, I absolutely loved the features that were added. I ordered a 128×32 pix OLED display from Adafruit to use as the display on this rig. After a bit of tinkering about and picking the brain of fellow ham and good friend Mike, AC9ID we together got the display working, and it looks great! It can be seen well even in bright sunlight without being washed out and has quite a bit of information on the display.
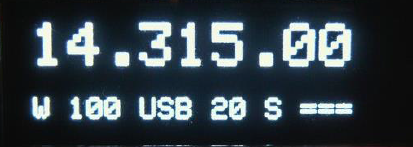
The display has the frequency shown at top. Then on the next line starting at the bottom right is the bandwidth selection (W/M/N), the tuning step indicator (10 Hz/100 Hz/1 kHz), the mode (USB/LSB/CW), the keyer speed for CW (mine is set at 14 wpm), and finally an S-meter.
I loved the feature of holding in the FUNCTION key to transmit a tone carrier for tuning. The Iambic keyer setting is nice so that you can use a paddle for CW or a straight key. It will detect the type based on the how many conductors the 3.5mm plug has that is inserted into the keyer jack.
CAT rig control can be used by connecting the ChipKit 32 UNO’s mini USB cable to your PC and using HRD or other software. Using the K3 rig control options, this seems to work very well, however there is no means of keying the transceiver that I know of using CAT control. This would be immensely helpful for running data modes.
Users of the Patriot can easily change firmware parameters to customize the radio in several ways:
- Change the starting band and frequency once the transceiver is powered on.
- Change the frequency limits (for US 40m change 40m band limit to 7.000 to 7.300 MHz).
- Change the display layout.
My experiences with the Ten-Tec 507 Patriot:
The receiver: I have found this small radio to be actually quite a good performer as far as QRP rigs go. The receiver performance seems to be fairly sensitive however there is a potential for overload of strong signals. I would suspect changes to the AGC circuit would help with the strong signal overloading. I found the bandwidth filters sufficient to reject adjacent channel interference to some degree, however they are fairly basic DSP filters and cannot perform miracles. The RIT control is very nice to tweak stations that are slightly off frequency and is intuitive to use. Although it is NOT the receiver in a KX3, it does perform surprisingly well overall with only the strong signal overload to be of minor issue.
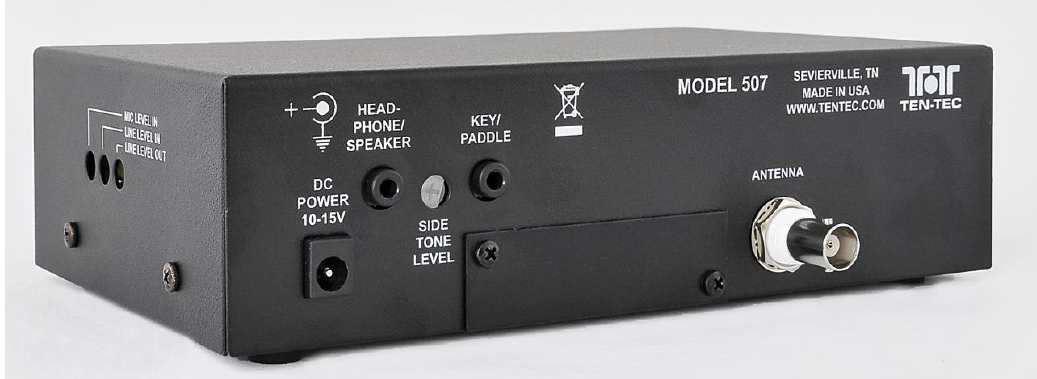
The Transmitter: Feeding this rig with 13.8 V with a power supply able to provide at least 5 Amps I have found that I can get just over 5 watts out of the transmitter into a dummy load on both 40m and 20m. The mic gain control was really pretty weak set from the factory, so I had to turn up the mic gain (MIC LEVEL IN) pot a bit in order to get adequate modulation to drive the transmitter. I am running the mic gain almost fully open, but I had a friend listen to me on another radio and the audio sounded good, not distorted using a Yaesu style 8-pin hand microphone. I may need to turn this down when using a headset such as my Heil Pro7 or other microphone or headset.
My Setup for QRP portable ops using the TT-507 Patriot:
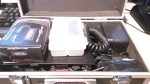
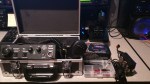
My setup for portable operations consists of the following equipment squeezed into 2 small go boxes:
- A 12 VDC 2 Amp AC adapter for running the QRP rig from 120 VAC mains.
- A 12 Volt 5 Ah AGM battery for running the rig off battery power. This should give me several hours of operation with minimal weight, however I am looking into a LiPO sytle battery for increase operation time and decreased weight.
- A small PowerWerx DC voltage/power meter to monitor battery condition
- Various power connectors using Anderson power poles for easy connection to other power sources.
- A small tackle box containing a USB to mini USB cable for connecting the rig to a PC, BNC to SO-239 RF adapter, and other various RF adapters such as a SO-239 female-female barrel adapter.
- 50 ft of 550 paracord to hang antennas
- A WindCamp multiband dipole antenna with 4:1 balun
- 50 ft of RG-8x coax cable
-

- The Patriot go-box.
-
- Everything fits nicely…

-
- All the goodies inside!
-
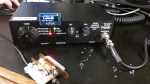
- The Patriot in use with small CW paddle and microphone.
-
- A close up of the OLED display.
The verdict:
At $299.00 US, the Ten-Tec 507 Patriot is a bit expensive for a two band QRP rig. I think a better price point would be $199 for it. The unit comes with the stock firmware, and paper manual and that’s it. No cables, no microphone, no key or paddle. Everything else is up to the operator to supply. However it is a solid little performer and is not a kit. You CAN operate this radio right out of the box if you supply the microphone and power, and antenna for it.
I have made several CW and SSB contacts using this little radio and have been absolutely ecstatic each time I do so. I guess there is a thrill of operating on 20m and chatting to a ham that is several states away with only 5 watts. I haven’t had this much fun with amateur radio since I first got my general license and was able to get on the HF bands! Going to a local park and setting up on a hill with a dipole in some trees is a lot of fun and it’s always good to be outdoors.
I did use my Patriot on field day and had an absolute blast, although it was a challenge to get through with QRP power.
Overall I would recommend this radio. QRP operation requires a great deal of patience, and so does tinkering and modifying the Patriot. The patriot isn’t something for the instant gratification crowd, so by that virtue it isn’t for everyone. There are other radios out there, but this one is a lot of fun if you like to tinker about with your radios and antennas.
You can find more information about the Ten-Tec 507 Patriot at Ten-Tec’s web site: http://www.rkrdesignsllc.com/products/transceivers-receivers/507-patriot-open-source-arduino-based-ssbcw-qrp-transceiver/
Do you own a Patriot, Rebel or other QRP rig? Let me know about your setup in the comments below! Also if you are a Rebel or Patriot owner or want to chat with others that have these rigs, please visit the Ten-Tec 506/507 Reddit subreddit at http://www.reddit.com/r/TenTecPatriots/
73! de Nick N9SJA
Flex Radio Systems SmartSDR 1.4.3 review
 With the highly anticipated release of SmartSDR 1.4 now available I wanted to do a review of this software package. Then the review was pushed back just a bit because of the recent upgrade to version 1.4.3 with even MORE features. I decided to wait and just do one comprehensive review on version 1.4.3. This is my review of the features from an average DX’ers point of view. Let’s go over the release notes of version 1.4.0 first for new features and changes:
SmartSDR version 1.4.0
The highly anticipated release of version 1.4.0 came exceptionally late as the original target release date was supposed to be October, 2014 according to Flex Radio Systems road map for SmartSDR releases. There were a bunch of cranky Flex signature series owners that were really clammering for a new release to hopefully address problems, and also to give them the new features that were promised. Let’s take a look at the features released in 1.4.0:

Remote button to enable remote use over LAN in SmartSDR GUI
LAN Remote: With this feature you can now operate your Flex radio from anywhere within your local network. For example, if your shack is downstairs in the basement, you can now use your laptop upstairs over a wireless network using a cheap headset plugged into your laptop.
This feature works very well indeed, even over wireless. I have found that you will need a descent enough Windows laptop however to have the best results. I tested the remote with an older Core2 Duo laptop with 4GB of ram, and there was some audio cut-outs and lag using that laptop with 802.11n wireless network in my home. Overall though, it still worked very well.
I had much better results using my Intel Core i7 laptop with 8GB of RAM on the same 802.11n wireless network with no noticeable audio drop outs. I really believe that the drop out were due to the poor disk IO on the Core2 Duo laptop (it only has a 5400 rpm HDD. The Core i7 has a Solid State Drive).
Since most likely you will be using a laptop headset for your audio, quality could vary quite a bit between different types. I used a Logitech USB headset. This was easy to setup as the default headset and I had excellent audio reports from various stations on the 40 and 20 meter bands. I would not recommend using the built-in speakers and microphone on the laptop for obvious reasons as the microphone will pickup keystrokes, wind noise, and other sources of noise close to your laptop. Also
Network quality is a huge factor for good performance of the remote feature. You really must use either a cabled network in your home or a higher speed 802.11n wireless network. The bandwidth requirements are simply going to be too high for older 802.11b or even 802.11a wireless networks. Make sure that your wireless network is setup well and working properly BEFORE attempting to use the LAN Remote features of SmartSDR 1.4.x. You will have far less headaches if you do so.

The network quality graph at the bottom right corner of the SmartSDR GUI.
Being in the computer business, I am very well versed in various computer networks, such as wireless and VPNs. And although it is unofficial and not directly supported by Flex Radio Systems yet, I have tested SmartSDR over a WAN link using various VPN methods. I would like to state now however that using SmartSDR over a WAN link is heavily dependent on having enough Internet bandwidth. Because most home consumers will have asynchronous Internet connections (asynchronous means having a different speed for downloads than uploads), you must know ahead of time what your Internet speed is for uploads as well as downloads. DSL Internet connections with only 1MB uploads will not work using SmartSDR using a VPN, so forget about even attempting it. You will need a connection with at least 5MB upload speeds, and even then you may experience trouble with broken TX audio.
I tested 3 different types of VPN connections using my Flex 6500 and my Internet connection. My ISP is Metronet and I have a 200MB download with a 25MB upload speed over fiber optic cable. It is by all accounts a better than average speed connection than most consumers seem to have at this time (well at least in my area). I tested 3 different types of VPN: PPTP VPN (using Windows Server 2012 host), OpenVPN (Using a Linux host), and Cisco Secure VPN (using a Cisco ASA 5520 firewall host). Going through the setup of VPNs is WAY beyond the scope of the review I am writing on this blog and there are differences for just about any network people use, so I won’t go over how I set it up here, but I had great results with all 3 types of VPNs. If you would like to try to access your Flex 6000 series from over the internet securely, VPN does work well if you have adequate Internet bandwidth at both sites.
One criticism that I would have is that when you choose remote, and “PC” as the microphone to redirect your mic audio, these settings seem to be remembered by the transceiver and not by the SmartSDR software on the individual machines. For example, when I am in my shack, I want to use my fancy Heil PR-781 mic and JBL Control 2P monitor speakers. But when I use the laptop upstairs I need to click the “REMOTE” button then select “PC” for the microphone input. But if I forget to turn off the “REMOTE” button before I exit SmartSDR, then when I go back into the shack it will still be selected. It would be nice if it would store the preference for these settings in the SmartSDR client software instead of in the transceiver just to make it more intuitive to use. Not a big criticism, but hey I gotta be thorough!
Overall Flex Radio Systems did a great job with the implementation of the LAN remote feature, and it even works using a VPN over the Internet (WAN) quite well if not supported by them at this time. Eventually they plan on releasing their own way of connecting over the Internet for WAN operations without the use of a VPN. But this will not be available until a future release.
FM Mode: Finally, Flex Radio Systems has included FM on the Flex 6500 for those that want to chat up their favorite 10m or 6m repeater, not to mention for Transverter use. I know that several Flex customers were really livid about this not being included from the get-go, and I really agree with them about that. The Flex 6000 series was advertised with having FM mode, but when people bought the rig, they got NO FM!
The implementation was very good, with narrow FM mode (NFM) that uses 2.5k deviation and standard FM (FM) that uses 5k deviation. There is also a Digital FM (DFM) mode that has no pre-emphasis applied which is nice for digital modes such as packet over FM.

SmartSDR using standard FM, CTCSS TX encode and offset set for the W9YB 6m repeater in my area. Too bad that repeater is offline due to a lightning strike 😦
The FM mode implementation has a CTCSS tone encoder, a nice squelch control, and adjustments for offsets. It would also be nice however if the included full CTCSS decode for RX as well, but alas we don’t have that. Boo… Note that the offset is set in MHz and not kHz so you will have to use 0.5 for a 500 kHz offset. Not a big deal, but interesting to note.
I did try to access a 6m repeater using my Flex 6500, but unfortunately I couldn’t access any repeaters in my area on 6m or 10m. They all seemed to be not functional in my area. I know that the 6m repeater that my club runs is currently offline due to a horrible lightning strike, but has been repaired and as soon as it is placed back in service I can test it out. I have used the Flex FM mode on 10m simplex with another ham here in town where I live just to try it and it worked well.
Memories Feature: This is a great feature so that you can store your favorite frequencies and modes. It is quite detailed so that you can name the memories, and even crate memory groups to group them all together. I typically do not use memories, but I put a few in to try it out and was quite happy with the implementation. I kind of wish however that there could be a small right side dock-able window with memories instead of a new pop-up window. It would just be nice to streamline the interface a bit better.
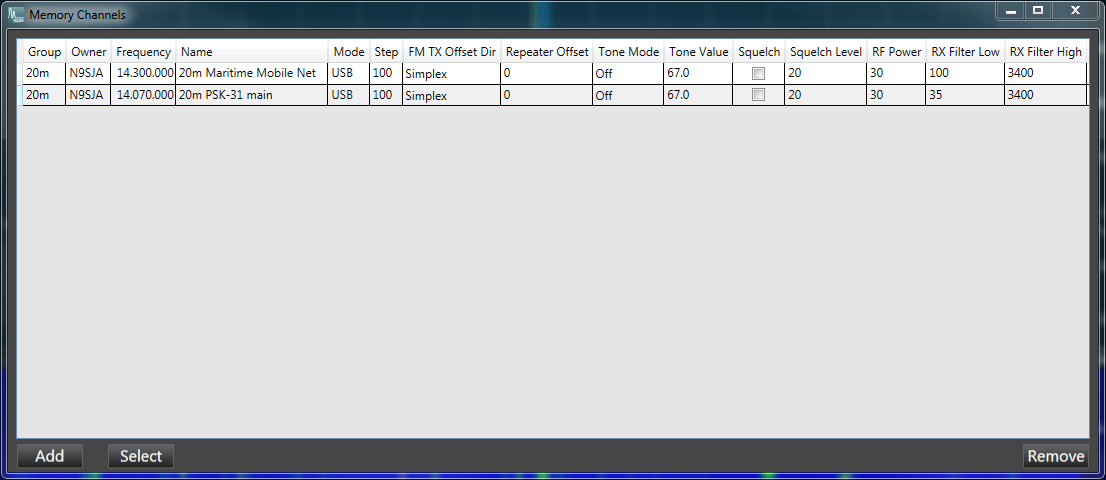
The SmartSDR Memory Menu. Note CTCSS column for repeater PL tones.
I really like how they also added a column to set TX power, and also you can put a custom name description in. This has been done very well.
CW Enhancements: If you are a CW guy (or gal) you will love the new QSK improvements for better CW break-in! This was somewhat broken in previous versions of SmartSDR but now has been fixed quite well. No more popping sounds between CW characters. Thumbs up!
SmartSDR Software Client Optimizations: Flex Radio Systems really retooled SmartSDR so that it uses a fraction of the PC power it once used. I did notice a quite significant decrease in CPU (computer processor) utilization and WAY lower RAM (memory) usage! The spectrum display is much smoother and more responsive and the software itself is way more stable. I never had too much of an issue with stability with SmartSDR in previous versions, but I know that several users had a lot of SmartSDR crashes.
Some users experience crashes however because of the configuration of their individual computer systems. I don’t believe I have ever had a proper crash going back to SmartSDR v 1.2, but I did notice it was a bit heavy on system resources.
Overall another welcome change, thumbs way up for this! My PC fans thank you…
DAX Enhancements: Ok, this has got to be the best single improvement to SmartSDR! In prior SmartSDR versions DAX has simply just been broken. The drivers were awful (especially the 64-bit drivers), and users reported having to re-install DAX every so often just to get it to work. I too was one of these folks, and have been really angry about using DAX. As a matter of fact I have avoided using digi modes in the past using my 6500 because DAX was so problematic.
Well, I am happy to report that the drivers seem stable now, and you no longer have to continually re-install the DAX drivers to get DAX to pass audio! YEA FLEX!!!!!
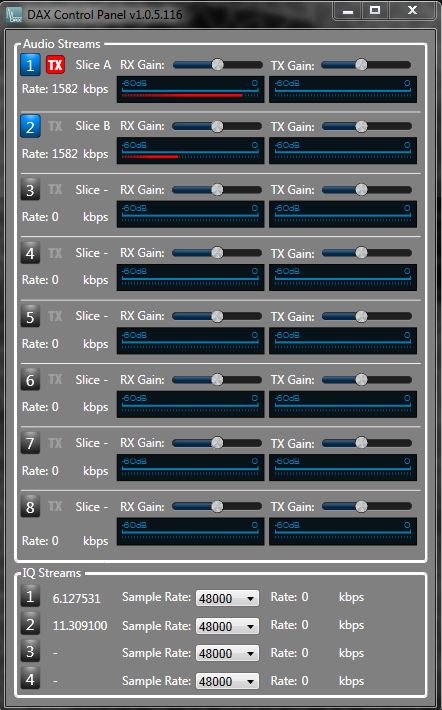
In addition to the stability fix with DAX, there have been changes to the DAX control pannel to provide you with more information so that you can understand which DAX channel is being used on which slice and even on a particular computer. Since DAX can be used on multiple computers now with the remote feature this is handy information to have!

DAX ver 1.4.3 control panel.
Note the slice is displayed next to the DAX channel number, and for DAX IQ streams it displays the frequency of the slice that you are using.
DAX IQ streams are totally awesome for use in other SDR applications, keeping everything in the digital domain. For example you may wish to use another SDR applications to record a chunk of the spectrum (on a Flex 6300 that is 7 MHz of bandwidth, on a Flex 6500 and 6700 that’s 14 MHz of bandwidth!) and then play it back later for analysis. For SDR noobs, this is not recording just audio, this is recording the radio spectrum of several transmitting stations and saving it and or playing it back later! A truly awesome feature of modern SDR technology! Tell that to the guys who tell you that they don’t like SDR radio because their are no knobs. SDRs can just do way more. Period. And it is the future of all things radio!
Finally DAX works like it should! Thank you, Thank you, Thank you, FLEX!
SmartSDR CAT Improvements: Can’t say too much about this really. The folks at Flex Radio Systems added some more CAT commands to the signature series of radios so that 3rd party applications can access more of the the 6000 series hardware features. These include, but are not limited to, several significant fixes for interfacing with slice B and support for the CWU/CWL tuning modes. In addition to the CAT protocol enhancements, improved diagnostic capabilities and virtual COM port driver modifications have been incorporated to improve SmartSDR CAT usage with CAT enabled programs. Good deal.
FlexControl Improvements: There have been improvements to the COM port driver so that the FlexControl is better identified by the computer when you plug it into the USB port. Some Flex users out there have had a lot of problems where when they turned on their PC the knob was not recognized properly and didn’t work, and they had to fiddle with port (COM) settings to get the FlexControl knob to work. I personally never had this issue, and the FlexControl knob has always worked just fine for me, so I am not sure if this has been totally resolved or not.
EQ Modifications: The 8-band graphical EQ has been modified for the 2 kHz, 4 kHz, and 6 kHz frequencies to increase bandwidth around the center point frequency to ensure a smoother transition between these EQ bands. This is nice so their isn’t such an abrupt change now between adjustments of the 2 kHz, 4 kHz, and 6 kHz sliders. Not that this was a huge problem for most folks, but the audio quality of the Flex is one of its most redeeming qualities. We should all want it to be the best it can be.
TX Profiles: Flex added some default transmit (TX) profiles for the RadioSport model of headsets by Arlan. A nice addition I would say.
Expanded X/RIT frequency range: The X/RIT frequency offset range has been increased to 99.999 kHz to accommodate very wide splits when operating digital modes. Awesome.
Now on to the version 1.4.3 specific additions!
Binaural Receive Audio Mode: SmartSDR for Windows now has the capability to receive audio in Binaural mode. Enabling this option will produce a virtual 3D spatial depth of field listening sensation by shifting the phase of the recovered audio relative to one channel of the speakers or headphone channel. The effect may enhance weak signal reception. If any of you out there have been PowerSDR users with the Legacy Flex 5000A, 3000, or 1500 then you will be familiar with Binaural audio mode. This is a really great feature, however Flex chose to put the button that enables in in the “Radio Setup” menu under the “Receive” tab. This is really lousy since you have to access two menus to get to the darn thing. They really need to change this to a button in the audio menu on the slice where it is intuitive for users to find and use. After just installing 1.4.3 I had a hell of a time trying to find out how to enable the Binaural mode since the button was not in the location in the SmartSDR GUI where I thought it should logically be.

The Radio Setup – Receive menu. A poor place to put the button to enable Binaural mode. This should be in the GUI slice under where the volume controls are!
Transmit Monitor for DIGITAL Modes: You now have the ability to monitor the transmitted audio while operating in DIGU and DIGL modes. This is especially useful for 3rd party digital software setup and troubleshooting. This is great because it allows you to hear the sound of your transmission to better identify over driven audio, or perhaps problems with the transmitted signal when using 3rd party sound card digital mode applications.
Actual Transmitted Audio Record and Playback: The slice RECORD function now records actual audio being transmitted over the air. This includes transmit audio bandwidth, equalization, and other audio effects. Once the audio is recorded, the PLAYBACK function will transmit a faithful reproduction of the recorded signal without adding any additional processing.
Additional Function Button Options for FlexControl: Flex finally let folks with the good ‘ol FlexControl knob to be able to use one of the programmable buttons as a transmit switch. This switch does not however operate in a momentary fashion. Meaning that you push it once to transmit and then you need to push it again to stop transmitting (toggle function). It would be really nice to allow folks the option between the on/off (toggle) style of button versus the push and hold ability. But I am guess that pushing the button simply is just sending a CAT command stored as a macro to the radio, so it was simple for them to implement. It’s OK, but I would still rather use my Heil hand-switch, or foot-switch instead of clicking that button. I’m just sayin’. The other button addition is the CHANGE ACTIVE SLICE function allows you to step through all of the enabled slices, making them “ACTIVE” for tuning.
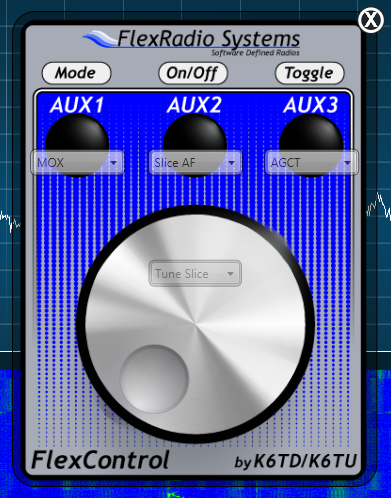
My FlexControl configuration. Note the MOX button on the upper left to use as a toggle style (push on – push off) switch to transmit.
Well that about covers all the features. Now for a list of the GOTCHAS that I experienced.
After installing SmartSDR ver 1.4.3 I had problems getting my amplifier working. At first I suspected a problem with the amp, but after troubleshooting a bit more I noticed that the TX relay was not engaging. This was because there is now a button to enable external TX through the RCA jack on the rear of the transceiver. Sneaky!
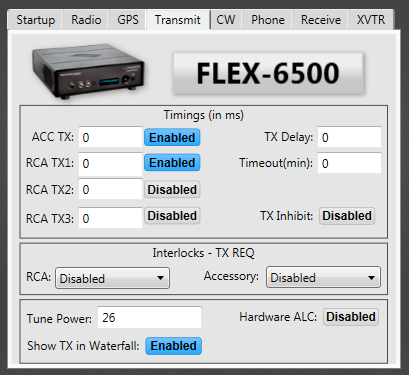
SmartSDR ver 1.4.3 Radio Setup menu – TX menu tab. There is the button that enables external TX RCA jack!
So, if you have an amplifier and it doesn’t seem to want to transmit anymore, check to make sure RCA TX1 is ENABLED. Perhaps this button has been here in other versions, but was enabled by default or something, I am not sure without researching it, but I thought that was quite interesting that my settings were not passed on from one version of SmartSDR to another.
That actually seems to be a big problem for most users that when they upgrade SmartSDR, or upgrade computers and re-install the software that various settings are not retained. I did backup my global profile and transmit profiles, but some settings are obviously still not part of either those two profiles yet.
The bottom line: Overall the version 1.4.0 and version 1.4.3 SmartSDR updates are really great! Until DAX was fixed in version 1.4.0 I would not have recommended a Flex 6000 series to hams that were big on data modes. This was really because DAX was so sketchy. Also I should state that there have been many other improvements made to SmartSDR other than what I covered here. I just stuck to the main bigger picture type features and problem fixes. For more information please see the release notes for the the version of SmartSDR that you wish to update to. The guys at Flex Radio Systems do a great job with documentation.
As a Flex 5000A user previously, I do remember versions of PowerSDR that were a bit wonky and features did not work well. The thing is with Flex SDRs are that the software is a fluid, living entity of its own that is always evolving. If you have not yet taken the SDR plunge, that is a major consideration from changing from a traditional radio to an SDR like the Flex. But the power that SDR technology delivers cannot be denied. SDR radios are far more flexible, configurable, and powerful than a comparable traditional radio in a desktop box with knobs on the front.
I hope that you have found this review useful. It took a lot of time for me to test various features of these software releases, but I had a blast doing it. A new release of SmartSDR is almost like getting a new radio. As soon as Flex announces a new software release, I always get excited to see what features have been added and what bugs have been resolved. It adds to the enjoyment of owning an SDR transceiver.
If you have any comments, or questions submit them in the comments section below!
73 de Nick N9SJA
Artemis: Radio Signals Recognition Manual
![]() For those of you that are interested in all the strange and mysterious buzzing, beeps, and shrill tones of shortwave (as well as the VHF/UHF bands) identifying these signals can be difficult. However with the advent of SDR and more and more people dedicated to the identification and decoding of these types of signals it has recently got quite a bit easier.
For those of you that are interested in all the strange and mysterious buzzing, beeps, and shrill tones of shortwave (as well as the VHF/UHF bands) identifying these signals can be difficult. However with the advent of SDR and more and more people dedicated to the identification and decoding of these types of signals it has recently got quite a bit easier.
Enter Artemis and Sigidwiki.com. These resources allow you to easier identify that strange signal that you are receiving on your shortwave receiver and even have links to software to help you decode it.
I have been a user of sigidwiki.com for quite some time now and love how there is a listing of these signals with a waterfall image and a sound file. Artemis takes this a step further by being an installed Windows application so that you can download the sigidwiki database and then keep it on your local computer. It has a dedicated interface and is quite a nice little program.
Artemis is software created by Dalla Tiezza Marco in cooporation with RTL-SDR.com forum.
When you open the software for the first time you will need to update the database files and then load them:

This is a really nice feature as it lets you know if the software and the database files are up to date. Don’t have internet and you are going to be on the go? Just update your laptop before you go and then listen away and you can identify those stations.
The interface has many different modes and explains where most likey there are found, the bandwidth of the type of signal being used, a spectrum waterfall photo, as well as a sound file that will play a sample sound.

Some of these signals listed are quite exotic and interesting. A link to Sigidwiki.com will take you to a web page (Wiki) where you can find out even more informaiton about a given signal.


I found this software and the wiki to be excellent and always have a lot of fun checking out these different signals on shortwave in particular.
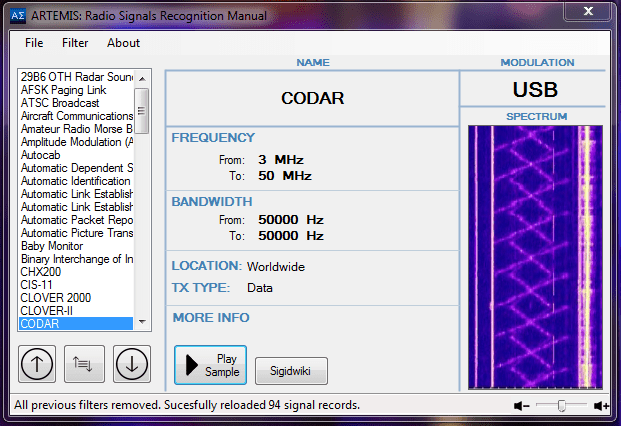
This signal is quite interesting: CODAR (Coastal Ocean Dynamics Application Radar) and has been used since the early 1970s to measure and map near-surface ocean currents in coastal waters.
If you ever seem to hear something strange on your receiver you can even capture the audio and the spectrum and then upload it to sigidwiki.com and add a new signal to the list. New signals are being added all the time and it is interesting to see what changes from month to month.
You can download Project Artemis (currently version 1.0 Beta) from http://markslab.tk/project-artemis/ and you can check out sigidwiki.com at http://www.sigidwiki.com/wiki/Signal_Identification_Guide
I can’t wait to see what also becomes of project Artemis. I would love for them to add software decoders built in to the interface or perhaps at least links to the decoders in Artemis.
All in all, it is a very cool little program and I look forward to further development.
73! de Nick N9SJA
1A0C DXpedition – Order of Malta
 The Order of Malta’s Italian Relief Corps (CISOM) Amateur Radio Station
Starting on Dec 28th and running through January 6, 2015 check the bands for this awesome contact! 1A0C is an Italian DXpedition to Malta to provide humanitarian relief, medical assistance and emergency support for the victims of natural disasters in the Mediterranean.
This group also provides communication via Amateur Radio in the event of an emergency or disaster. Currently the group is on the air making DX contacts and this is a good one to add to your log. You can find them working all Amateur bands, but 10m USB was the best for me.
The QSL card is really nice and also the monies that go to them to process the card are also used for their operations as a charitable donation.
You can read more about 1A0C at www.1a0c.com.
73! de Nick N9SJA
VOICE ACROSS THE OCEAN
I got an enjoyable surprise in my email last weekend. Gerald PA3GEG from the Netherlands sent me an mp3 file of our recent DX contact. Conditions have been pretty favorable for 10 and 12m lately and I’ve been trying to take advantage. I actually worked Gerald about a week before on 12m USB. It was neat to hear my own audio from so far away. I’ve since added a couple TX profiles for my Flex-5000 (one for DX and another for rag chew) so hopefully I’ll sound even better now. He sent me a couple links so I went ahead and signed his guest book and checked out his page on QRZ.com. There’s some good stuff there worth taking a look. You can see his page here. It was an enjoyable contact for both of us. Thanks Gerald!
New list of Tipp. Co area repeaters and map
Today I decided to create a new listing of repeaters for the Tippecanoe County, Indiana area.
You can download the PDF here and also check out the Google Map listing: https://www.google.com/maps/d/edit?mid=z8Msk_9VcUuE.ksnDEBNrZVNw
Flex Radio Systems – Flex 6500
 Recently, I purchased a brand new Flex Radio Systems Flex 6500. I have been drooling at the prospect of upgrading to the new Flex 6500 for some time now and have had a blast using the new SDR.
After a few months of owning and operating the Flex 6500 I thought I would create a review blog post, highlighting both the good and bad as I see it in my opinion. I will be going over the Flex 6500 specifically, but where applicable I will differentiate between the other Flex models. In reference to SmartSDR, I am using version 1.3 of SmartSDR software/firmware, so my perspective will be based off of that revision.
The SmartSDR GUI in general:
SmartSDR is a really sexy streamlined interface compared to PowerSDR, but it just doesn’t work quite as well as PowerSDR in some scenarios. For example, to change frequency, when you were to click on the frequency in PowerSDR, you could click and highlight a single digit, in SmartSDR when you click, it highlights the whole thing. And you must know to use the decimal as the display is in MHz and if you type in 7200, it will think that you mean.720 and not what you really want 7.200.000. Tuning with the mouse scroll wheel is adjustable but by default is set to 100KHz, which for most people is perfectly okay.
I would love the GUI to use docked window modules so that I could move them to different monitors. Although you can stretch out the SmartSDR program and use it over several monitors, you really cannot take things out of the main program window and move them about which is disappointing. This would be an improvement in future releases that would be really fantastic so that you could move bits around other software, such as a logging program or something. It’s pretty clear that the developers really like this to be full screen so that the panadapter is predominantly displayed.
The graphics have been drastically revamped from PowerSDR, and it shows. The large panadapter, and waterfall are much larger and more useful than what was included in PowerSDR. The fonts used are very nice and easily read on even the smallest on-screen buttons.
There are some menus that are utilized as opposed to PowerSDR where there really seemed to be a button for just about everything. In SmartSDR you click on the various buttons and other menu windows open to reveal the functions. Overall this cleans up the interface greatly, but some items you have to hunt for a bit to find.
The panadapter and waterfall combination is just gorgeous! Using a good PC with a good video card the panadapter is smooth and the detail that you get from signals is amazing. Here…see what I mean?

It’s porn for Hams…the sexy SmartSDR interface of the Flex 6000 series (click on image for full-size image)
Ok, now for the most exciting of the features of the Flex 6000 series…Slice Receivers!
Flex has implemented the ability to have multiple slice receivers. These “slices” are separate receivers that are shown on the same GUI screen in SmartSDR. Slice receivers are fantastic for you to really get a view of what is happening on different radio bands, as well as to work split or cross band. The Flex 6500 can utilize 4 slices at once (the new 6300 can use 2 slices, and the big boy Flex 6700 can use 8 slices!). The slices can have both the panadapter and waterfall and can be scaled so that more of the spectrum is displayed (7 MHz displayed bandwidth for the 6300 and 14 MHz bandwidth for the 6500 and 6700). Here is a shot of 4 slices on the Flex 6500:

4 simultaneous receivers running on the Flex 6500 (click on image for full -size image)
Using slice receivers you can keep track of activity on various bands. This is an awesome feature to use in a contest to find activity on various bands.
DAX and SmartCAT:
With PowerSDR you needed to load various 3rd party tools on your PC to really get the most out of the previous generation of Flex SDR transceivers. Tools like Virtual Serial Port manager (VSP manager), Virtual Audio Cable (VAC), and DDUtil were are utilities that were used to interface of PowerSDR to various 3rd party programs such as Ham Radio Deluxe, FL-Digi, etc. Now all this is built in with various degrees of success and failure.
Digital Audio eXchange (DAX) is what is now integrated into SmartSDR to replace the venerable Virtual Audio Cable (VAC) software used with PowerSDR and previous generations of Flex radios. DAX is a somewhat clumsy alternative and in a lot of cases, I just have problems trying to get it to work properly and do what I want it to do. The interface is nice, but I just can’t always seem to get the audio where I want it without really digging down into the bowels of the Windows 7 sound settings in the control panel. For example, I tried output the audio of a second receiver slice to Ham Radio Deluxe Log. In the logging software there is a digital recorder that I like to use to record and catalog various transmissions. I struggled with this for quite a bit of time before just giving up on it (I haven’t had the patients to go back to it again yet ;). For whatever reason I can only seem to get audio on the 1st DAX channel. I think this has something to do with Windows settings in relation to DAX, but when I used VAC, I didn’t have any issues or problems trying to get the audio from PowerSDR to various other software applications. So DAX in my book should be looked at to be more intuitive (however I don’t know how possible this is given Microsoft’s settings for Windows 7 audio). There is also virtual audio ports for IQ stream data so that this information could be output to other software which I thought was really awesome (however I have not experimented with it yet).
Overall I think they did a great job of integrating DAX and cheers to them for doing this saving users from installing other 3rd party software.
SmartSDR DAX Control Panel
SmartCat is really the replacement for Virtual Serial Port (VSP) manager. It works, but the interface is a bit confusing. One issue that I have with this is that there is no descriptors for what serial ports are in use by the computer. You have to bounce back and forth between the Windows control panel to see what the hardware is. Now, if your like me, you have a bunch of stuff connected to your PC using serial ports. I have a USB to serial adapter that connects to the serial port of my amplifier, a USB port for my Wave Node station monitor (uses an FTDI USB to serial chipset), USB to serial adapters used to program various HTs, etc. SmartCat is a simple interface that is not as nice as VSP manager. It is basic, does the job, but just not that well.

SmartSDR CAT interface window (click on image for full-size image)
The Hardware of the Flex 6500
First lets talk about the case, then go inside…
The new case design is sleek and easier to deal with than the Flex 5000A. Rack mounting handles lets you even easily put the 6000 series Flex SDRs in a rack for space saving, and ergonomics. The large VFD display currently only shows minor bits of information, but I can see this VFD display getting extra capabilities in future firmware releases. Currently mine just displays “FLEX-6500” on it. The black paint is nice with beautiful silver silk screened lettering for the logo and descriptors for front panel jacks. I really wish that they would have moved the KEY jack, used for a morse key or paddle, to the rear of the radio (or at least duplicated it on the back). When this thing is rack-mounted you don’t want to plug wires into the front of it. It just looks too damn good to do that to it. Connecting a bunch of wires to the front of the Flex 6500 would be akin to drawing a mustache on a supermodel.

On the back the Flex 6500 actually uses Anderson Powerpole plugs for the DC connection to the Flex 6500. I love that they did this and it’s not some esoteric, hard-to-find, have to order Molex connector and wiring harness. All the connectors are easily identified and are very accessible. I really love the balanced microphone input (XLR+TRS combo connector) on the rear. I use a Heil PR-781 which works really well with Flex SDRs.
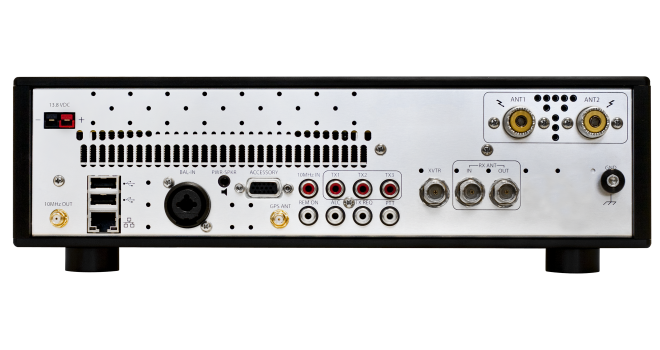
With 2 USB 2.0 connectors I do have to wonder about the DB-9 “accessory” connector. This same connector was used on the Flex 5000A, and it was called “Flexwire” accessory connector. However I don’t know of any “accessories” that Flex has ever made to utilize this connector. I guess it’s good to have it on there although the likelihood of ever using it is fairly dubious.
With the latest firmware (version 1.3 released 8/2014 as of time of this article) there is now transverter support.
The FlexControl knob was first incarnated to the last generation of Flex SDRs. Flex control is basically a USB connected external large knob and a few buttons. It works very well with both PowerSDR on the previous Flex SDRs as well as SmartSDR and the new 6000 series SDRs. The best part about the Flex Control knob is that it retains window focus, so that if you click on another window with the mouse to log a contact say in a logging application, you can still tune the receiver using the FlexControl knob. The buttons on the FlexControl knob are programmable to an extent and they can be used to change what the main knob does, for example, volume control, AGC-T control, frequency tuning control etc. The knob itself is a 4th button if you press vertically down on the knob. Tuning is smooth and the knob is balanced well for tuning just like on a standard more traditional transceiver.
 The FlexControl external tuning and adjustment control
The Flex 6500 internal hardware:
The Flex 6500 SDR transceiver utilizes FPGA (Field Programmable Grid Array) hardware to directly generate signals digitally at the RF frequency. This approach is largely flexible using the massively powerful Xilinx FPGAs deployed in Flex 6000 series SDRs. Capabilities can be further enhanced with simple firmware updates and updates to the SmartSDR application that interfaces with the Flex 6000 series. FPGAs have been a game changer in most electronics for the past 5-8 years or so allowing highly flexible hardware designs as well as increased performance, decreased power consumption, and smaller size.
The FPGA is a type of intergrated circuit (chip) that can be customized by software (firmware) upgrades into a specific hardware ASIC (Application Specific Intergrated Circuit). Before the advent of FPGAs, ASICs were designed and then created for a specific hardware task such as a logic IC, or IO control IC, etc. FPGAs offer flexibility as they can be reprogrammed in the field to be a CPU (central processing unit – processor), an ADC (analog to digital converter), or other hardware that used used to be a bunch of separate ICs. In more powerful FPGAs they can be several ASICs and combine roles, such of that of a CPU and and ADC with on board logic. All in one chip!

Flex 6500 & 6700 Hardware Architecture (www.radiocronache.com)
The Flex 6000 series bristles with this advanced technology internally.
The Receiver:
The Flex 6000 series incorporates Direct Digital-Conversion (DDC) into the transceiver so that the received signal is amplified and filtered digitally at the basesband rather than at some high intermediate frequency. This means lower current drain in the amplifier and active filters, and a simpler task of image rejection. Selectivity of the receiver is fantastic with an Image rejection of ≥ 100 dB. In most commercial ham gear even with IF DSP technology 60-80 dB is the norm.
The receiver performance of a Flex 6000 series is spectacular. Just as good as the Flex 5000A or even better. The 0.5 ppm TCXO on the 6300 and 6500, and the .02 ppm OCXO on the 6700 provide rock solid stability. However you can also attach a GPS TXCO for GPS locked clock and stability. This would make the device suitable for work in radio astronomy or other high precision sciences that need to utilize a near drift free RF receiver.
The Transmitter:
The transmitted signal is clean, with little to no harmonic distortion and the PA gives you 100 full watts out. I found testing into a dummy load that the performance of the PA was pretty much spot on:
160m – 102 watts
80m – 102 watts
60m – 100 watts
40m – 104 watts
30m – 100 watts
20m – 104 watts
15m – 104 watts
17m – 104 watts
12m – 100 watts
10m – 100 watts
I used a Palstar DL2K dummy load through a WaveNode WN-2 station monitor using RG-213 type coax from the 6500 to the DL2K. For the 6m measurement I could not use the Palstar DL2K, so I did not record a measurement for 6m.
The ATU:
The built-in antenna tuning unit (ATU) works quite well, being able to compensate for SWR mismatches that are 10:1 or higher. The specification for the ATU is that it can match 16.7 Ohms to 150 Ohms across all HF amateur bands and 6m (160m – 6m). I found the tuner in the 6500 to be excellent. This is amazing since most radios with built-in tuners struggle to match antennas with mismatches 5:1 or less.
The best features of the Flex 6000 series SDR Transceivers:
Here is a quick list of what I think are some of the best features of the Flex 6000 series:
- Tracking Notch Filter (TNF) – The tracking notch filter is a programmable notch filter that you can place on the panadapter and it can be stored in memory to remove interference on known frequencies.
- AGC-T – This works like a traditional RF gain, but even better in Flex SDRs. Removes the noise, but keeps the signal so that you can see what is going on in the bandwidth you are viewing.
- Slice Recievers – Slice Receivers allow you to have 2 simultaneous receivers for the 6300, 4 simultaneous receivers for the 6500, and 8 simultaneous receivers for the 6700.
- The Panadapter and Waterfall – High resolution smooth panadapter display and waterfall.
- Excellent Receiver Performance – DDC with an image rejection of ≥ 100 dB, and outstanding sensitivity.
- Nice integration in the digital domain with a PC and other PC applications – Really nice for digital modes as well as analog voice, logging, and rig control.
- The new GUI is super nice looking – PowerSDR looks quite a bit more archaic than the newer SmartSDR counterpart.
- Excellent Transmit Audio manipulation – Just like with PowerSDR, you can control your transmit audio through a 10 band EQ. Downward Expander, presets for audio (DX settings) are also super awesome. Excellent compression. And now with version 1.3 transmit microphone settings profiles!
- HUGE panadapter bandwidth – You can see 7 Mhz bandwidth at a time (YES 7 MHz!) with the Flex 6300, and 14 MHz (YES, I typed it correctly 14 MHz!) bandwidth with the Flex 6500 and Flex 6700. With this you can really see what is going on across a huge swath of the radio spectrum. Very cool!!!
- Scrollback history in the waterfall – You can scroll back and see different transmissions in the waterfall for a historical perspective of what was going on within the bandwidth you were looking at. This scroll back buffer can go back and show a full 24 hrs worth of activity!
- Synchronious AM (SAM) – This was added with version 1.2 of the firmware. PowerSDR has it, and now SmartSDR does too. Makes it very nice to listen to shortwave and ham AM signals with out the annoying fading. It also uses the carrier to tune the AM signal automatically so that when you are in a group with everyone off of the correct frequency by a few Hz, synchronous AM will automatically tune in each signal as they transmit.
- Quick Record and Playback – A awesome feature that lets you record audio and play it back. Quick record records both sides of the transmission and then you can play it back and transmit the audio. This is helpful when you perhaps when you have a ham buddy that wants to hear the quality of his audio transmission. He could transmit to you and then you can play it back for him to hear.
The not-so-good:
Here is a quick list of what I think is not so good with the Flex 6000 series:
- No FM mode (yet) – If you want to operate 6m or 10m FM repeaters, you cannot yet with the Flex 6000 series. However FM mode will be included in a future software/firmware update.
- The SmartSDR GUI is a bit confusing coming from PowerSDR – You have to hunt and find different options in little menus. Sometimes I find that this is cumbersome for certain features.
- Using DAX and Windows 7 sound controls – I had a helluva time getting DAX setup and sending audio properly at times. You need to be patient with this, but I think more of the issue has to do with Windows 7 than DAX. There is a guide that helps specifically with this feature. I will link it down below at the bottom of this post.
- Direct frequency entry is different from PowerSDR – Kind of cumbersome to use, but it works. It would be nice if the interface just knew that when I type 14200000 without decimals, that it would know that I really wanted 14.200.000 and also when I click on the digits of the frequency I could change that individual digit like I could do with PowerSDR.
- Problems with QSK when sending CW – I am not a big CW op, but I have heard that there were some problems with the radio giving a “pop” sound when sending CW with full break-in QSK. I do believe that this problem was address though with version 1.2. If you are a big CW op, then you should look into this issue before committing to a Flex SDR. Flex may have addressed this and fixed this issue.
- Dock-able GUI modules and separation from the main GUI window – I outlined this above, but I would really like to have separate modules on separate monitors. That would be really awesome! For example, the panafall (panadapter and waterfall) on monitor 1, RF power and SWR measurement on monitor 2, etc. It would be awesome to reconfigure the GUI some.
- CWX – A new feature with version 1.3 that will let you send CW with a keyboard, but it won’t decode CW for you. It would be nice if there was a CW decode feature with it, but there are plenty of applications that will do this for you and you can send using CWX.
- Paying for major software update releases – For the Flex 6000 series when you buy one, it ships with the latest software/firmware at the time. Each major version of SmartSDR comes with free updates and maintenance releases for the life of that release. However for major releases (version 1.x to version 2.x) they will charge a $199 fee. This simply sucks. Your radio will not stop working or anything like that, but to get the extra features you have to shell out more money. Hopefully they see how stupid this is and they don’t stay with this model. Hey Flex…we like your products, we even buy your newest hardware and upgrade, don’t charge us for the software releases.
- Only OS that is supported is Microsoft Windows OSes – No Linix yet, no Mac OSX yet as well.
Summary:
Well that is my 2 cents worth for this Flex 6000 series review. Over all I would recommend a Flex to anyone that was interesting in owning an SDR. A Flex SDR really takes your radio operating experience to the next level in technology.
Links:
Here are some links to various files and information on the Flex 6000 signature series SDRs:
Flex Radio Systems – Main page for the 6000 series SDRs – http://www.flexradio.com/amateur-products/flex-6000-signature-series/
Flex Radio Systems – SmartSDR Release Roadmap – https://k9xn.org/wp-content/uploads/2014/08/smartsdr_roadmap.pdf
Flex Radio Systems – SmartSDR v.1.3 release notes – http://www.flexradio.com/downloads/smartsdr_v1-3-0_release_notes-pdf/
Flex Radio Systems – SmartSDR v.1.3 Windows software users guide – http://www.flexradio.com/downloads/smartsdr-software-users-guide-pdf/
Flex Radio Systems – Community Support portal – https://community.flexradio.com/flexradio/categories
Flex Radio Systems – YouTube Channel (lots of good videos here!) – https://www.youtube.com/user/FlexRadioSystems
I hope you enjoyed this post, and as always if you have anything to add, put it in the comments below…
73! and Flex ON!!!! Nick N9SJA
TX Factor – Episode 1

There is a new Amateur Radio webcast show on the Internet and it is really awesome. “TX Factor” is a new webcast featuring Bob McCreadie G0FGX, Nick Bennett 2E0FGQ and Mike Marsh G1IAR from the United Kingdom.
Although the show is aimed at a UK ham audience, I found the show to be very well produced and professionally done with excellent and interesting content. Although I love to watch the guys from Ham Nation, this is not your 3 – guys on Skype chatting about Ham radio type production. Each segment looks professionally produced. From the camera work, to the on-screen graphics and segways from topic to topic it is extremely well done. You would think that you were watching a professional news program on television watching this.
In episode 1, the first segment of the show takes you to The Marconi Centre at Poldhu in Cornwall, England where the first transatlantic radio transmission was sent. Guglielmo Marconi heard this transmission from Cornwall to Signal Hill in St John’s, Newfoundland on December 12th, 1901. On the site now resides the Poldhu Amateur Radio Club.
The second segment takes you to a hike up a mountain in Shropshire to show you the activation of a Summits On The Air (SOTA) station!
In the last segment Mike Marsh G1IAR takes you to the Norman Lockyer Observation Radio Group in east Devon to show you their 2m repeater. (**Slight Spoiler Alert***I love the cavities made from beer kegs!)
The show was just so well done and interesting I think hams the world over will enjoy watching it. If I were to judge the future of the program by the first show, I really believe that the “TX Factor” has a bright future indeed!
Now on to the show…Here is the first episode (available on YouTube). Show notes are available on the TX Factor website at http://www.txfilms.co.uk/txfactor/.
73’s and Cheers Mate! de Nick N9SJA
N9SJA Amateur Extra Class operator

Today, I passed my Amateur Extra class exam! Woo Hoo!
Thanks to the VE team of the Iroquois County Amateur Radio club in Watseka, IL!
Originally a bunch of guys and myself were going to take the exam in Frankfort, IN, but the session was canceled in Frankfort, so we decided to drive to Watseka, IL.
I have wanted to upgrade to Extra Class for a few years now, so I am really glad that I did it. I am really looking forward to using the Extra Class band segments that I couldn’t use as a General.
Next week I will be filing my paperwork to become a VE with ARRL VEC. Soon my club W9YB will be able to administer exams and people from Lafayette/West Lafayette won’t have to drive to Frankfort, Indy or Watseka to take their test. The plan will be to hold exams 2 or 3 times a year depending on interest, but more on that later.
For now I am going to really enjoy chasing DX on HF and I get some more room to roam on the bands!
73 de Nick N9SJA (Temporary AE)
Merry Christmas from N9SJA!

Merry Christmas and Good DX in 2014 from N9SJA!
HF Band Conditions
