10m is open to Japan! konnichiwa! 今日は

Today I was finally able to work some Japanese hams for the first time. I have been trying to work Japaneese stations for awhile now, but the conditions were never really good enough for me to work over there. That is until today. I didn’t just make one contact with Japan, I got to make 3!!!
Using the Flex 5000A, my trusty Hustler 6BTV vertical and just 100 watts I was able to make 3 good contacts to Japan finally! I was elated to add them to the log.
First up was Yoshi JA1oJJ outside of Tokyo. We actually had a small rag-chew type qso which was very pleasant and rewarding since most of the time they are simple signal report exchanges. He was such a nice guy and I explained to him that he was my first ever contact to Japan.
Second up I spoke to Mashiko JE1LET in Odawara, a coastal city not very far from Yokohama. Mashiko was also a very nice guy and we enjoyed another short rag-chew style QSO as opposed to the quick signal reports. Again I found this fun as he told me a bit about his station and I told him a bit about mine as well.
Lastly I was able to make a contact with Teruo, JA3JOT. This last contact was more of a tough one since there were strong state-side stations 50khz above and 100 khz below the frequency. This made for some strong QRM that made it difficult to pull out his 5/4 signal at times. But with a bit of timing between when the interfering stations were talking and when Teruo was speaking, we made the contact.
I had so much fun making the contacts. But then the band started to fade out some on me, so I hung it up for the night.
I plan on rushing home every night to see if 10m is open for great DX.
73! de Nick N9SJA
10m Weekend

The 10m band was hot this weekend thanks to some extra sun spots and other help from our mother Earth.
Here is a list of contacts I made over the weekend:
EA8YB – Juan, Canary Islands
XE1YQQ – Theodoro, Mexico
F6IGS – Gerry, France
F1RHS – Eric, France
9A3OS – Sinisa, Croatia
OK1CF – Karel, Czech Republic
DL8YBM – Henry, Germany
ON8KW – Kurt, Belgium
OT4A – Theo, Belgium
OH0JJS – Jukka, Aland Islands (Finland)
ON8DM – Mich, Belgium
OH8X – Radio Arcala (massive contest station), Finland
XP1A – Jesper, Greenland
CO6LC – Orelvis, Cuba
Thanks to these Amateurs for the QSOs. I had a blast working DX on 10m and hopefully the band will be open again soon.
73! de Nick N9SJA
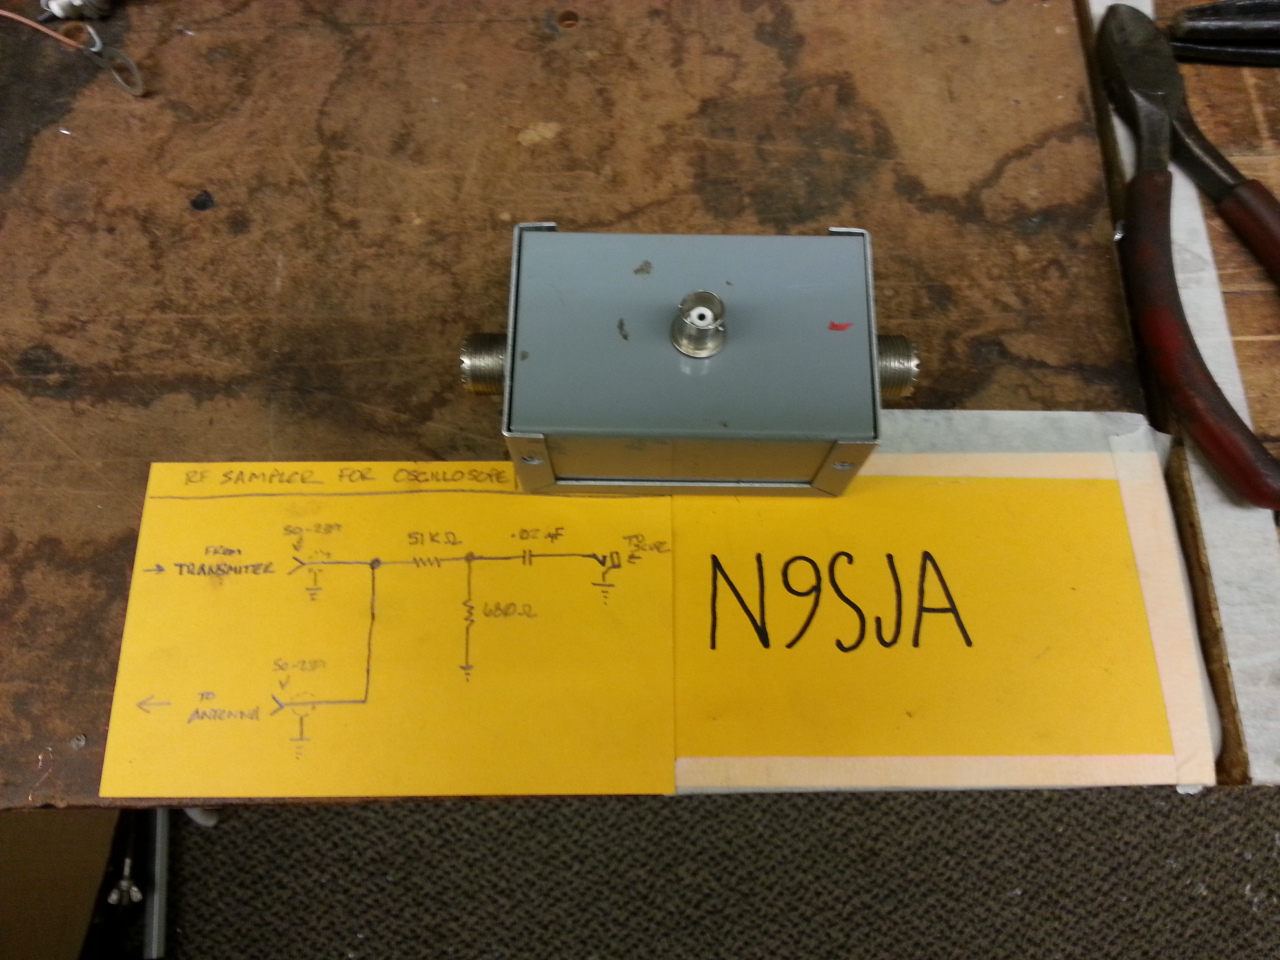
RF Oscilloscope sampler
 Here is a little project that I put together a few weeks ago while playing around at my club W9YB.
It is an RF Oscilloscope sampler designed to connect in-between your transceiver and antenna to display the signal out of your rig.
This project was inspired from episode #110 of Ham Nation titled “Bob Shows How to Connect Your Scope to Your Transmitter”. In this episode Bob Heil K9EID will show a basic schematic for the design that I have made digital here.
In my design I had to use two .01 mfd capacitors in parallel since I did not have the correct .02 value, but other than that I was able to scrounge up all of the parts that I needed as they were lying about at my club station at W9YB. This is just one of the many projects that several folks put together spontaneously at W9YB, usually on a Friday afternoon when we are there just hanging out.
I was really lucky to find this small box that was perfect for the SO-239 UHF style connectors and it housed everything I needed perfectly. I plan on building more of these with some other members in the future and using them to display the characteristics of RF on an oscilloscope.
Here are some more photos:
 The finished product (sans the labels that I need :))
 The diagram of Bob Heil’s (K9EID) RF Sampler that I made
This was a very easy but fun project to build. I really had a blast using this and analyzing the RF signal of some of the HF radios at W9YB.
Feel free to download the schematic and build one for yourself. And if you would like, let us know how your build went in the comments below.
73! de Nick N9SJA
W9YB – Purdue University Amateur Radio Club

Today I met with the gang from W9YB to become an official member of the Purdue Amateur Radio Club – W9YB.
All the members are students, except for ‘ol N9SJA here. I was explaining to them that is has been almost 20 years or so since I have been a student at Purdue. I am the old guy in the club with the most experience hamming it up, but I found that I can learn a lot from them as they are EET students, and we even have a new member from China. Sheng came from China and had an interest in radio. He used to enjoy monitoring shortwave and HF traffic, but could not obtain his license in China. So, I’m going to help him with that. We should be able to get him an American FCC license here so that he can operate. Of course he can always use the gear at the club to operate when there is a licensed control operator present.
So far I am helping by donating some funds, and offering to do small projects. I think it will be fun to go over and hang out from time to time.
They have some nice antennas, however they have fallen into disrepair over the years. The main issue is that students are not allowed on the roof anymore of the Purdue Memorial Union, so they will have to hire someone that is bonded and qualified to work on the antennas to get them back up to snuff. I would also like to see them put up a good G5RV style of dipole just to get something good up in the air for general operation.
They have a collection of some nice radio gear. A Ten-Tec Omni V, Yaesu FT-920, and a member’s Yaesu FT-957 and some mixed other gear that ranges from 2m/70cm hand helds to some boat anchor type gear that has been with the club for quite a long time.
Here is a few pics of their boat anchor gear (we call this the museum gear 😉 :


And they have a TON of QSL cards that have been collected over 70+ years! Some they display on the wall, others they have drawers full of:

It was very nice meeting some of the members today and getting to tour the shack. I think next time I am up I will operate for a little while perhaps.
I am sure that I will have a lot more postings and will have a blast as a new member of W9YB!
73! de Nick N9SJA
Flex 5000A Software Defined Radio

Two Weeks ago I stumbled across a good deal on a Flex Radio Systems Flex 5000A software defined radio, so I had to snatch it up! I bought it used from a ham in Pennsylvania in excellent condition. My particular model has the 2nd receiver installed which I really like.
I thought I would write up a bit of a blog post with my experiences and revelations regarding the Flex 5000A.
First off I should preface that I am not new to software defined radio. I also own a awesome RF Space SDR-IQ HF software defined radio that I totally love. My good friend Jeff N9IZ also owns a Flex 5000A and really enjoys it. I have had the opportunity to use his Flex in the past, so I was somewhat familiar to the platform.
With all that being said, I still have learned a lot of new aspects about the Flex 5000A in past 2 weeks. It seems like every time I go to use it, there is something else to discover and play with. As a curious amateur radio operator this makes operating the Flex a blast and sometimes a frustrating venture indeed.
INSTALLATION:
Installation of the Flex 5000A is not for someone that has little to no computer experience. If you really like the idea of SDR and don’t know much about computers, then seek out a computer savvy Guru to help you out. I have over 15 years of experience in the computer technology industry and even I found at times aspects of installing the Flex 5000A to be frustrating. This is because of the Firewire 400 interface used to connect the Flex 5000A to your PC. The Flex 5000A is very particular about Firewire card chipsets and the installation of its drivers.
You should also be using a good at least dual core PC with at least 2 GB of RAM. I would recommend 4 to 8 GB of RAM actually and a good GPU (graphics card) will really work well for the Panadapter performance.
Firewire 400 (and Firewire in general) is now largely an outdated computer IO system. USB 2.0 has largely surpassed Firewire 400/800 because of its commonplace with PCs, tablets, etc, not to mention the backward compatibility to older USB devices. Firewire interfaces to have their positive strengths, in particular they don’t share interrupts like USB does and have dedicated bandwidth, but with USB 3.0 now out, that is the final nail in the coffin for Firewire 400.
The Flex 5000A is admittedly picky about what Firewire card you use. This can make installing the Flex 5000A a bear. I went through 3 different Firewire cards each with a different chipset before I found a card that worked properly with the Flex 5000A. The one that finally worked for me is a cheap StarTech.com branded 2+1 port Firewire PCI card with a VIA VT6307 chipset. I paid about $20 for it from Amazon.com.
Install the Firewire card first, and let your PC find it and install the Windows driver for the card. Then you will need to install the Flex 5000A driver with the radio disconnected from the PC. DO NOT plug in the flex until the driver is properly installed and working. You will need to restart your PC after the driver is installed. The Flex 5000A software driver is written well and if the Firewire card is good, it will work just fine. It even asks to set a Windows software restore point which is particularly good since installing drivers improperly can cause the dreaded Blue-Screen-Of-Death (BSOD).
After your computer restarts you will then be able to connect your Flex 5000A to your PC and all your cables (antenna, ground, speakers, mic, etc) and install PowerSDR, the interface that the Flex 5000A uses to control the radio. PowerSDR is a very well written application and the interface looks great. I am running the latest version of PowerSDR version 2.6.4. When installing the latest version of PowerSDR it will also check the firmware of the Flex 5000A to see if it needs updating and update it for you.
When you launch PowerSDR for the first time there is a brief wait while it copies and backs up the internal settings for the Flex 5000A to your PC and also runs a self optimization routine. It only will do this during this first time start up of PowerSDR and subsequent restarts of the application will not go through this.
Then before you actually start the radio you will need to go through the settings for the audio mixer for your microphone and speakers, and then lastly set your options in the antenna selector screen.
Whew! Then you can start your Flex 5000A in PowerSDR and use your Flex!
NOTE: PLEASE CONSULT THE FLEX QSG (Quick Start Guide) FOR COMPLETE INSTRUCTIONS. YOU CAN DOWNLOAD A COPY HERE.
MY EXPERIENCES USING THE FLEX 5000A:
PowerSDR 2.6.4 is very well written and has a really nice graphical interface. You can even skin the interface to make it look different if you care about such things. I am using an all black skin but there are others out there that change the color of the application, buttons, and text. This can be nice for people that have trouble with their vision (there is a high contrast skin that comes with the installer for PowerSDR even).
 PowerSDR 2.6.4 on 20m running my the “IK3VIG Black” skin. I am using the “Panafall” display. A true thing of beauty!
The receiver on the Flex 5000A is simply awesome. It is probably one of the best, if not the best receiver in an amateur radio that I have ever used. The ability to pick out weak stations and reject strong interfering stations is very powerful with the Flex’s receiver using preset filtering or custom filters set in the software. The Tracking Notch Filter function that was introduced in PowerSDR 2.x is very useful. You can set several of these notch filters and have them stay on certain segments of the band that you are using. For example, if you have some RF interference caused by some noisy electrical appliance that always seems to be at a given frequency, you can set the Tracking Notch Filter that interference and it will remember always that position notching out the interference.
 PowerSDR 2.6.4 with the Tracking Notch Filter enabled (note the green vertical bar in the panadapter at the top of the interface).
Every time I start PowerSDR I find that I learn something new. There are so many features that I cannot list them all here, it would just take too long.
For details about the Flex 5000A’s performance and features, check out the Flex Radio Systems website for more information.
Setting up and installing a Flex 5000A is a huge pain in the ass as I outlined earlier. But once it’s set up you should be just fine. It is really helpful if you have an experienced Flex Elmer like I had to help. My good friend Jeff N9IZ was kind enough to come over to my shack and help me get things working properly.
I had problems with the balanced microphone input on the Flex 5000A. There is no preamp on this input, so if you plan to use a balanced dynamic mic you will need a preamp of some sort to drive the microphone. Some folks use a mixer or the famed W2IHY audio equipment with their microphones, so that would work. The Flex 5000A has extensive transmit and receive audio controls including a 3 and 10 band EQ so you really don’t need external audio equalization. The Foster mic connector on the front of the Flex 5000A seems to work well and is cabled for a Yaesu style 8 pin microphone. It seems out of place on the clean front of the Flex and is kind of ugly. They should have put a Foster connector on the back I think. This would keep with it’s hamsexy appearance! There is also a 1/4″ headphone jack and the very cool red LED power button.
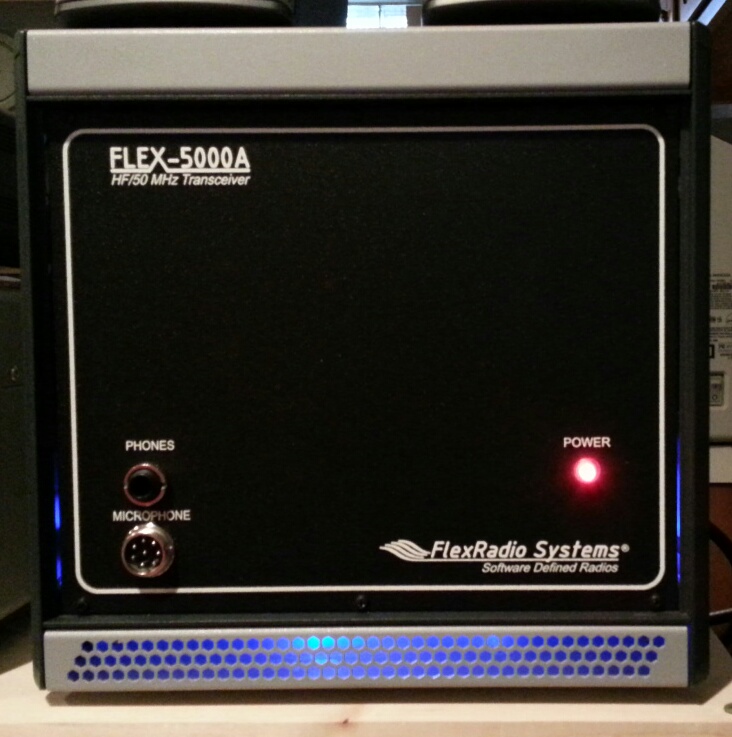 My sexy Flex 5000A from the front side. Check out the sweet blue LEDs inside!
The backside of the Flex 5000A has a myriad of connectors for every option that you can imagine with an HF radio. First off there are 3 HF antenna connectors. This makes this radio very FLEXable (pardon the pun) should you want to use different HF antennas. There is a External reference input for a 10 MHz oscillator, line inputs, line outputs, AMP relay, transverter, antenna connector for the optional VHF module, etc.
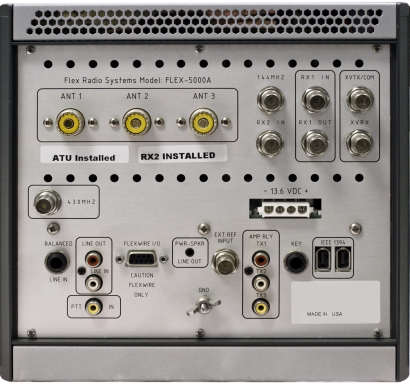 The backside of the Flex 5000A and all it’s connectors.
I do have a few gripes using the Flex 5000A. The AGC-T is supposed to be used like an RF gain control. This works well, but it’s a little strange as it doesn’t adjust your receiver S-meter to show you the threshold like a traditional RF gain control does on a regular knob having transceiver.
I also would like the ability to “move” some of the control buttons in PowerSDR to make the GUI a little bit more intuitive to use. The placement of some of the controls is a little annoying causing you to search a bit to find the button or slider to activate the function that you want to use.
The “edge” style S-meter is a little ugly. I really would like them to make a nice looking graphical needle style S-meter option like they use on the Icom IC-7600/7700/7800. I do however like the display in dBm above the S-meter.
There are constant updates and they even take feature requests for updates to PowerSDR and radio firmware. So perhaps I can get that sexy designed S-meter after all…
Other than that I am loving the Flex 5000A! I have made several contacts, including DX contacts with excellent results. I always get great audio reports, as the Flex 5000A audio is one of the most outstanding features. A lot of hams use the Flex for AM on 80m for rag-chewing because of the audio performance.
I also got the “FlexControl” with my Flex 5000A. This is a USB connected external tuning knob that works perfectly with the Flex. You plug this knob into the USB port on your PC, not on a port on the Flex. There are 4 buttons that are mapped for specific functions (3 hardware buttons and the 4th button is on the encoder shaft of the tuning knob). The tuning knob is really nice and has a great feel to it. The flex control also works exclusively with PowerSDR even when you have other applications open on your computer and the window focus is not on PowerSDR. This means that you can log, yet still tune your radio without clicking from application to application. This is a must have for a Flex owner that is into contesting.
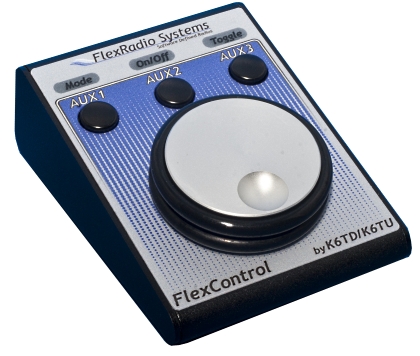 The USB powered FlexControl.
Well that about wraps it up for now about the Flex 5000A. I really enjoy using this new rig and making some good DX contacts on it. I’m sure that I will have some more posts with some additional thoughts and discoveries to come.
A big thanks to Jeff N9IZ for helping me with my Flex 5000A. He is the Flex-master! 😉
Have a Flex or other SDR? Tell us about it! Post a comment below!
73! de Nick N9SJA
Project HF Vertical! (part 2)
 In a previous post, I outlined the parts and the basic planning for installation of my new HF vertical antenna, the Hustler 6BTV. Now that my installation is completed I thought I would go over a bit of what I have learned and just how it performs.
First of all, I must say that this antenna works fantastic. After the initial installation I noticed that my receive performance was noticeably better on most of the bands. By noticeably better, I am talking 1 to 1 1/2 S-units better over my G5RV dipole! I was hoping that this antenna would perform well and was very happy to see that it does work very well. I have already made several DX contacts as well as state-side contacts on it and get great reports back.
I took my time with the installation of this antenna as I did the entire installation by myself. With such a busy work schedule and everything else going on in my life at the moment, I wanted to take my time to make sure that it was done right. Lucky for me we also had some great weather (only in the mid to upper 70’s) the past few days here in Indiana. This made it much more comfortable for me to be outside without baking in the hot summer sun.
The installation was divided up into a few phases. In the first phases I readied the location for the mount. I made a decision about where I would like to mount this antenna and then used a hole post digger to dig a 2 foot hole. I then purchased a 2″ diameter steel pipe and set that pipe in concrete. After a few days I began the 2nd phase and installed the DX Engineering radial plate and installed the radials. First I trenched a short path through my lawn and buried the coax cable about 3-4 inches deep. Using landscape fabric staples, I laid out the ground wires shortly after the lawn was mowed. I stretched out the ground wires and held them in with the staples. Then I took a break for a while before finishing with the final phase. In the final phase I mounted the vertical feed line choke, and assembled the antenna. I installed all the traps and then the 12m and 17m add on kits that I bought from DX Engineering. Then I tuned the antenna per the instructions.
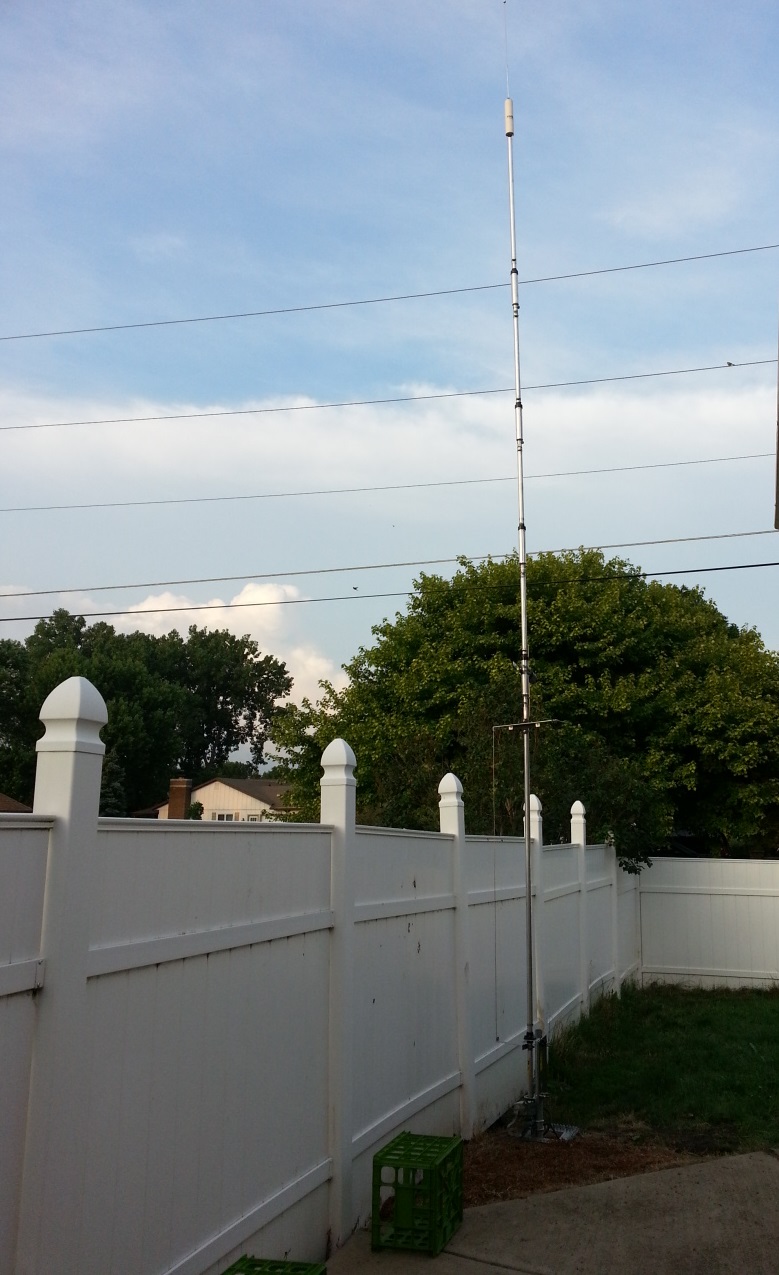
I really like the mounting location as this serves 2 purposes. Tilting this antenna down it will lower right behind the fence, protecting it against high winds. It also is very stealthy as when it is folded down behind the fence, nobody can see it from outside the back yard.
I bought some cheap milk crates from the hardware store to use as supports for when the antenna is tilted. These work well since they are cheap, weather proof, and just the right size.
Here are a few things that I learned from my experience putting up this antenna…
On Radials:
1. You must use ground radials for the Hustler 6BTV. You will not get good performance without a radial installation.
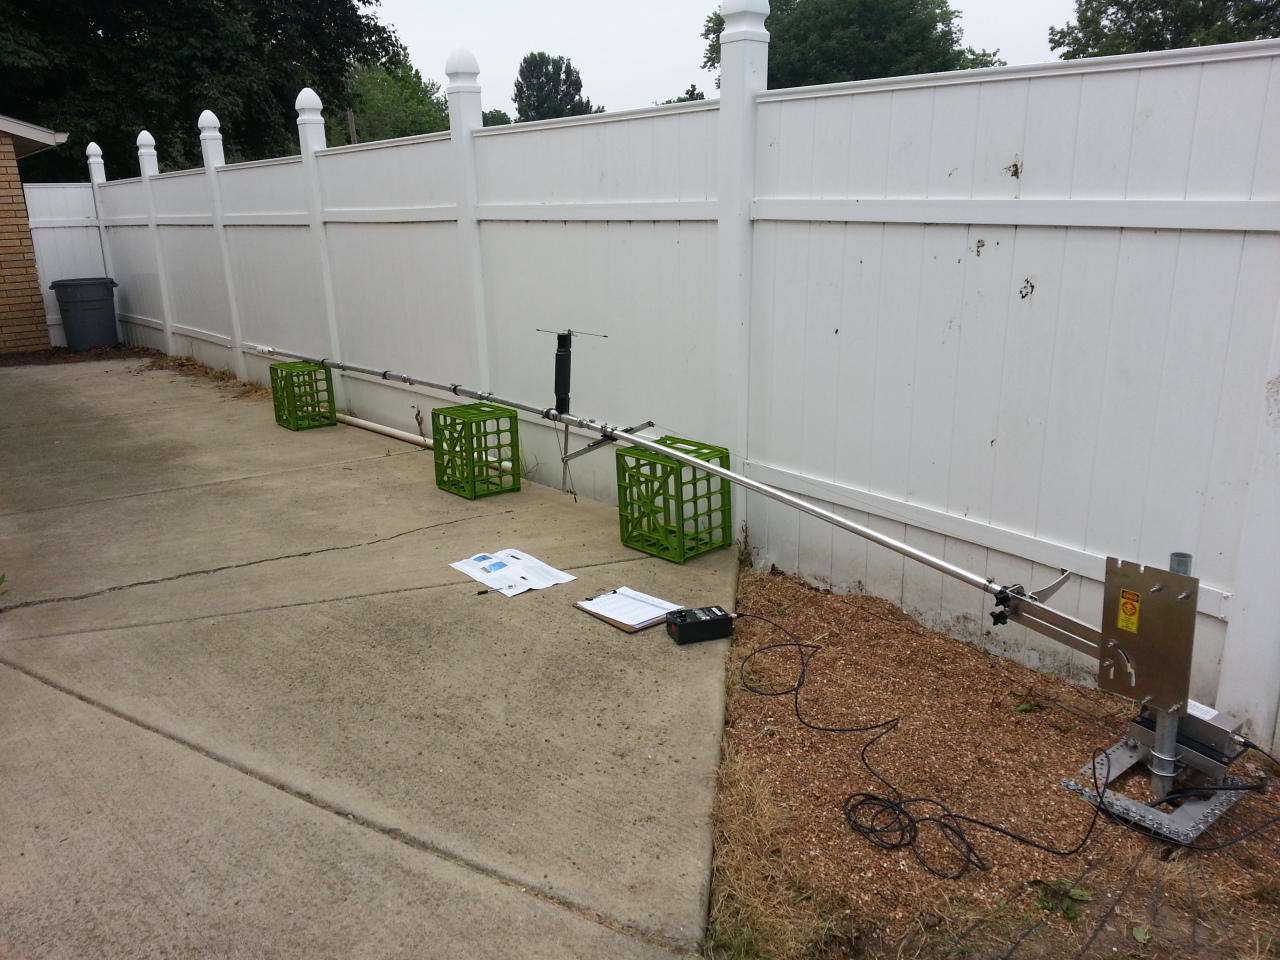
2. The more radials the better. Although I had a tough time finding room, I still was able to put down 26 radials. I could not put them in a complete 360 degree arc, but put them in as many angels that I could. (There is a concrete patio to the left of this photo only 1 foot away).
3. Cutting radials to specific wavelengths is not necessary since they will change electrically when put on the ground. Just make as many as you can that are 40ft long or so. Use shorter lengths if you must, but put them down. I have a mixture of 24 foot and 40 foot radials.
On installation:
1. Use a tilt mount. This will make it easy (and safer) to raise and lower the antenna for maintenance. I was very nervous about the power lines behind my house, but with the tilt mount properly installed I did not have to worry about the antenna falling into the lines.
2. Mount the base of the Hustler 6BTV to the tilt mount first. Then tilt the base. Then install the parts of the antenna. I used a 4 foot ladder to lean the sections on. This way I could move the ladder to where I was working. This meant less bending over and no sore back.
3. Use a ScotchBrite pad or steel wool to clean the parts of the tubes before insertion. This will ensure proper electrical contact between the sections.
4. I used Penetrox-A electrical joint compound to ensure a good connection between parts. This stuff is incredibly messy. It is like a conductive paste that is very sticky. I am not sure if this stuff works well or not. It was recommended, so I decided it couldn’t hurt using it. I suspect as long as you have good metal to metal contact you would be fine without using the messy Penetrox.
On DX Engineering parts and accessories:

1. I was very happy purchasing this antenna and all the parts from DX Engineering. Some say that they are expensive, but I found the best price for my Hustler 6BTV was DXE. R&L had it for a little bit less, but did not sell all the other accessories I needed/wanted for my installation.
2. The staff at DX Engineering were great. I did have some questions about some of the parts that I was purchasing and they were very courteous and helpful on the phone.
3. As for the 12m kit addition DX Engineering part number DXE-AOK-12M there is a plastic bracket that comes with this kit that mounts the top part of the kit under the 10m trap. In the instructions it will tell you to use a carriage bolt, washer, lock washer, then nut. You will find that the carriage bolt is to short for all the washers and then the nut. The reason is the square base of the carriage bolt that will not be flush, thereby giving you sufficient length of the bolt threads. This is an easy problem to solve. Just insert the carriage bolt without any of the washers, tighten the nut down until the square base of the carriage bolt embeds itself within the plastic bracket. Once the head of the carriage bolt is flush, remove the nut and remove the bolt and install with the proper washers.
4. The DX Engineering “New Assemby and High Performance Instructions” are excellent. I would strongly advise using these instructions for any Hustler 4/5/6BTV type installation. They are simply awesome. If you follow these instructions properly the 6BTV will perform great!
5. All of the parts I purchased from DX Engineering were of very high quality. All stainless steel, heavy duty bolts, and good connectors.
I have spent some time tuning the antenna. I found this process to be somewhat tedious, but generally I have not had much difficulty getting the antenna tuned.
Here are some SWR plots that I made using my Wavenode WN2, so that I could document and graph SWR on each band:
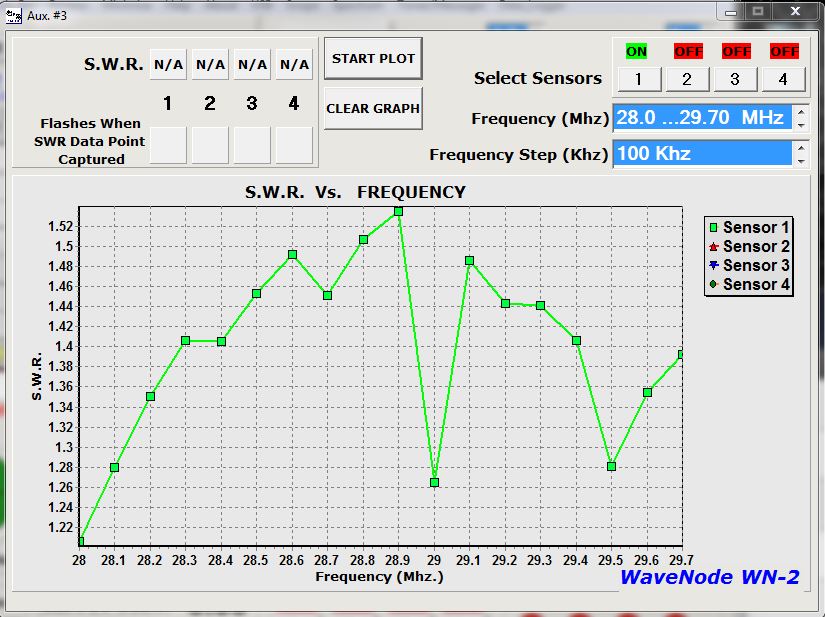
10m SWR plot using 20 watts RF power.
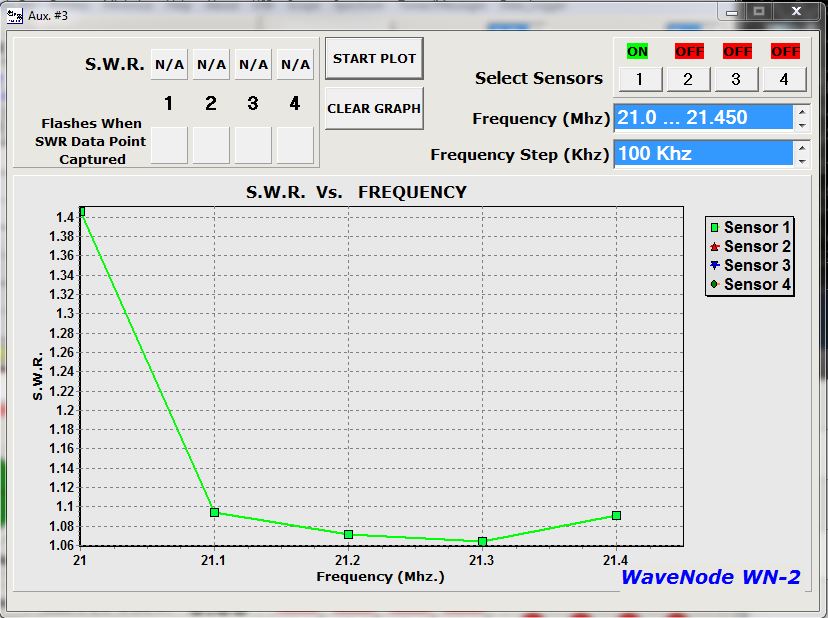
15m SWR plot using 20 watts RF power.
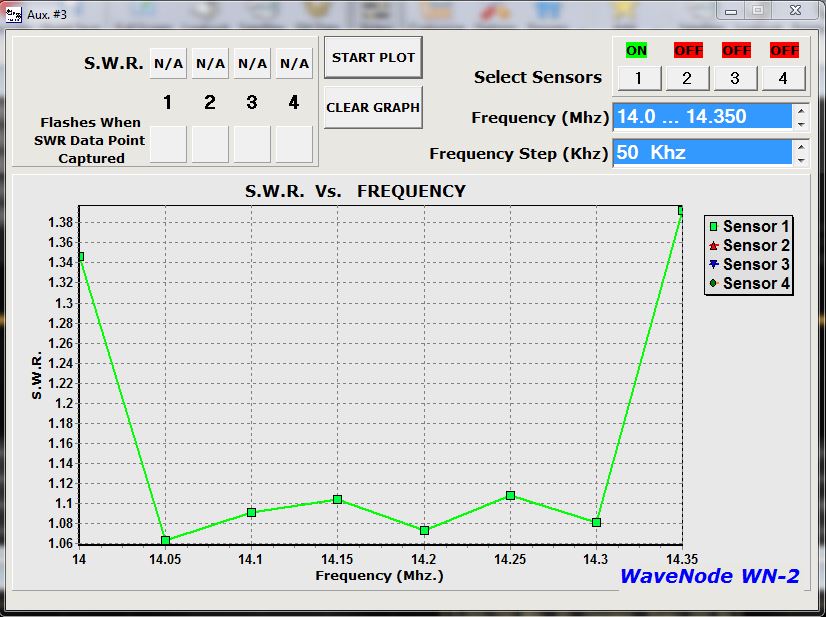
20m SWR plot using 20 watts RF power.

40m SWR plot using 20 watts RF power.
As you can see I do need to adjust tuning a bit more on 40m, but for the most part it is OK. As of now 12m is good, but 17m and 80m needs some adjustment. I really need to shorten the whip at the top for operation at 3.900 MHz. Since the portion of 80m is only about 100 kHz, I decided to set the center frequency to be 3.900 MHz so that I could operate 3.850 – 3.950. Currently it works well at 3.780 so I need to shorten the whip a little bit more to raise the frequency where the antenna will be resonant.
After the first time I tuned this antenna I was amazed to make DX contact on 15m to Ecuador. I made a contact with HC2AO on 15m and spoke to him for a few minutes asking him about my signal quality. He told me that my signal was great and the vertical was working well! I was so happy to make this contact because I was really hoping that this antenna would shine on 20 – 10m. A bit later I was able to make a contact with LY80L in Lithuania on 20m using just 100 watts!
So far I am very happy with this antenna. It really works well, and although it was time consuming to do it correctly, I had fun installing this antenna and all the accessories.
Do you have a Hustler 4/5/6BTV or other vertical antenna? Let me know what you think and tell me about your antenna in the comments.
73! de Nick N9SJA
Happy Independence Day! 13 Colonies Special Event

This July 4th weekend, there will be a special event held on all the HF bands (non WARC). The stations will operate from 13:00 UTC July 1st to 04:00 UTC on July 7th 2013.
The 13 stations will be:
K2A – New York
K2K – New Hampshire
K2J – North Carolina
K2B – Virginia
K2C – Rhode Island
K2D – Connecticut
K2E – Delaware
K2F – Maryland
K2G – Georgia
K2H – Massachusetts
K2M – Pennsylvania
K2I – New Jersey
K2L – South Carolina
Working all of the 13 colonies stations will yield you a very nice certificate (pictured above). I love working these stations. It is very fun to track down all the stations and work them all. You can find more info out at 13colonies.info.
So far I have worked 10 of the 13 stations, mostly on 20m and 40m.
Have fun working all these great stations and have a safe and happy Independence Day!!!!
73 de Nick N9SJA
****UPDATE 7/5/2013 21:29 UTC**** I just made my 13th and final contact to get a clean sweep for the 13 colonies special event. It was blast! Thanks so much to everyone that made this happen and God Bless the USA!
Project HF Vertical! (part 1)
![]() In the past few weeks I have decided to invest in a good HF vertical antenna and try that out. I have always heard that verticals work quite well for DX due to the low angle radiation they give off. I have also heard that they can be quite noisy. But regardless, after much research I decided to buy a Hustler 6BTV antenna from DX Engineering.
In the past few weeks I have decided to invest in a good HF vertical antenna and try that out. I have always heard that verticals work quite well for DX due to the low angle radiation they give off. I have also heard that they can be quite noisy. But regardless, after much research I decided to buy a Hustler 6BTV antenna from DX Engineering.
First of all, I have to say the people at DX Engineering were excellent. Even though I ordered everything from the web, I did have a few questions about some of the parts that I was purchasing. They were great to help me find everything that I needed for my desired installation.
I decided that I really want to get as much out of putting a vertical up as possible. On the web I found an EXCELLENT guide made by DX Engineering that shows step-by-step instructions for an antenna that will really perform. I found this guide on K6RF’s web site here. After reading though it I decided to buy all the parts and the antenna from DX Engineering.
Let’s take a look at all the goodies I got!
DX Engineering Vertical Radial Plate:

Look at this hamsexy hunk of stainless steel awesomeness. This plate is pre-drilled for up to 60 radials, made of stainless steel, and has a really nice laser etched DX Engineering logo on it. This is going to help make a great radial system. I have heard the more radials the better, but only have room for 20 24-foot radials at the moment. I may decide to add a few longer 40-foot radials in 2 directions as well, but I am going to start with the 20 24-footers to see how well that works.
The Hustler 6BTV antenna:
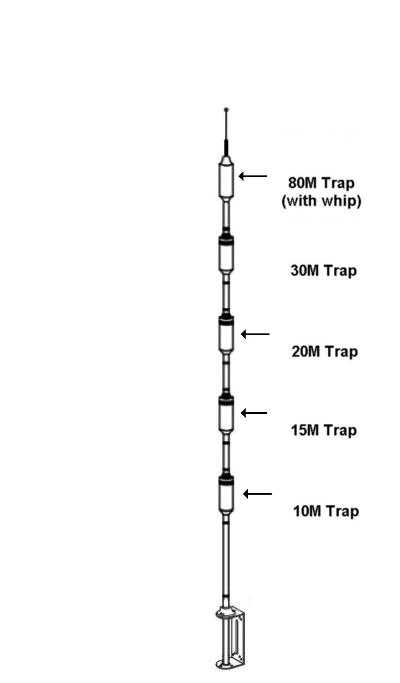
I looked at several different types of vertical antennas and saw several that rated very high on eham.net with their owners. But the 6BTV seemed to me like the best combination of performance and also durability. I live in northwestern Indiana about 2 hours south of Chicago, and we get a lot of ice storms in the winter and can get strong winds from thunderstorms in the summer months. With weather being a factor I definitely wanted something durable. The 6BTV covers 80m (small bandwidth of like 100 kHz is all), 40m, 30m, 20m, 15m, and 10m. However DX Engineering sells an awesome 17m and 12m add-on kids for this antenna, so I bought those as well. I am really hoping that this antenna will shine on 40-10m especially 10m!!!
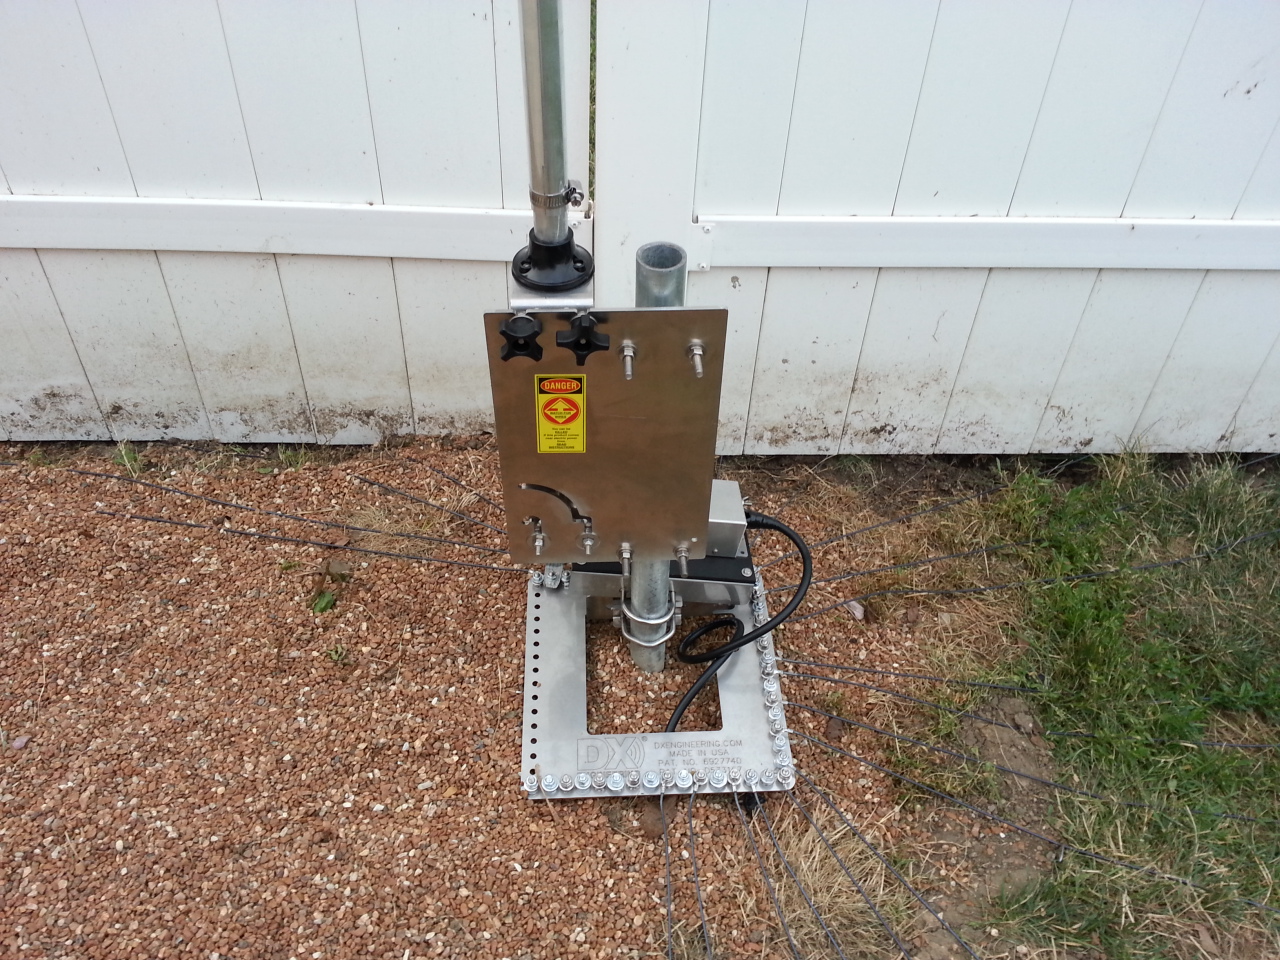
DX Engineering Vertical Feedline Choke:
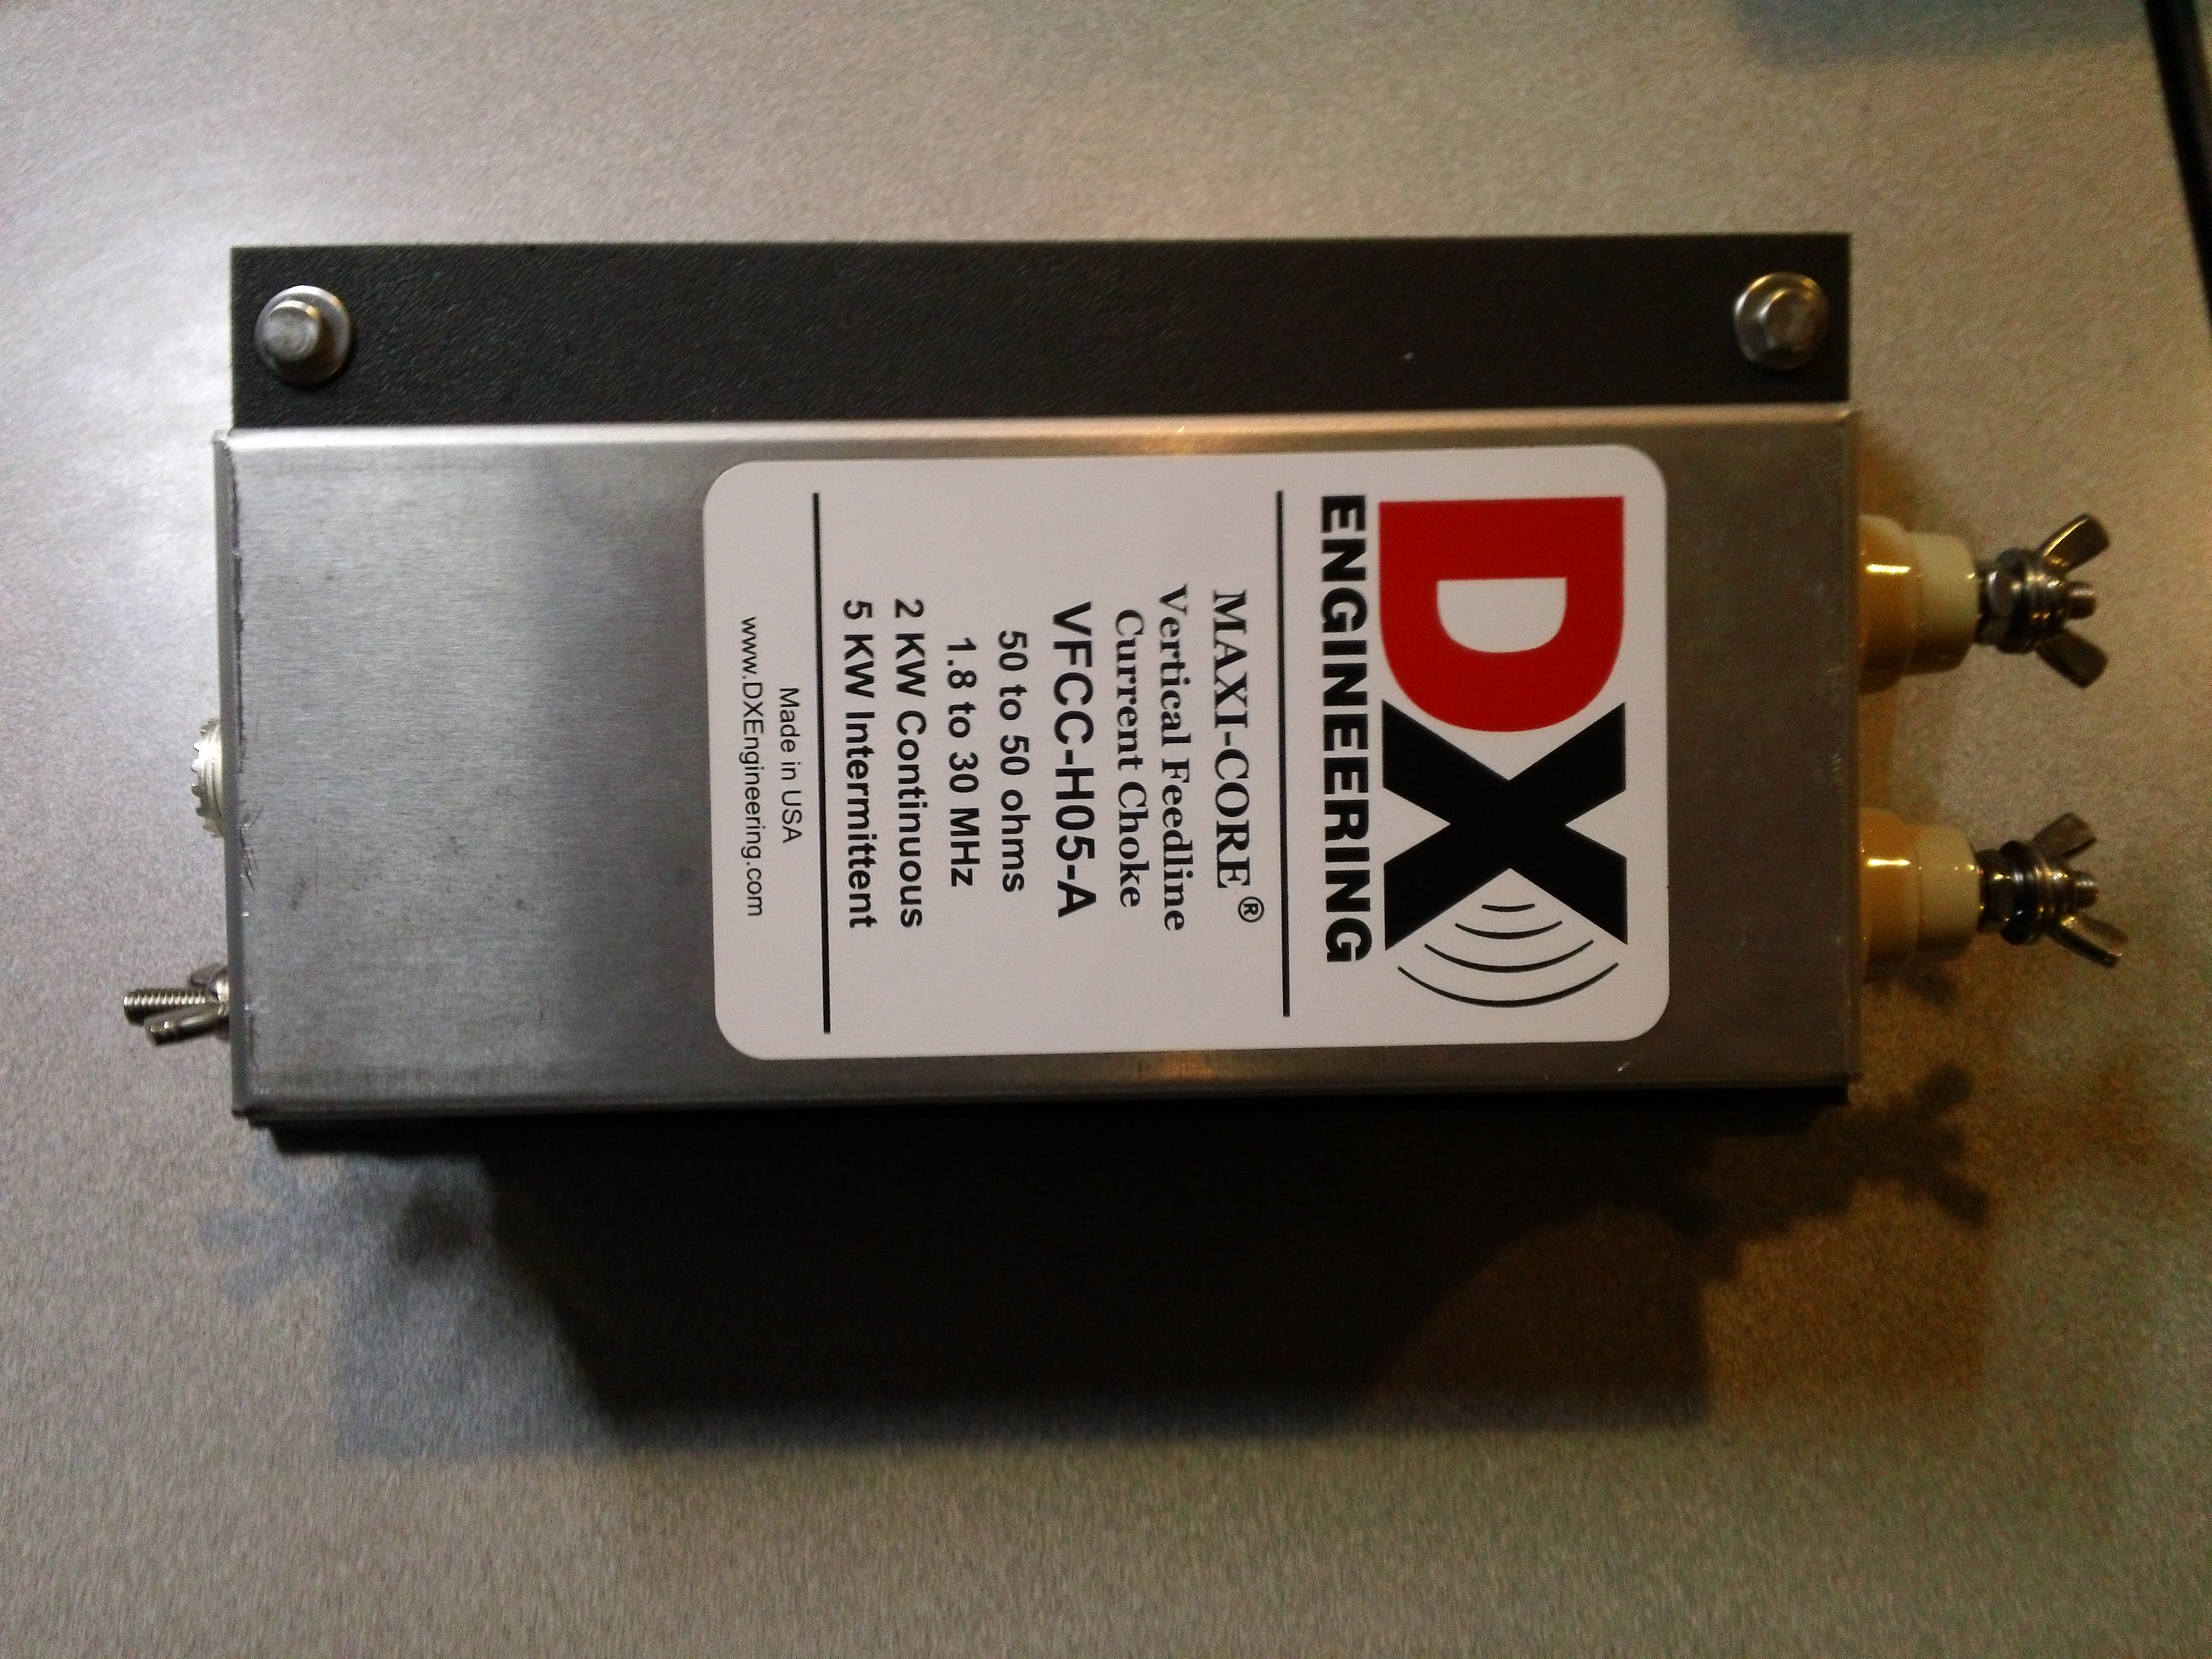 This choke has a shelf that will mount to the antenna mounting pole right above the radial plate. It is designed so that you feed the vertical antenna with this choke and connect your coax on the end to run to your shack. The choke makes it so that your coax cable doesn’t turn into a radial thereby feeding back RF into the shield of the coax. NO RF BURNS FOR ME THANK YOU VERY MUCH!
DX Engineering Vertical Antenna Tilt Base:
 This is what makes having a vertical antenna, especially in a suburban neighborhood worth it. This tilt base allows you to take down the antenna for maintenance (such as tuning), for inclement weather, or if you just want to run your antenna stealthy like a radio ninja! For me I wanted the ability to take it down quickly in the event of a storm, and or to maintain and tune it.
This past weekend I was able to get a 4ft. post into the ground and I poured 2ft of concrete so that it would be level. Next I started to assemble my radial wires:

I made 20 24-foot radials using 14 ga THHN stranded wire. I crimped and soldered lugs on the end to connect to the radial plate. Once I run these out into the yard, I am going to use sod staples to lay them down so that my mower wont get a hold of them.
Next week – weather permitting, I plan on finishing up my installation and mounting the antenna. I will make another post then that shows the completed setup and tuning.
I am really hoping that this antenna performs as well as people say it does. I do have horizontal dipole antennas (my G5RV works pretty darn good really), but want another option to see how well it works as well. Looking forward to using it on 40m, 15m, and 10m really. I haven’t had much luck on 10m this summer, and I know there are people out there that are on that band, but I think the G5RV holds me back on that band.
That’s all for now. Stay tuned for part 2 of this interesting story! 🙂 Got a 4/5/6BTV or other HF vertical antenna? Share your experiences in the comments below. I would love to hear about and or see pics of your setup!
73! de Nick N9SJA
Dayton Hamvention 2013
![]()
This year’s annual pilgrimage for ham radio ops was a big disappointment for me. Why? Because I got sick! On Friday Dave and Craig kept asking me for tissues beacuse they kept sneezing. I didn’t think too much about this beacuse I thought maybe they had allergies. But on Saturday afternoon I came down with the sickness. My muscles were sore, I couldn’t stop sneezing and coughing and I felt very weak. Symptoms of the flu. Booo!
With that being said, I did still have a good time because I was with good friends and got to see the biggest spectacle in ham radio, the 2013 Dayton Hamvention. Here are some highlights:

Here we are just before our journey. Pictured left-to-right is: Nick – N9SJA, Jeff – N9IZ, Craig – KB9JDW, and Dave – KF9IZ photo courtesy of Amber Brown (Mrs. N9IZ 😉 ).
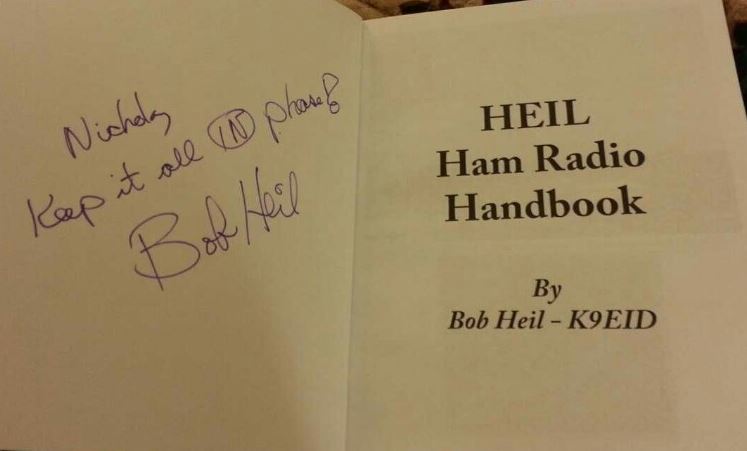
I also got to meet with the much admired and very cool, Bob Heil:
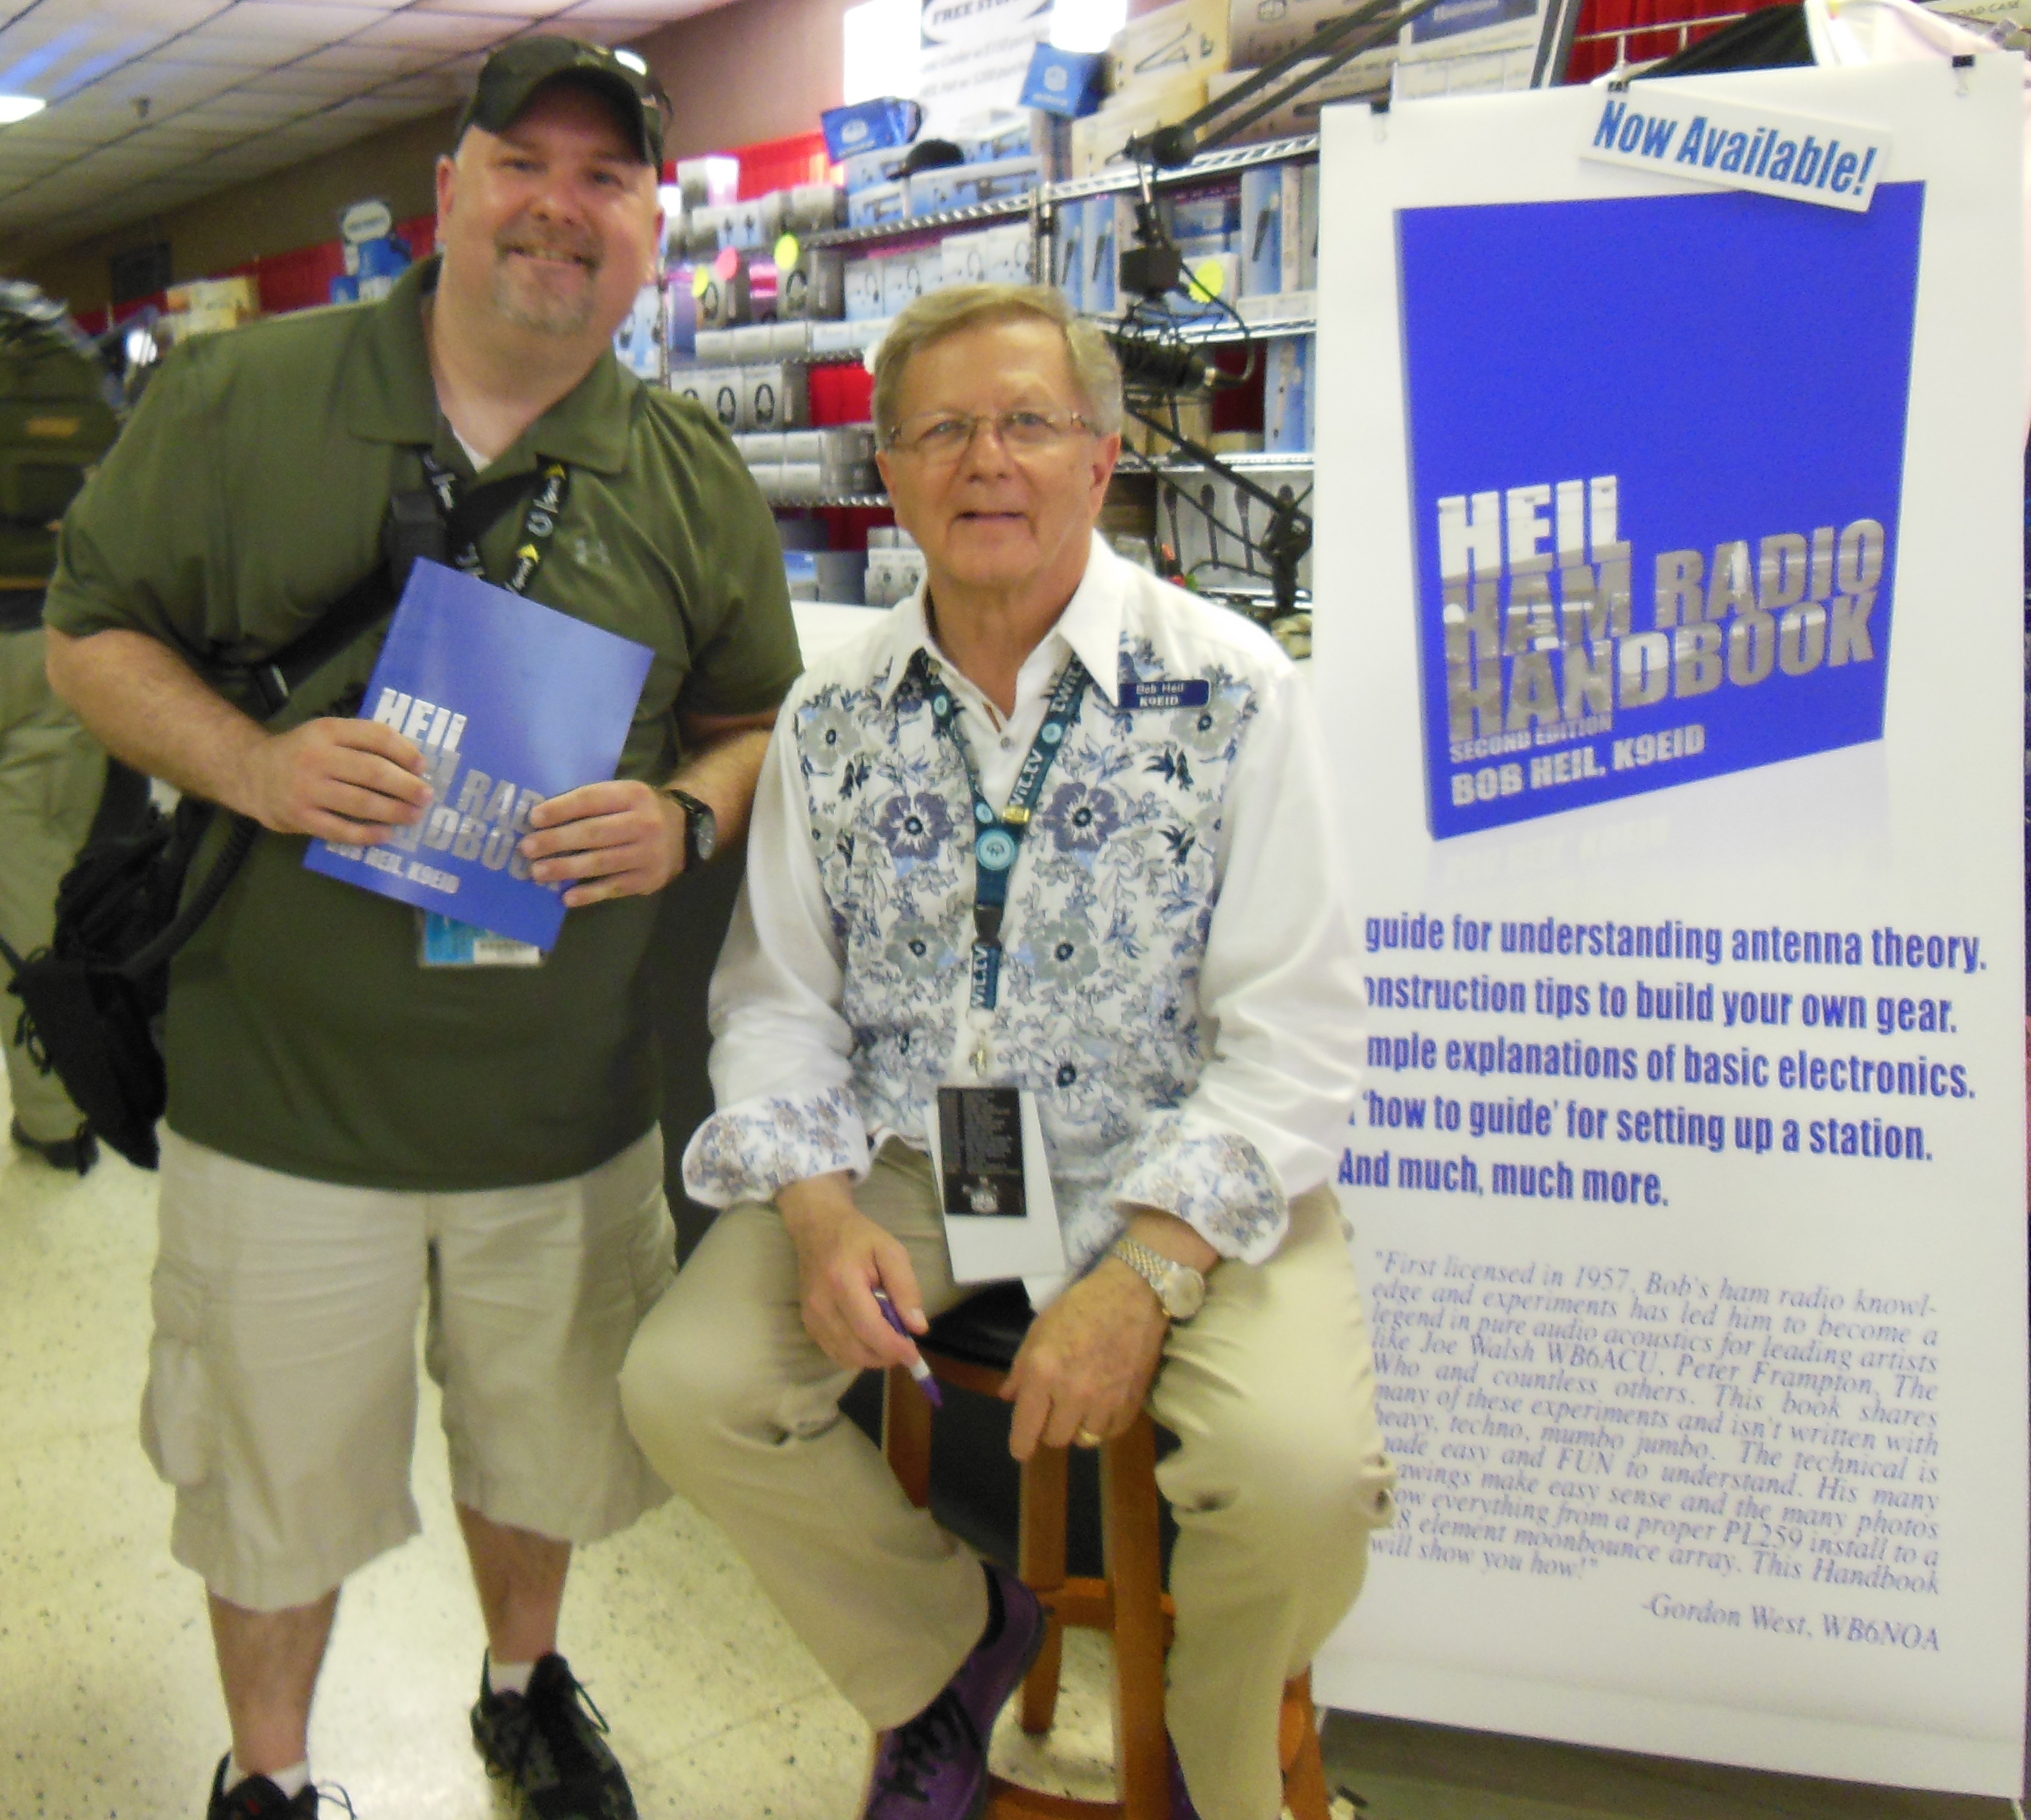
Bob signed my new Heil Ham Radio Handbook:
Since I was ill, I didn’t buy anything and didn’t get to look around in the flea market area much. Overall a disapointing time beacuse I got sick! Booo! I guess I will do it up twice as good next year. Well on to Field Day and eventually the Fort Wayne Hamfest!
73! de Nick N9SJA
Pocket RXTX – Remote operation from your Android smartphone or tablet

Today I ran across a fun little app on the Google Play store called Pocket RXTX that allows you to remotely control your rig using Ham Radio Deluxe’s IP server right on your Android phone or tablet!
The app can be downloaded for free on the Google Play store here.
Pocket RXTX is the brainchild of Dan Toma YO3GGX. He has really done a great job writing this app even though it is officially in ALPHA status. Here is how it works:
The app can connect directly to a few different Yaesu radios such as the FT-817, FT-857, and FT-897D using a Bluetooth interface. Additionally it can connect to online SDR’s over the internet so that you can listen to various servers (currently there is only one available, but I’m sure that will change with time). Lastly you can use Ham Radio Deluxe’s IP server capability to remote control just about any rig that is compatible with HRD it looks like. I am running HRD 5.24.0.36 currently with my Icom IC-7600 and it worked fairly well.
Since I demonstrated Pocket RXTX with my Icom IC-7600 and HRD, my review will be based on connecting the app in that manner. Basically there are just a few steps to get this working:
ON THE PC SIDE RUNNING HAM RADIO DELUXE:
*Note this setup will be for starters on your LAN. Be sure your Wi-Fi radio is enabled on your Android device and you are able to communicate with your computer running HRD.
1. If you allready have your radio connected to HRD, start your radio and then start HRD.
2. At the top of the main window click “Tools” on the menu.
3. From the Tools menu click “IP Server”. You should see the following window:

4. In the PORT section type in 7809.
5. Check the little box that says “Start server when HRD starts”. This will make sure that the IP server is available when HRD starts and you do not have to manually start it.
6. Note the Addresses section to the right. Most computers will only have one IP address in this field. Write down this address and then the port number (7809) you will need them for the setup on your Android device next.
7. If you are running a software firewall on your computer, you will need to allow in access for traffic using TCP port 7809. Please allow the exception in your firewall software.
8. Click the START button if the server is not running yet.
9. Click OK to exit this window.
ON THE ANDROID SIDE RUNNING POCKET RXTX:
1. On your Android device install the Pocket RXTX app from the app store. You can just open the app store on your phone or tablet and then search for Pocket RXTX.
2. Install the app. Follow the instructions to install the app.
3. Open the app on your Android device and you will be presented with the first time setup screen. Using your finger scroll to the right until you see a picture of Ham Radio Deluxe on the screen. Next tap “START” button.
4. Now you will need to input your settings for HRD. To do this click the menu key on your Android device (some phones have soft-touch buttons for the menu, others have on screen menu buttons”.
5. Choose “SETUP”
6. You will be presented with a simple screen on your Android device. Input the IP address and port that you wrote down earlier here and click the “SET” button.
7. Next click the little blue power button and your all set!
To pipe the audio through you will need to setup Skype for that. Since there are plenty of other tutorials out there on the net that discuss how to do that with HRD, I won’t cover it here. But basically if you search for “Ham Radio Deluxe remote with Skype” you will find someone who outlines just how to do it.
Also, in order to remotely control your rig from anywhere other than your home network you will need to set up a port forward rule in your router. Again there are plenty of sites that will show you how to do this. Since there are many different brands of routers out there, the setup is different for each one. A good ‘ol Google search using the make and model of your router followed by “port forward” should yield you the info you need to get the job done.
OPERATION:
The operation is pretty straight forward. I really like the big onscreen buttons as they are easy to push without clicking something else by accident. The layout is really well done, and has most basic controls such as:
- VFO dial for selecting frequency.
- Large frequency readout.
- Mode control (USB/LSB/AM/CW…etc.)
- RF Power control.
- Band button to quickly switch bands.
- A clock that syncs with HRD.
- VFO A/B selector button.
- S meter
- And antenna tuner button (for those radios that have them).
I tried out these controls and all of them seemed to work fairly well. There is a “Function” (Fn) button that is used in conjunction with some buttons near the top for storing frequencies in memory which is very nice. Not only can you just store the frequency, but the mode, power level, and other settings as well so that you can recall your favorite net frequency with the touch of a button.
PROBLEMS RUNNING ALPHA SOFTWARE:
I did experience a few problems running this app. After all this app is in ALPHA status of testing. Sometimes I had problems connecting to the IP server with HRD. After quitting the app and then reconnecting a few times, it finally connected and worked. Also at times the frequency would just cut out and show some weird band or something that I was not on and then 1 second later it would display the correct frequency.
I was able to connect to the online SDR, but it was really choppy sounding, perhaps this is because of network latency. I think Dan is located in Romania, so I am going to assume that is where the SDR (currently there is only one online) is located. Since that is pretty damn far from Indiana USA, it could be a latent connection if the routers that pass traffic between the SDR over the Internet and my house are on slow networks or something.
The skinny on PocketRXTX:
Basically I love what Dan has done with the software. Even though it is in ALPHA, it feels more like a BETA. It is fairly refined and does work with some occasional glitches. It wouldn’t be 100% reliable yet for remote operation, but it’s getting there. For my review I give this a solid 4 out of 5 stars. I cannot wait to see the progress that this app makes in the next few months, I think the reliability will increase and more people will use it.
I made a brief video showing it functioning on my base rig (the Icom IC-7600) with my Nexus 7 Android tablet and my Samsung Galaxy S III smartphone. Enjoy 😉
I highly recommend experimenting with this and giving it a try. It is a very cool app and it was fun to tinker with. If you have tried it out, why not share your experience in the comments below? Everyone else would love to read your thoughts!
73! de Nick N9SJA
HF Band Conditions
