
Wavenode WN-2

Recently I ordered a WaveNode WN-2 for an accurate RF power station monitor. I must say that I really love this little box! I first saw the advertisement for the WN-2 on eHAM.net, but my buddy Jeff N9IZ bought one before me, so I got a bit of a chance to play with one before I bought it.
At the core of the WaveNode is the controller, a small device with a nice multi-function LCD display. The display will show the information of up to 4 sensors connected to it as well as Voltage and Amperage and also 2 channels that you can define for other devices. The controller connects to a PC via USB connection, but you can use it as a stand-alone system. It’s when you connect it to a PC and use the supplied software that the unit really shines!
My WaveNode WN-2 system consists of the following:
- The WaveNode WN-2 controller
- 2 HF1 sensors (1.8 – 60 MHz – 2 kW power handling)
- 1 HF1 sensor with RF-View (1.8 – 60 MHz – 2 kW power handling and a BNC jack for connection to an oscilloscope).
- 1 UHF1 sensor ( 140 – 460 Mhz operation – 500 Watts power handling)
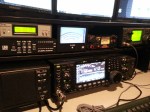
For my setup I connected sensor 1 to the output of my IC-7600 and sensor 2 to the output of my SPE 1K-FA 1000 Watt amplifier so that I could monitor the output power between the IC-7600 and the amp, and the output of the amplifier. This works really great for accurate SWR and power monitoring of my primary station.
Sensor 3 is used on my test bench where I can test radios that seem to make their way in and out of my shack. I have connected my oscilloscope to the RF-View BNC connector to monitor modulation waveforms.
Sensor 4 is connected to my IC-910H. This allows me accurate power and SWR measurement of my VHF-UHF radio.
WaveNode has other sensors available that go up to 8 kW!!!!! You can see the very impressive line-up of sensors here.
The good:
As far as the good goes, there is MUCH to say about the WaveNode. I have had other power meters from Diawa, and Power Master. And although those products are good, they cannot come close to matching the capabilities of the WN-2. Here are just some of the features of the WN-2:
- Power measurement (up to 8 kW depending on the sensor used!)
- SWR measurement and protection.
- One WN-2 can handle up to 4 sensors, but two WN-2 units can be cascaded together for up to 8 sensors!
- Excellent information on the LCD display.
- PC connectivity using a USB connection with a quality FTDI chipset (no junky, problematic Prolific USB to serial chipset!)
- Sensors utilize a PS/2 style mini DIN plug that can be extended using PS/2 style keyboard extension cables.
- Software is included.
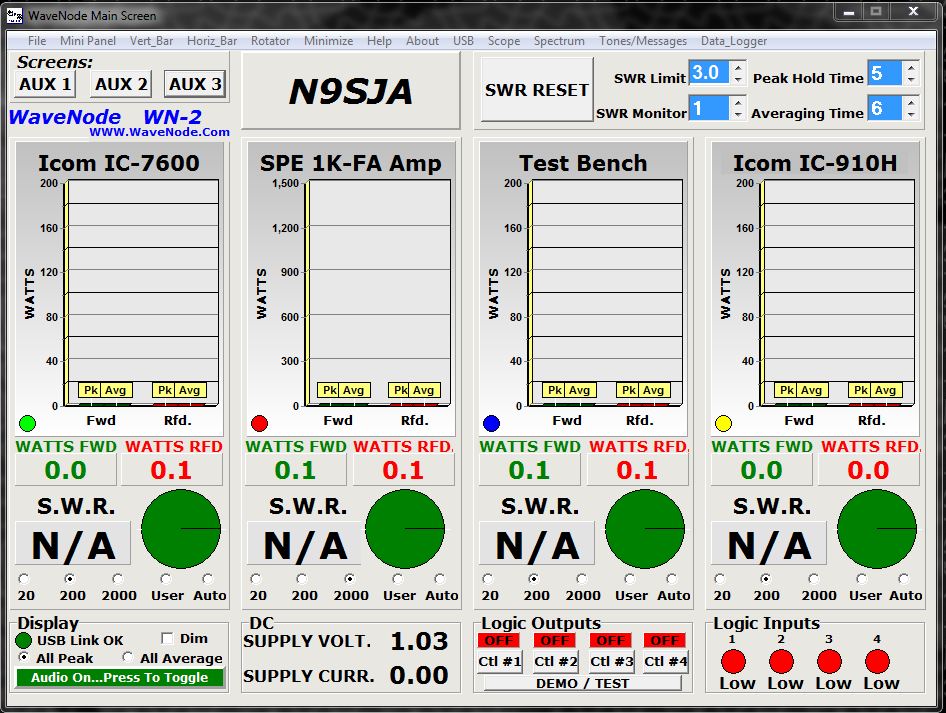
- Software measurement shows Peak/Avg power, power forward, power reflected, and SWR. Even has a nice pie graph to show forward/reflected power.
- Software tracks elapsed DC power usage.
- Software tracks elapsed RF power usage (Watt-Hours).
- A totally awesome histogram of power that compares different sensors with a power vs. gain graph.
- A SWR vs. Frequency graph that you can run on multiple sensors (and different antennas if you wish on a switch!)
- WN-2 has connections for rotator control. Control is done via software.
- Software has an audio tone generator for testing.
- 4 logic outputs for controlling additional accessories with supplied schematics.
- And still there is much more! Check out the WaveNode site for more information!
Here is a screen shot of the “Main Screen” window:
Technical support is also EXCELLENT! Most people will have absolutely no problems connecting the WaveNode WN-2, but I did have a small issue when connecting mine. It turned out that a PC accessory that I was using was conflicting with the WN-2. The PC accessory was a VL Systems L.I.S. 2 status monitor for the PC that monitored fans and other aspects of the PC that I really didn’t need to use anymore. I called WaveNode for support and spoke with Alan Burroughs AD6MT. What a nice guy Alan is. He was very patient and offered me different solutions to get my new WaveNode working properly. Thanks Alan!!!
The Bad:
Now this really would not be a very objective review if I couldn’t state what I didn’t like about the WN-2. But I have to say there aren’t many dislikes. Here is my run down of the things that I don’t really like about the WaveNode WN-2 (pretty petty stuff really):
- Their website is a bit basic and old-school. They really need a web site revamp! Make it easier to navigate and find information.
- The WN-2 shipped with 2 very large front feet. I guess this is so that it can be presented at a slight tilted up angle. I removed those feet and bought some smaller ones to make it fit where I wanted it…easy enough done.
- The software works great, but is not very refined from an aesthetic standpoint. I would like to see some additional configuration options to get it to display the way I want (i.e. sizable windows). Low resolution graphics and text makes it dated looking.
- The “Dim” feature just looks horrible, but it swapps the light grey background with a dark grey one so that it isn’t so beaming. In other words it works…
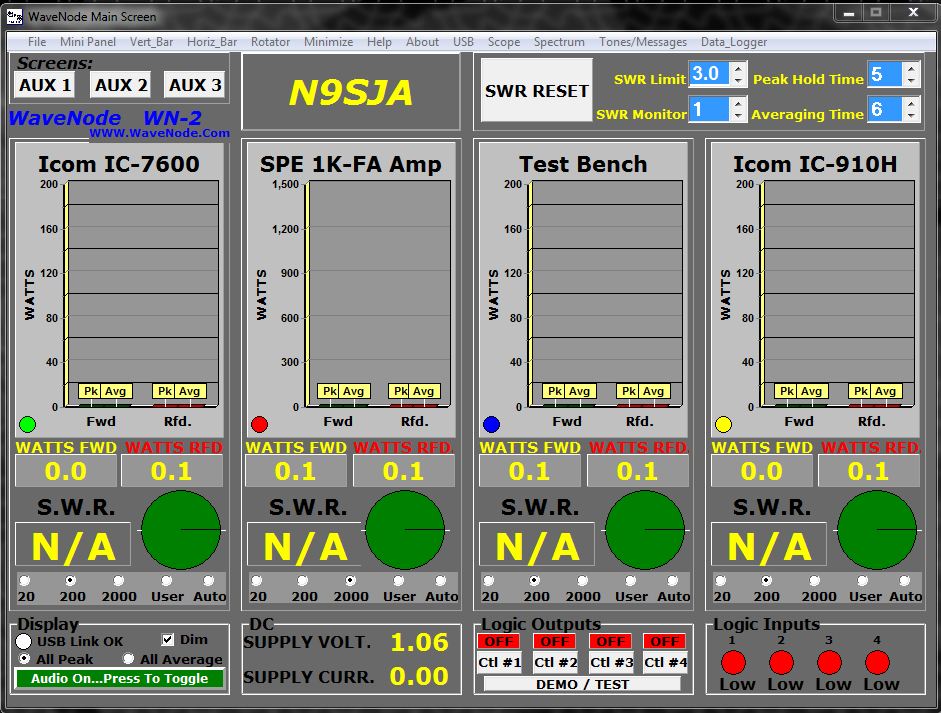
*ugh* the “dim” version….bleeeech!
Now for a nice slideshow of my WN-2 in my shack!
-
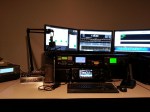
- N9SJA Main Operating Position
-
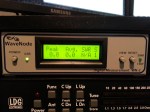
- WaveNode WN-2
-
- WaveNode WN-2 with IC-7600
-
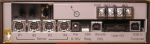
- WaveNode WN-2 rear
-
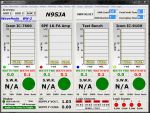
- WaveNode Main Scren
-
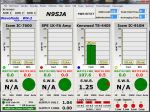
- WaveNode WN-2 in action w/ TS-440SAT on test bench
-

- WaveNode WN-2 in action with IC-7600 and SPE 1K-FA amp
Summary:
If you are in the market for a great SWR/Power station monitor that does more than just the basic, the WaveNode WN-2 is your girl.
The price was very reasonable and way cheaper than my Power Master for way more features and performance.
I rate the WaveNode WN-2 at 4 3/4 out of 5 stars. Really you cannot go wrong with a WN-2. Get one and you will love it.
I made a video showing the WN-2 in action. Here is the video for your viewing pleasure!
This was my first go with some video editing. I still have a lot to learn :-D.
73! de Nick N9SJA
4 Technologies that Amateur Radio manufacturers should incorporate into every transceiver:
4 Technologies that Amateur Radio manufacturers should incorporate into every transceiver:
 The 9-pin DB9 serial connector complaint:
Why in the heck are manufactures still using the old DB9 RS-232 serial interface? Icom started to use USB with the IC-7600 and now they are FINALLY getting rid of the old archaic 9-pin DB9 serial interfaces. Elecraft is STILL using the 9-pin DB9? They have other great features, but why-o-why the old serial connector? USB technology is really pretty standard and not very expensive and is on just about everything. The best part about ICOMs use of the USB interface is that it is actually a sound card that also caries the full CI-V command set for rig control. Very well done ICOM. How about a kit to convert other ICOM radios that don’t have USB. My ICOM IC-7000 is a great rig, but no USB on that puppy. I guess we will have to wait for an “IC-7000 MkIIG:, or perhaps an IC-7001 to come out. So it looks like I will be stuck using a sound card interface with all the fricken cables and wiring. Booo!
![]() The Bluetooth bitch:
The Bluetooth bitch:
This ubiquitous technology should be on all Amateur radio transceivers Period! I know that Yaesu has put it’s own proprietary Bluetooth on some radios (VX-8 series), but it actually sucks because you *must* use a Yeasu headset, not just any Bluetooth headset. I was excited when Yaesu came out with it’s VX-8DR with Bluetooth. Thinking that I could buy this module and then pair it with my audio system in my truck. Nope. No standard A2DP! Booo Yaesu! I don’t want to just have to use the douchie earpiece that you provide.
Radio manufactures should put Bluetooth on every transceiver they make so that we can use wireless headsets and pair them with other Bluetooth audio devices. Bluetooth is in every single cellphone now made and in most laptop computers, so the technology is inexpensive and readily available.
 The GPS Grumble:
Again, this technology should be available in everything. It has so many uses from APRS, Navigation, and even just synchronizing time. For base radios, maybe a jack for an external antenna. Again, both ICOM and Yaesu have incorporated this into some of their HTs and mobile rigs, so YEA to you guys! But where is Kenwood on this? I know they have been a bit quiet throughout the 2000’s not producing many radios, but in the past few years they have been designing great new radios. They have gotten onto the USB bandwagon, but no bluetooth or GPS on their radios yet (TM-D710)! Every cell phone in the world just about has GPS on it much to the detriment of GPS makers like TomTom, Magellan, and Garmin. Their GPS navigation solutions are usually better, but when you have a GPS reciever and maps on your phone that are good enough, why bother with a TomTom? At least that what most people are thinking. With GPS receiver technology so cheap, why not put in in Amateur radios????
 The lack of LAN Lament:
Ethernet connectivity connects you to the world via the Internet. Some radios are now incorporating an Ethernet jack so that they can be controlled over TCP/IP Ethernet networks. But this technology is also pretty cheap to implement since over the past 20 years it has grown in popularity to become the defacto standard for computer networking. Imagine the possibilities for remote control of your station with a network jack on it! There are several companies that offer add-on solutions for remote operation, but most of them are clunky, require a crap load of cables and the software for most of them doesn’t work well for remote operation. Icom, Yaesu, Flex Radio, and some of these vendors offer TCP/IP connectivity using a network jack on the radio, but this should be on every radio. Again, the technology is inexpensive to implement and is readily available. Additionally 802.11 Wi-Fi connectivity might be nice on transceivers also (however it is not clear to me if this could be a possible cause of interference on some rigs, so it might not work well on some radios).
So what do you think about my list? Are their any other features/technologies that you think I missed? Tell us all in the comments below! We would all love to hear from you!
FreeDV – Digital Voice for HF bands
 This weekend I had the time to try something new. FreeDV is software for digital voice on HF!
My buddy Jeff N9IZ first told me about this exciting, new, experimental mode.
FreeDV is pretty interesting to use. I had the chance to mess around with it for a few hours and here is a brief description of my experiences with it:
On Sunday morning I had some time to kill before the “big game” so I installed the software. FreeDV is opensource so it is completely free to use, and if your a developer you can take the code and build and improve upon it. They use the CSV system for submittals. Check out their website here for more information. The software is in BETA (version 0.91 at the time of this post), so it could be a challenge to get things working properly. You will need some computer know-how and a good deal of patience to get it to work properly. If you are a computer n00b, then I would suggest waiting for a bit until a production release of the software is available. BETA software is experimental and usually means that it is buggy, and you will have some issues working with it, so be forewarned.
To use FreeDV you will need the following hardware and or software:
- A computer.
- 2 computer sound cards (one for the radio, and one for FreeDV to use.
- A headset with boom microphone (or just a headset or speakers for receive only).
- Microsoft Windows XP or better (or Linux, but you will have to compile the code for your distro).
- You should have a dual core processor and at least 2GB of RAM I would think. This will be a poor experience on an old clunker Pentium 4 like PC, so if your computer is too old…don’t bother. But if you already use HRD+DM780 for digital modes your good to go.
- A small amount of HDD space. The extracted folder is only about 30MB.
- An HF transceiver that is connected to your computer with a sound card interface or direct USB type connection.
INSTALLATION (this applies to Windows type OS):
- Download the program at http://freedv.org/tiki-index.php. Scroll down and click on “Windows binary files (v0.91 beta)
") ” to download.
” to download. - Once the .zip file is downloaded, extract the contents of the folder to your desktop.
- Make sure that your HF transceiver and sound card interface are connected properly so that you have the audio from your transceiver coming into your computer.
- Next make sure that your second sound card is functioning. I myself use a USB headset (the USB connection is a sound card itself – this is the easiest method I would think).
- Run the program from the extracted folder on your desktop named “freedv.exe”
- You should then see the main GUI for FreeDV.
- Next you need to configure the sound cards that FreeDV will use for connection between your headset and the sound card that is used for the sound card or radio interface. You can access the Audio Config from the Tools menu at the top left of the FreeDV GUI.
- Tune to 14.236 MHz, this is the main frequency that is used for FreeDV QSOs right now. There may be other frequencies that are used, but this is the most popular one in North America.
- Click the “start” button in the bottom right to start the decode.
That’s really the process in a nutshell. There is some issues with configuring PTT still. For example, my setup cannot be keyed with the PTT button in the GUI right now because the software does not yet support it. I use an Icom IC-7600 with it’s own USB sound card interface and CAT control using the Icom CI-V code set. Typically I use Ham Radio Deluxe and Digital Master 780 for digital modes and that software will support CAT control PTT. This is a feature that is currently being looked at by FreeDV developers to be incorporated into the next version of the software.
HOW IT WORKS:
Since I am not an expert, I will explain this in simple terms as I understand the operation. Basically FreeDV uses an audio codec (a piece of software that encodes and decodes audio like MP3’s use) as a software based modem to decode and encode the voice and text data from your computer. The data is encoded and then is transmitted over the HF radio using AF signals that can then in turn be decoded by the receiving station.
The codec that is used is called “codec2”. There is a lot of information about how codec2 is being used for digital HF and the information on it can be found here: http://codec2.org/
MY EXPERINCES WITH MAKING QSOs ON FREEDV:
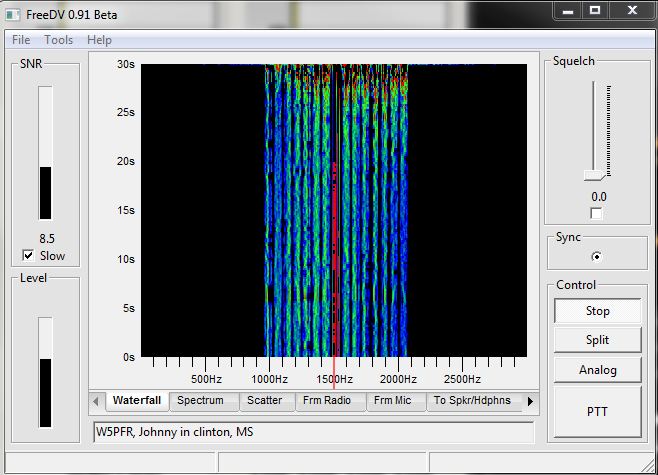
When you just tune to the frequency using analog SSB you will hear a distinctive “warrrrrrrrrrrrrrr” growling sound of those transmitting using FreeDV. To me it sounds a bit like digital ASCII or MT63 if you know what those digital modes sound like. On an audio spectrum analyzer you will see several vertical lines that occupy the audio bandwidth of 1000 Hz to 2100 Hz if you are on center frequency.
FreeDV GUI with digital QSO carrier (note the audio spectum vertical lines from 1kHz to 2.1kHz)
Generally speaking this mode does not work well when the bands or noisy due to QSB or QRM. Making QSOs when the band is very busy with other stations 3kHz away using SSB and having them bleed over on you will cause your FreeDV QSO to be almost unintelligible. Typically it will sound garbled, almost like the transmitting station is trying to talk on a tin-can with a string while under water. Signal strength is important as too week a signal just will not be received. I have found generally that if you have an S-4 noise floor, the station needs to be S-6 or better to be properly decoded on FreeDV. This is definitely not a weak signal type digital mode.
One good piece of advice to start, is to uncheck the Squelch check mark box setting in the GUI so that you can hear what is going on. Once you get used to using FreeDV then you can use the squelch to block out the background noise. This just makes it easier to know that you can hear the audio from your HF rig to start. By default (after you run the program for the very first time) the squelch is set at 4.0 and is enabled (checked box).
Also, it is a good idea if you have a radio with an adjustable filter to narrow the filter bandwidth to 1.2kHz. This will eliminate most adjacent channel interference and extra noise. My Icom IC-7600 lets me adjust the filter bandwidth from 50Hz to 3.6kHz on SSB which is a really great feature that is now incorporated on most modern mid-range to high-end HF transceivers.
Once you do find a station that is transmitting a strong signal, the audio is really pretty good, especially for only using 1.1kHz of bandwidth. I made several QSOs and at times had trouble copying the transmitting station (and likewise they copying me as well due to noise) every now and then, but when it did work, it was really pretty neat.
There is also a text field where you can input your call sign, QTH, and other information. When you transmit that text data is also transmitted with your voice as well. Most people will put in their call sign, their first name and their QTH just so make it easier on the receiving op to know who is transmitting. I found this very helpful when the conditions were noisy and couldn’t copy the transmitting station’s call sign. With noise though this text field sometimes becomes garbled and unintelligible as well as the voice data.
MY SUMMARY OF FREEDV:
Here is my bottom line no B.S. assessment of FreeDV thus far.
THE CONS:
- Software is buggy, and can be difficult to configure if you don’t know much about computers.
- Noisy HF conditions are a problem and will cause unintelligible QSOs. NOT A WEAK SIGNAL, OR NOISE BUSTER HF DIGITAL MODE!!!
- Sound card-radio-headset configuration is not for newbies. But if you have successfully connected your HF rig to your PC for digital modes like PSK-31, RTTY, or OLIVIA, then you should know enough about what your doing to make this work.
- PTT can be a problem as there is not good support for different PTT schemes yet.
- WATCH YOUR SOUND LEVELS! You don’t want to damage your sound card because of a too strong audio level input.
THE PROS:
- Very cool idea. It’s about time we had some digital voice on the HF bands (besides DRM).
- FreeDV is completely open source and free. No proprietary protocols that only work with a certain brand of radio (um, yeah I am talking to you Icom :@ ).
- The 1.1kHz bandwidth makes for good audio quality when there is no QSB or QRM and the signal is strong.
- Nothing too special is required to make it work. If your a Ham that is already on PSK31 or using other digital modes, most likely you have everything you need. Just pickup a USB headset.
Here is a great demonstration video on YouTube from one of the author’s of FreeDV, Bruce Perens:
And here is an EXCELLENT video by sandydiesel on YouTube that is a quick start guide/tutorial! Very nice!
I hope you found this post informative and interesting.
Are you a FreeDV user? What have your experiences been like? Tell us about it in the comments section below this post. We would love to hear from you!!!
73! de Nick N9SJA
Kenwood TS-440SAT HF Transciever
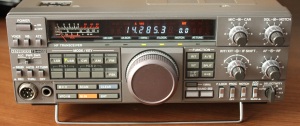
Recently I have purchased a Kenwood TS-440SAT with the matching power supply (PS-50) from an estate sale from a SK. From time to time I come across equipment like this, and the price was right so I just had to snatch it up. I decided to make a post about this radio outlining what I consider to be the good, the bad and the ugly with the Kenwood TS-440SAT.
This radio was sold by Kenwood in the late 1980’s through the early 1990’s. This particular model looks like it is from 1994, so it may be near the end of the production run for Kenwood at the time. It is in immaculate condition as the SK ham that had it before me took very good care of it. He still had the original boxes, packing, and even a plastic bag like dust cover for it. There is not a mark or scratch on it.
The particular model I have is the TS-440SAT with the integrated antenna tuner in it. And I must say that the tuner does work quite well. It will tune a mismatch that is 20 to 150 ohms. For a built in tuner that’s pretty darn good. This means of course that you can tune those “multi-band” antennas making this radio ideal for field day, portable ops, and for radio n00bs as well as for people with crappy antennas. I have used this radio on 80m through 10m with a G5RV antenna and the built in tuner found a good match most of the time with the exception being on the 17m WARC band. The G5RV is immensely popular as it is sold as one of those “multi-band with a tuner” antennas, so I thought it best to test this radio with that sort of antenna.
The radio is has a great layout to it and is very intuitive to operate with no menus or function keys really. The memory and VFO keys are the only thing that perhaps you will need to use a bit to get the hang of. Other than that, everything has it’s own button and or knob to turn to get the radio to do what the operator wants it to do.
There are a TON of modifications out there on the Internet for this particular radio, and I can tell that it was modified for perhaps MARS operation because there is no limit to what band it can transmit on. I tested this on a dummy load to make sure that the signal did not escape the bounds of my shack and found that it will put full output on any frequency. For those interested in the mods, you can find them here: http://www.radiomods.co.nz/kenwood/kenwoodts440.html
I also got the PS-50 power supply for this radio, and I can say that if you can get one do so. This power supply is good and very stable. I put it on a DVM and found that the voltage was good and stable at 13.94 VDC with only a minor drop to 13.86 VDC under load. The power output connection on the back has the Kenwood 6 pin connector built in, but there is a small set of screw posts for supplying power for accessories (such as a small Timewave 9+ AF DSP filter – but more on that later!). The PS-50 matches the radio and they look really great together.
THE RECEIVER:
The receiver on the TS-440SAT is a synthesized triple conversion superhetrodyne design. I found it to be very sensitive and could pick out some weak stations, but also noticed that noise was bigger problem than on some other radio designs. My TS-440SAT does not have any additional filters, just the stock 6 kHz wide (for AM reception) and the 2.2 kHz filter for SSB/CW/FSK operation. There are several other filters available for CW and SSB use, you just have to find them. Kenwood has always made Amateur Radio equipment with some of the best receiver designs and the TS-440SAT is of no exception. Although this old school radio is pre DSP era, I found it to be a really good performer. I compared the reciever to my Icom IC-7600, RF Space SDR-IQ reciever, and to the oldie but a goodie Kenwood TS-830S. I found that the receiver was at least on par with all of these radios but with more noise and no good way to get rid of it with the stock filters of the radio.
The notch filter on this radio is pure junk. That’s all I can say. I generally test this by tuning to WWV on 10.000 MHz and then try to notch out the 1 kHz tone that is broadcast. I simply could not do it on this radio no matter how I adjusted the NOTCH knob with the button enabled. I was able to notch out the 1 kHz tone by using an AF DSP filter from Timewave, the Timewave DSP 9+. The 9+ is a great add on to radios such as this that do not have IF or AF DSP features or have stock crappy filters. You can pick these up around the internet now for around $100 and are a must for older radios if you are used to DSP on newer rigs.
The on-board speaker also sucks. It is a top firing speaker making it a really bad idea to sit any equipment on the top of this radio. I connected an external speaker to this radio and got MUCH better sound quality from the radio. Pair a Timewave AF DSP filter and a good 3 way speaker and you have some really good sound quality. With the DSP 9+, it removed the majority of noise that I struggled with using the radio with just the noise blanker, stock filters, and crappy notch filter. The IF shift feature does also help with noise from adjacent channel interference. I used it quite a bit on 80m when there was that booming guy 3 states away that was just splattering the band 3 kHz above the frequency I was listening to.
THE TRANSMITTER:
Transmitting I found this radio to be a good performer. I tested the radio on each band using a dummy load at the band center. The power output was strong and consistent on every band giving me a bit more than 100 watts (on 40m it was 108 watts out and on 10m I had right at 100 watts). After the dummy load tests, I connected a G5RV antenna and tuned up the radio using the built-in tuner. I called CQ on 20m and after a call or two, made a QSO with Brian K4ARD in Pensacola, FL. He gave me good audio reports and a 5/9 signal report.
Adjusting RF power on this radio is a problem, since there is no way to do so without adjusting your ALC level via the Mic Gain and CAR control. I would have liked to be able to turn down the power and tried a QSO at 5 watts without worrying about my microphone gain. This used to be the norm on older tube transceivers but this is a somewhat modern solid-state design and other radios of this era had an RF power adjustment. The lack of this control baffles me a bit. Also unlike the newer radios, there are no adjustments for quality for transmitted audio, unless you connect a different microphone/mixer setup. I was just using the stock microphone, and it still got good audio reports.
SUMMARY:
Here is a quick list that shows my PROs and CONs with this particular radio. This is based on my experience and you may or may not agree because your needs and circumstances are different, so take it with a grain of salt and internally ask yourself if these particular points matter to you or not:
PROS:
- PS-50 is a great matching power supply for the radio.
- The built in AT is very good.
- Small size.
- Intuitive design and no menus. Simple to use.
- Receiver performs very well! Outstanding really.
- Solid transmitter output power.
- The silver face is nice and it is a good looking HF transceiver.
CONS:
- The notch filter sucks. Pretty much worthless.
- Stock filters aren’t adequate to rid yourself of noise.
- Built in top-firing speaker sucks.
- No RF power control.
Here are some pictures of the Kenwood TS-440SAT and the PS-50 power supply:
-
- Kenwood TS-440S/SAT front
-

- Kenwood TS-440SAT front
-

- Kenwood TS-440S/SAT rear
-

- Kenwood PS-50 front
-

- Kenwood PS-50 rear connections
Additionally I made a short you tube video showing my Kenwood TS-440SAT and PS-50 power supply:
Here is also a link to the user manual for the Kenwood TS-440S/SAT HF Transceiver: http://inform3.kenwoodusa.com/Manuals/TS-440.pdf
I hope that you found this little review interesting and helpful. If you are looking for one of these rigs for your shack, this should be a good little overview of my experiences so that you know what to expect. If you have one of these Transceivers or have any questions or comments, please feel free to comment below. If there is question you have or something else I can test, please let me know and I can try it and post it here. I hope you enjoyed this post. Happy new year to all!
Thanks, and 73! de Nick N9SJA
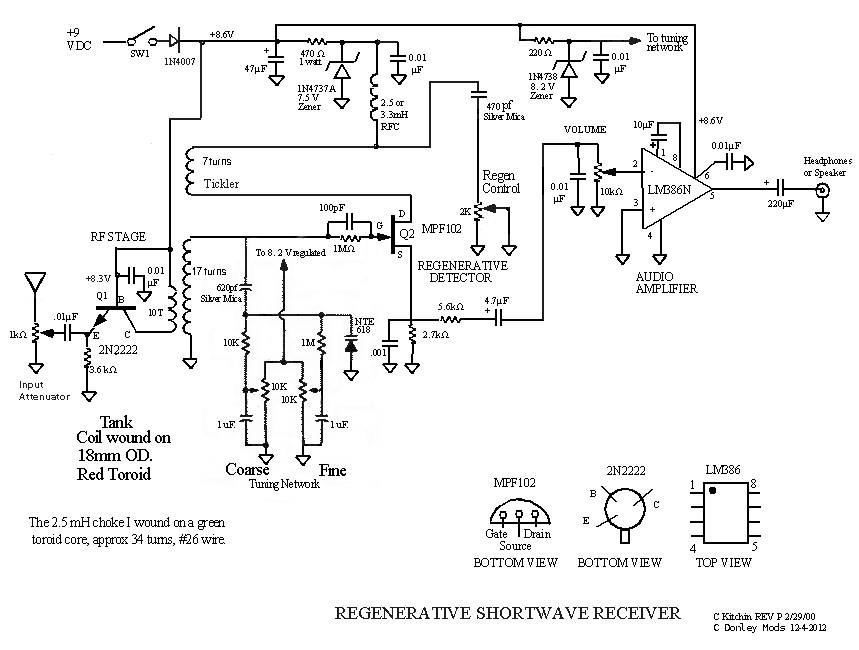
K8TND’s Take on the Kitchin Regen: Part 2
For those of you that have read “K8TND’s Take on the Kitchin Regen” that I posted here on this site back in November, Cliff K8TND was kind enough to send some updated schematics as well as a photo of the all metal enclosure he uses now to reduce air currents within the enclosure:
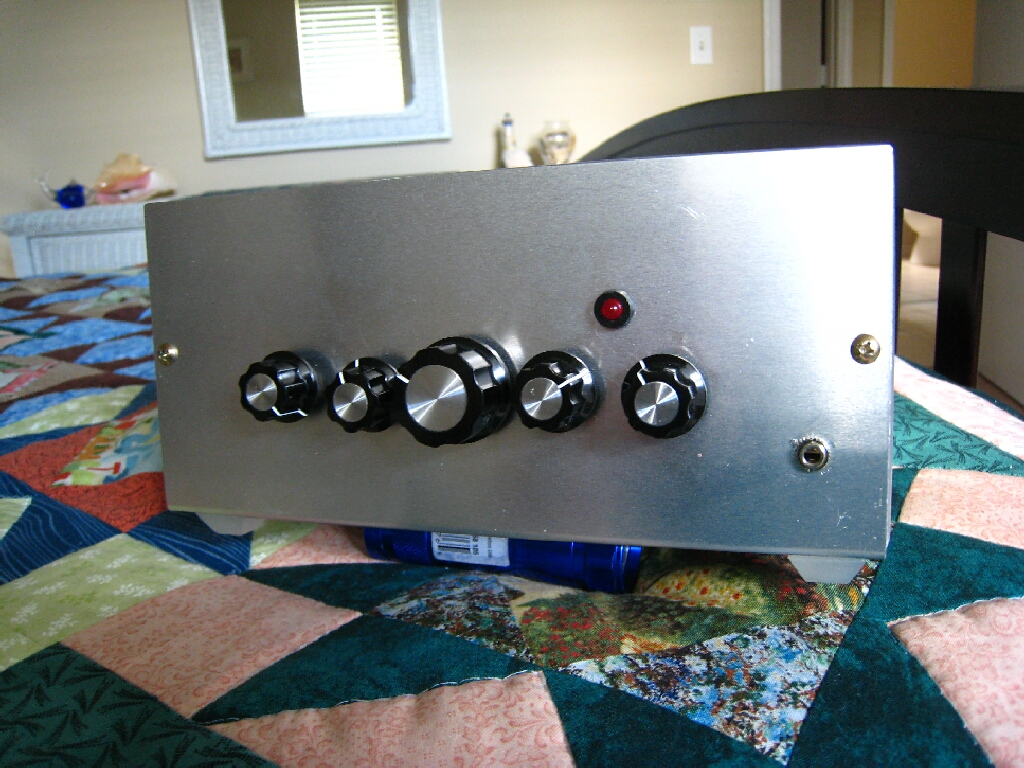
Here is also the latest schematic with modifications from Cliff K8TND (click on the pic of the schematic to open full size in another window or tab):
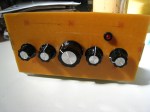
Here is a nice slide show displaying the new enclosure as well as the old one made of copper pcb:
-
- Previous Enclosure
-

- Rear View
-
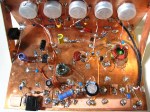
- Rear View
-
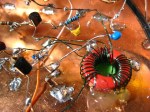
- Coil
-

- Pots
-
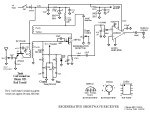
- Newest Schematic 1-7-2013
-

- New Aluminum Enclosure
Again, Thank’s to Cliff K8TND for sharing.
73! de Nick N9SJA
glSDR: SDR for Android devices

Recently I have been playing around a lot with SDR radios. I have an SDR-IQ from RFSpace which I really love to use, but for times when I cannnot make it down into the shack for whatever the reason, I would like to use something on my Android tablet or iPad.
Looking through the Google Play store for Android ham radio apps, I found glSDR. I did originally download the app a few months ago for my Nexus 7 tablet. Back then when I first started using it, everything was extremely buggy. Many feature did not work and the app crashed everytime I used it. So, I deleted it off and decided to wait to see if the developer would fix the issues.
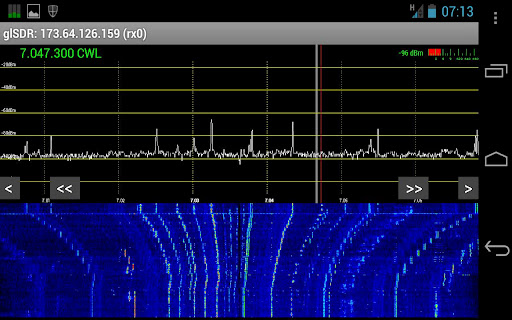
Well, now I am happy to report that the developer has addressed some of the issues that prevented this app from working, however it still has a very long way to go. The app still crashes quite a bit and I have to play with the options a bit, but it does work. Here is just how it does work:
This application connects to a server hosted SDR over the internet. It is not simply an audio stream, but an actual connection to the SDR accessing the real time I/Q data from the SDR. There are a few servers online, and you can host one your self with the open source server software and a supported SDR radio. More on that here. But if you would just like to listen to one of the online servers and you have a decent high speed (not dialup) connection, you can just download the Android app from the Google Play app store.
If you are on a PC you can access the glSDR app at the Google Play store here: https://play.google.com/store/search?q=glSDR&c=apps
If you have an Android device, use a QR Code reader and use this QR Code to download it to your Android device directly: 
Compatability seems to be a huge problem for the developer of this app. There were some rumblings about it not being compatible with Adreno GPU based devices, but some of those problems have been addressed in the newest version of glSDR.
Again, the app still crashes and it seems like some of the servers are not working for whatever the reason, but I was able to listen to 1 or 2 of them using the app and it worked ok. I could change frequency, mode, filter options, and it did work. Apparently there is also support to transmit using the app on an Android device so that you can remotely controlled operate a station with supported hardware. Hopefully the developer continues working on this and making the app more reliable. It is a very interesting and cool way to get you your HF radio fix especially when your not in your shack or traveling around.
Here are some additional screen shots from the Google Play app page:


My assessment thus far? Very cool idea, but needs a lot of work. Fun to try and play with, but be prepared for some headaches.
73! de Nick N9SJA
K8TND’s Take on the Kitchin Regen
Some of the most popular feedback I have had on this blog revolves around the Kitchen regenerative receiver project that I took on initially back in Feburary of 2012. From time to time I still receive interesting e-mail messages and comments about other people’s designs and this one is of no exception!
Cliff Donley K8TND sent me a very interesting e-mail message about his take on the Kitchin regenerative receiver. He has made several modifications and also has some pointers to share with us. First up the schematic that Cliff sent me is the latest schematic of the Kitchin receiver that he could find: (you can click on the image below to open just the schematic in another window for printing)

Cliff told me that he has some pointers on how to eliminate the hand capacitance issues that plague this type of receiver:
“Regarding hand capacitance issues, with the tank coil being wound on a
toroidal core, that helps tremendously on my version and the
varactor/diode and potentiometers totally eliminate it.”
And here is where he gave me a tip about grounding the rotor of the capacitor to reduce the hand capacitance:
“On the older regens I’ve built, using traditional variable
capacitors, I have eliminated MOST of the hand capacitance problems by
grounding the rotor of the capacitor and connecting the stator to the
hot side of the tank circuit and then of course enclosing the circuit
board in a metal case.”
I am amazed how far this circuit design has been modified and taken to yet the next level. This is truly “open source” before that term was original coined, and it is still going strong today!
Here is a little slide show that shows Cliff’s regen that he build with the modifications: (Nice blue LED indicator light Cliff! – You can click on the slideshow to stop it to examine the photos in closer detail if you wish)
And one last tidbit of wisdom from K8TND about air variable capacitors:
“BTW Nick, I was also going to mention an old trick from way back in the
60s. If you have a variable capacitor that’s too high in capacitance and
you want to reduce it, simply put the capacitor in a vise, take a sturdy
pair of long nose pliers, grasp ONE plate at a time, starting from the
outside and YANK it out of the ROTOR. Do NOT try to remove plates from
the Stator.”
This is a great little trick as finding the proper air variable capacitors is getting increasingly difficult and when you do find them they are relatively expensive.
A huge thanks to Cliff Donley K8TND, and thanks for sharing! I know that others will benefit from your radio wisdom.
73! de Nick N9SJA
Barker & Williamson BWDS-90N
Today was a really nice fall day in the state of Indiana, so I decided to take advantage of it and do some antenna work before winter hits. Today I hung up a Barker & Williamson BWDS-90N antenna. This antenna is a broadband folded dipole antenna.

I have been testing it for a bit this afternoon and this is what I found so far:
The BWDS-90 is a broadband antenna that works all the way down on 160m and as high up as 6m. Generally this antenna is not a performer. They are also quite expensive (about $250 for the BWDS-90 model). However this antenna is a perfect match on all the bands without a tuner. If you get it up high enough it does work okay. I even made a few DX contacts with it. One to Italy and one to France today. So it does work.
The military uses these antennas often since they match well on the bands and work well for NVIS type installations. They are popular with the military for field ops using man-pack portable radios.
I am looking forward to testing it more, since I didn’t really have time today to put it though it’s paces.
While I was on the roof I also tweaked my G5RV antenna so that I could still use that as well. It works also just okay. I really cannot have anything great where I live right now, I just don’t have the room for it. Perhaps when I move later there will be better antennas in my future.
I will try to make some time this week to test out the BWDS-90 antenna so more and let you know how it goes.
73! for now. de Nick N9SJA
New QSL card!

This is my new QSL card that Jeff Gaskins, K4JSG also known as “Mr. QSL” printed for me. I first noticed his QSL cards when I received several cards from my OMISS group, and I was so impressed with them I looked up who made them.
Jeff took my graphic, the plasma ball image I thought looked cool and then customized the card with my call, OMISS logo/number, and other details.
His work is really top notch and he went the extra mile to make sure they were exactly what I wanted.
This card is a 4×6 glossy full color print, and is the highest end card he makes. He also has other options for those on a budget, but I found these to be a great value (only $80 for 1000 qty). Shipping was free, and very quick. Turn around for me was only 4 days which I thought was amazing. It may take you longer if you have a lot of changes. He will work with you to get it right before printing, but after you give him the OK and he prints them, obviously you cannot make changes.
These cards are really awesome and I really appreciate Jeff’s hard work.
If you would like to check out more information about his cards, here is his website : http://www.k4jsg.com
73! de Nick N9SJA
Portable Ops: OMISS NET 7.185 MHz
 Last evening I decided to grab my portable HF/VHF/UHF station go box, my Eagle 1 vertical antenna, smartphone with data connection, and head out to McCaw park close to my house for some portable ops. McCaw park is a very nice new park about a 1/2 mile from my house. After tuning around on 20 meters, I decided to head down to 40 meters to see if there was any better action. I dialed up 7.185 and heard the OMISS net starting so I decided to throw my call sign out (N9SJA/Portable-9).
The OMISS (Old Man International Sideband Society) is a net that is setup for WAS (Worked All States) contest help. With this sort of net, you can get your WAS certificate superfast since there are a great deal of people on the network and they actively seek out states that most amateurs need for their WAS certificate. Alaska and Hawaii are two of the states that are the most difficult for WAS from the eastern area of the continental USA.
They use a special logging application called “NETLOGGER” to keep track of members and contacts. This ties nicely into their web site that also has a google maps version that shows what stations are on the air on a given band. There is also a chat component to netlogger that allows members to chat back and forth on the internet. If a check-in goes away from the net, or just has to get up to use the restroom, a message can be sent on the chat so that the net runs smoothly.
All of the members were super nice, and I had a blast operating this net. I spent about 3 hours taking calls from enthusiastic hams that wanted to hear from my little portable station. It took me a little bit of time before I learned just how the net operated. After listening to members, I figured it all out fairly quickly and tried to stay brief with my contacts so that I wasnt hogging all the time on the net.
Today I decided to join OMISS. It costs just $7 USD for a lifetime membership and you also must check-in to the net and make two contacts with OMISS members. After filling out the online application and transferring the money via PayPal, it just took about 3 hours before they sent me my membership info. They are very fast. My OMISS number is now #8376.
They members have official OMISS numbers that are used to exchange contact information. Additionally they have their own free QSL buro for members.
If you wish to work on your WAS or really like a great net with nice people that is a lot of fun, I would highly recommend the OMISS net.
Thanks to N4JTE Rob and ND8F Homer – Net Control Ops. Thank you for being so kind and inviting me into the net.
My Log of Contacts made on 7/22/2012 on 7.185 MHz OMISS net:
KZ1Q – Donald, in NH
ND8F – Homer, in GA
N4JT – Danny, in NC
W4YQY – Dal, in NC
N1PDP – Ashley, in ME
K5TRM – Tandy, in TX
K4SHA – Charlie, in AL
W4RHB – Robert, in NC
KK5EDD – Roy, in OK
N5JD – Joe, in AR
KI6WOX – Mike, in CA
KJ4SBC – Ray, in TN
KB1JTB/mobile – Jim, in MI
KD7ADH – Jerry, in WA
W7XTZ – Mike, in WA
KC0ZPS – Ron, in CO
73! de N9SJA
HF Band Conditions
